For years, Shopify merchants relied on a “set it and forget it” approach to analytics. But with the transition to Google Analytics 4 (GA4) and the rise of strict privacy measures like iOS 14.5, “basic” tracking is no longer enough. If you are only looking at page views, you are essentially flying blind.
The struggle is real: standard Shopify integrations often miss 10% to 30% of purchase data due to ad blockers or browser limitations. For a scaling brand, that’s thousands of dollars in “invisible” revenue that your marketing platforms can’t see or optimize for.
The good news? You don’t need a computer science degree or a $200/hour developer to fix this. Modern solutions allow you to bridge the gap between “technical complexity” and “business intelligence” with a few clicks.
How do I set up GA4 event tracking on Shopify without a developer?
The most reliable method is using a Shopify app like Analyzely to automatically inject a GA4-compatible data layer and enable server-side tracking. This captures critical events like add_to_cart and purchase without manual coding or GTM expertise.
Key Takeaways
- Automatic Events: Modern tools can track browse, cart, and checkout events automatically.
- Server-Side is Superior: Moving tracking from the browser to the server recaptures missed sales.
- Unified Data: Proper setup ensures your GA4 reports actually match your Shopify Admin.
What Problem Are Shopify Merchants Actually Facing Here?
Most Shopify store owners know they should be tracking events, but the technical barrier is immense. GA4 requires a “Data Layer”—a specific piece of code that tells Google exactly which product was viewed or how much the shipping cost was.
Without a developer, merchants often find themselves stuck with:
- The “Zero Sales” Glitch: Shopify shows 10 orders, but GA4 shows 7.
- Ghost Funnels: You see people visiting your site, but your “Add to Cart” and “Begin Checkout” metrics are empty.
- Attribution Chaos: You can’t tell if your Meta ads or your email list actually drove the final sale.
Why This Problem Happens
The “Data Gap” isn’t usually a mistake you made; it’s a byproduct of how modern browsers work.
- Client-Side Limitations: Traditional tracking happens in the visitor’s browser. If they use an ad blocker or a privacy-focused browser (like Brave or Safari), the “Purchase” signal is never sent.
- Cookie Deprecation: Shorter cookie life-cycles mean GA4 often “forgets” who a user is between their first click and their final purchase.
- Manual Tagging Errors: Trying to set up event triggers in Google Tag Manager (GTM) manually is prone to error. One typo in an event name like view_item can break your entire eCommerce report.
Recommended Blogs for You:
👉 Shopify Success Rate 2026: Why 90% of Stores Fail
👉 How to Set Up Google Analytics 4 on Shopify (Without Coding)
👉 What Metrics Should I Track in My Google Ads Performance Reports?
👉 How to Optimize Your Google Ads Without Hiring an Expert
How Broken Tracking Hurts Your Shopify Conversion Rates and Revenue
If your GA4 data is inaccurate, your entire growth strategy is built on sand.
- Wasted Ad Spend: If Google and Meta don’t receive purchase signals, their AI can’t optimize your bidding. You end up paying for clicks that don’t convert.
- Inaccurate ROAS: You might turn off a profitable campaign simply because the sales weren’t tracked correctly in your dashboard.
- Poor UX Decisions: If you don’t know where users are dropping off in the checkout funnel, you can’t fix the friction points that are killing your conversion rate.
Solution for GA4 Event Tracking for Shopify
To begin tracking your store with Google Analytics 4 (GA4), follow these steps:
Install the App: Find “Analyzely ‑ Google Analytics 4” in the Shopify App Store, click Add app, and complete the installation.
Activate in Your Theme: This is a critical step. Click the link “Here” in the Wizard to be redirected to your theme’s App Embeds settings. Click Save Button.

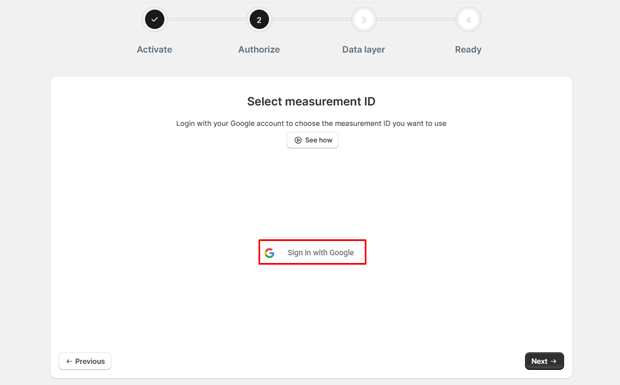
Connect Google Account: In the Analytics Setup section, click sign in with Google and select the account that has access to your GA4 property.
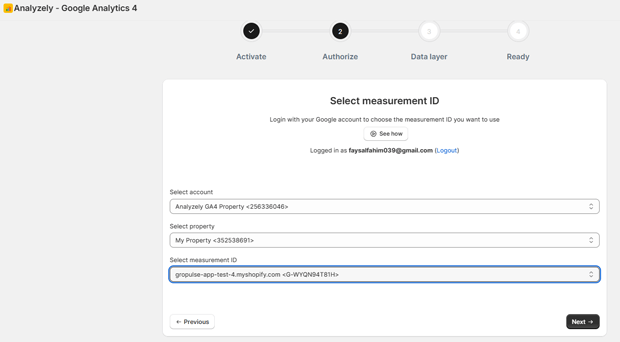
Select Your GA4 Property: Choose your Google Analytics account and the specific property associated with your Shopify store from the dropdown menu.
Configure Measurement ID: The app can automatically detect your Measurement ID (Recommended), or you can enter it manually if you prefer.
Enabling eCommerce Events
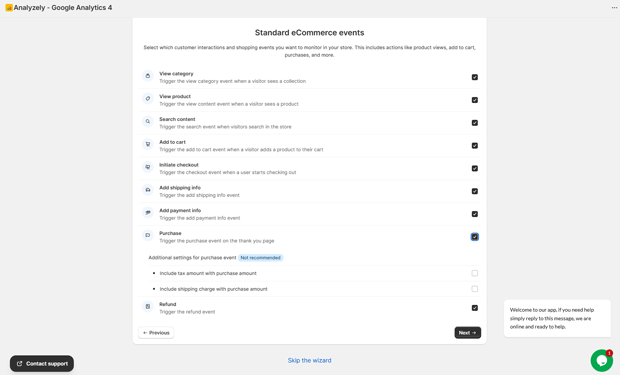
Select Events: Check the boxes for the events you wish to track. For most stores, it is recommended to enable all available events, including:
- Browse Events: view_item_list (View Category) and view_item (View Product).
- Search: search (Search Content).
- Cart Events: add_to_cart.
- Checkout Events: begin_checkout (Initiate Checkout), add_shipping_info, and add_payment_info.
- Purchase Events: purchase and refund.
- Configure Purchase Options: If you enable the Purchase event, you can choose to include Tax or Shipping amounts in the data sent to GA4 for better revenue accuracy.
Verification and Best Practices
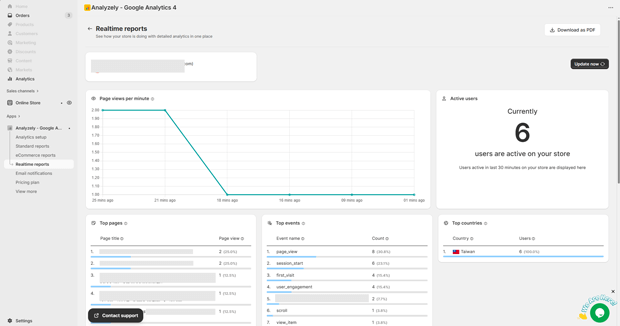
Realtime Testing: Use the app’s Realtime Reports or Google Analytics Realtime to watch events appear as you perform actions like adding items to the cart or viewing products.
Avoid Duplicates: Ensure you do not have other GA4 implementations or manual scripts in your theme to prevent double-counting.
Tools That Make This Easier
While you can try to piece this together manually, most successful Shopify brands use dedicated tools to handle the heavy lifting:
Analyzely ‑ Google Analytics 4: This app is designed specifically for Shopify merchants who want a “one-click” GA4 setup.
It handles the entire eCommerce data layer, meaning it automatically tracks product views, cart additions, and even refunds without any manual coding.
Common Shopify Mistakes That Make This Problem Worse
Even with the right tools, these three errors can ruin your data:
- Duplicate Tracking: Having both a manual GTM script and an automated app running at the same time. This leads to double-counting sales.
- Ignoring Server-Side Tracking: If you only use “Client-Side” tracking, you are still vulnerable to ad blockers. Pro-level setups use a “Hybrid” approach.
- Forgetting the “App Embed”: On many Shopify 2.0 themes, tracking won’t work unless you toggle the app to “ON” in your Theme Editor’s App Embeds section.
What To Do Next in Your Shopify Optimization Journey
Once your tracking is live, don’t just let the data sit there.
- Wait 24–48 Hours: GA4 data is not instant; it takes time to process into your standard reports.
- Check Your Funnel: Look at the “Purchase Journey” report to see exactly where you are losing customers.
- Optimize for AOV: Use your “Top Selling Products” report to identify which items are best for cross-selling or bundling.
Frequently Asked Questions
Do I need Google Tag Manager (GTM) for Shopify GA4 tracking?
Not necessarily. While GTM is powerful, most Shopify merchants find it too complex. Apps like Analyzely provide the same eCommerce event tracking without the need for manual tag configuration.
Why doesn’t GA4 revenue match Shopify Admin?
Discrepancies often occur due to time zone differences, cancelled orders, or ad blockers. Using server-side tracking can reduce this gap significantly by capturing orders directly from Shopify’s servers.
Is server-side tracking worth the extra cost?
For stores doing over $10k/month, the answer is usually yes. Capturing an extra 10–20% of sales data allows for much more accurate ad optimization and business reporting.