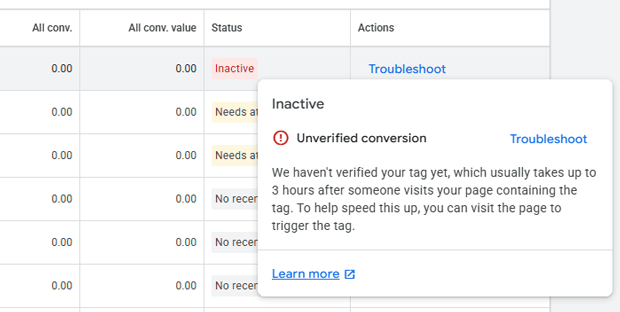
You’ve spent hours setting up your Google Ads campaigns, but when you check your conversion actions, you see a frustrating status: “Unverified” or “Tag Inactive.”
For a Shopify merchant, this is more than just a dashboard error. It means Google’s AI might not be getting the data it needs to lower your CPA (Cost Per Acquisition). If Google can’t “verify” the tag, it can’t optimize your bidding.
The good news? An “Unverified” status doesn’t always mean your setup is broken. Often, it just needs a “nudge” to tell Google that the connection is live.
How to Fix an Inactive Tag
To fix an “Unverified” Google Ads tag on Shopify, you must trigger a test conversion. Navigate to Google Ads > Goals > Conversions, select your action, and click “Troubleshoot.” Use the Google Tag Assistant to complete a test purchase on your store. Once a signal is received, the status will change to “Active” within 24 hours.
Summary
- Target Audience: Shopify merchants running Google Ads who see a “Tag unverified” warning.
- Main Takeaway: A tag remains “Unverified” until Google records its first conversion signal.
- What You’ll Learn: How to use the Google Tag Assistant to force-verify a tag and how to ensure your Shopify “Customer Events” are configured correctly.
- Outcome: A green “Active” status in your Google Ads conversion settings.
“Unverified” vs. “Inactive”: What’s the Difference?
Before you start changing your Shopify theme code, you need to understand what the status is telling you.
Definition: Tag Status
- Unverified: Google has not yet received any tracking data from your website. This is common for brand-new conversion actions.
- Inactive: Google previously received data but hasn’t seen a signal in the last 7 days. This usually indicates a broken link, a theme update that deleted a script, or a shift in Shopify’s checkout behavior.
Why Your Shopify Tag is Showing “Inactive”
There are three primary reasons this happens on Shopify:
- No Sales Yet: If you just launched a new conversion action, Google simply hasn’t seen a “Purchase” event yet.
- The Checkout Extensibility Shift: Shopify is moving away from checkout.liquid and “Additional Scripts.” If your code was placed there, it may no longer fire on modern Shopify checkouts.
- App or Script Conflicts: Multiple tracking apps or “hard-coded” snippets in your theme.liquid can sometimes block the official Google tag from firing.
The Shopify Diagnostic Checklist
Before diving into code, run through this table to identify where the break is occurring.
| Symptom | Likely Cause | Fix |
| Status is “Unverified” for 48+ hours | No test conversion recorded | Use Google Tag Assistant to “force” a signal |
| Status is “Inactive” after a theme update | Code was overwritten | Move tracking to Shopify “Customer Events” (Pixels) |
| Tag fires on Home Page but not Checkout | Checkout restrictions | Use the official Shopify Google Search & YouTube app |
| Duplicate conversions showing | Multiple tracking methods | Remove hard-coded tags; use one dedicated app or Pixel |
Step-by-Step: How to Verify Your Tag via Shopify Pixels
The “old” way of fixing this involved pasting code into your “Thank You” page settings. The “new” (and correct) way uses Shopify Pixels.
1. Access the Google Tag Assistant
Go to your Google Ads account. Navigate to Goals > Conversions. Click on the conversion action that is unverified. Scroll down and look for the “Troubleshoot” button. This will open the Google Tag Assistant (tagassistant.google.com).
2. Connect Your Store URL
Enter your store’s primary URL (e.g., your-store.com). Click Connect. A new window will open with your store. You should see a “Debugger Connected” badge in the corner.
3. Trigger the Purchase Event
This is the part merchants often miss. You don’t need to spend real money, but you do need to reach the “Thank You” page.
- Add a product to your cart.
- Navigate through the checkout.
- If you have a “Bogus Gateway” or a 100% off discount code, use it to complete the order.
- Crucial: You must reach the final Order Confirmation page.
4. Wait for Dashboard Refresh
Google Ads does not update in real-time. It can take 3 to 24 hours for the status to change from “Unverified” to “Recording Conversions.”
Why Shopify Merchants Struggle with Manual Verification
Manual setup is prone to “Silent Failure.” You might think your tag is live, but it could be blocked by:
- Customer Privacy Settings: If a user (or you, during testing) declines cookies, the tag won’t fire.
- App Embeds: Some Shopify themes require you to enable “App Embeds” in the Theme Customizer for pixels to work.
- The “Additional Scripts” Problem: As Shopify moves toward Checkout Extensibility, scripts placed in the “Order Status Page” settings are becoming less reliable.
Pro-Tip: The Automated Diagnostic Approach
If you’ve tried the manual steps and your tag still won’t verify, the issue is likely deeper in your Shopify Data Layer.
Many merchants use AdTrack’s Google Ads Diagnostic Tool to solve this.
Instead of guessing if your code is in the right place, the app scans your Shopify store’s “Customer Events” and identifies exactly why a signal isn’t reaching Google.
This is particularly helpful for stores using Consent Mode V2, which can often “mask” tags and make them appear unverified when they are actually just waiting for user permission.
Common Troubleshooting Scenarios
“I see the tag firing in Tag Assistant, but Google Ads still says Unverified.”
This is almost always a timing issue. Google Ads data is processed in batches. If Tag Assistant says “Succeeded,” your job is done. Check back tomorrow.
“My tag is verified, but it’s not tracking the correct Order Value.”
This happens when your Shopify “Purchase” event isn’t pulling the checkout.total_price variable correctly. If you are using a manual script, ensure your variable names match Shopify’s Liquid objects.
If you are using the AdTrack app, this mapping is handled automatically to ensure your ROAS (Return on Ad Spend) calculations are 100% accurate.
Final Recap: Keeping Your Tracking Green
- Don’t Panic: “Unverified” just means “I haven’t seen a sale yet.”
- Use the Debugger: Use Google Tag Assistant to prove the tag works.
- Modernize Your Setup: Move away from theme.liquid scripts and use Shopify Pixels.
- Validate Regularly: Check your conversion status at least once a week, especially after installing new apps or updating your theme.
Frequently Asked Questions
How long does it take for a Google Ads tag to verify on Shopify?
Once a conversion is recorded, it typically takes 3 to 24 hours for the status to update to “Active” in the Google Ads dashboard.
Why is my Google Ads conversion “Inactive”?
“Inactive” means the tag was verified in the past but hasn’t recorded a conversion in the last 7 days. This could be due to a drop in traffic or a technical break in your Shopify theme.
Does Shopify’s “Google Search & YouTube” app fix unverified tags?
Yes, the official app sets up a basic pixel. However, if you have custom checkout needs or require deeper diagnostic data, you may need a dedicated tracking app like AdTrack.
Can I verify a Google Ads tag without a real purchase?
Yes. Use the Google Tag Assistant “Debug” mode to complete a test order. Reaching the “Thank You” page in debug mode sends the necessary signal to Google.