Imagine a salesperson who memorizes exactly which pair of sneakers every customer looked at, waits until they leave the store, and then politely reminds them about those specific shoes the next time they open their phone.
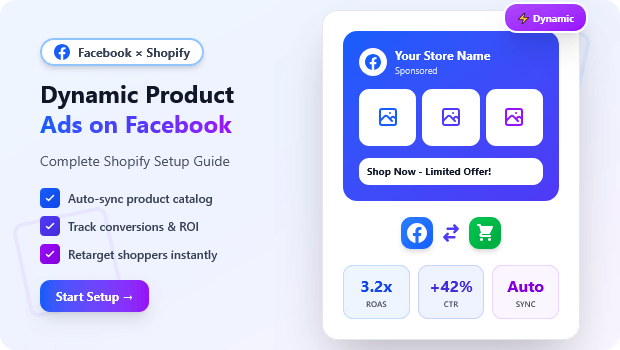
That is exactly what Facebook Dynamic Product Ads (DPAs) do for your Shopify store.
Unlike standard static ads where you manually choose an image and write copy for a broad audience, DPAs are automated. They pull images, prices, and descriptions directly from your Shopify store and serve them to the people most likely to buy them.
However, for many Shopify merchants, the bridge between Shopify and Meta is shaky. If your Pixel isn’t firing the correct “Content ID,” or your catalog isn’t syncing inventory changes in real-time, you end up advertising out-of-stock products or showing users items they’ve already bought.
In this guide, we will walk through the technical architecture required to run profitable Dynamic Product Ads on Facebook—from stabilizing your Pixel data to launching your first retargeting campaign.
How do I set up Facebook Dynamic Ads on Shopify?
To set up Dynamic Ads, you must first install the Facebook Pixel and Conversions API (CAPI) on your store to track user behavior. Next, sync your Shopify products to a Meta Catalog using a data feed app or channel. Finally, creates a “Sales” campaign in Meta Ads Manager, select “Catalog” as your source, and define your audience (e.g., “Added to cart in last 14 days”).
Summary
- Dynamic Product Ads (DPAs) automatically show personalized products to users based on their behavior on your Shopify store.
- Success requires a seamless connection between your Facebook Pixel (tracking), Conversions API (accuracy), and Product Catalog (inventory).
- Once set up, DPAs act as an “always-on” retargeting machine that recovers abandoned carts with minimal ongoing maintenance.
- Most DPA failures aren’t due to bad ad copy, but technical disconnects between Shopify SKUs and Meta Content IDs.
Why Dynamic Product Ads Are the High-ROAS Engine for Shopify
Dynamic Ads are widely considered the “low-hanging fruit” of ecommerce advertising. While top-of-funnel ads (finding new customers) can be expensive and risky, DPAs focus on high-intent users.
According to general ecommerce benchmarks, retargeting visitors who have already viewed products or added items to their cart typically results in a significantly higher Return on Ad Spend (ROAS) than cold traffic campaigns. This is because the purchase intent is already established; the user just needs a nudge.
The “Relevancy” Factor
The magic of DPAs lies in personalization. If a user views a red dress in size Medium on your site, the ad they see on Instagram five minutes later isn’t a generic brand photo—it’s that specific red dress. This high relevance reduces friction and increases Click-Through Rates (CTR).
How to Run Dynamic Product Ads on Facebook
Step 1: Installing the Facebook Pixel and CAPI on Shopify
Before you can show products to people, you need to track what they are looking at. This is the job of the Meta Pixel and the Conversions API (CAPI).
Historically, merchants relied solely on the browser-based Pixel. However, with the rise of privacy changes (like iOS 14.5+) and ad blockers, browser tracking has become less reliable. Data loss here is fatal for Dynamic Ads—if Meta doesn’t know a user viewed Product A, it can’t retarget them with Product A.
The Role of Server-Side Tracking (CAPI)
To fix data loss, modern Shopify stores must use CAPI. This sends data directly from your Shopify server to Meta, bypassing the user’s browser limitations.
How to set this up:
Standard Integration: You can use the official Facebook & Instagram sales channel on Shopify.
Enhanced Third-Party Tools: For merchants who need more granular control over data or are seeing discrepancies in their event match quality, dedicated pixel apps are often necessary
This is where a tool like Pixee ‑ Multi Pixel & Meta Ads becomes highly relevant.
It allows you to enable Conversion API for accurate server-side tracking, ensuring that events like ViewContent, AddToCart, and Purchase are captured even if the user has strict privacy settings.
Pixee also provides AI-powered diagnostics to instantly spot if your events aren’t firing correctly, which is critical before spending money on ads.
Key Check: Ensure your Pixel is firing the ViewContent event on every product page. This event must include the content_ids parameter, which matches the SKU or ID in your catalog.
Step 2: Syncing Your Shopify Inventory to a Meta Product Catalog
Your Pixel tracks behavior, but your Catalog provides the creative. The Catalog is a structured data file (often called a product feed) that lives in your Meta Commerce Manager. It contains your product titles, images, prices, and stock status.
The Sync Workflow
When a user visits your store, the Pixel reports: “User 123 looked at Product ID 99.”
Meta then looks at your Catalog and asks: “What does Product ID 99 look like?”
It pulls the image and price, then builds the ad.
If your Shopify store and Meta Catalog are out of sync, you risk:
- Showing products with old prices.
- Advertising items that are out of stock (wasting budget).
- Broken links (404 errors).
Methods for Syncing
You can sync your catalog via the native Shopify channel, but for larger inventories or multi-pixel setups, automated feed tools are superior. Pixee simplifies this by auto-syncing your product catalogs to Meta.

This ensures that when you update a price or sell out of an item on Shopify, the change is reflected in your Facebook ads almost immediately, protecting your budget and brand reputation.
Step 3: Configuring the “Catalog Sales” Objective in Ads Manager
Once the plumbing (Pixel and Catalog) is fixed, building the campaign is straightforward.
- Create Campaign: Go to Ads Manager and select Sales (formerly Conversions/Catalog Sales) as your objective.
- Select Catalog: Toggle the “Use a Catalog” switch and select the catalog you synced in Step 2.
- Ad Set Settings:
- Audience Source: Choose “Retarget ads to people who interacted with your products on and off Facebook.”
- The “Split” Strategy: A common high-performing setup involves creating different ad sets for different time windows:
- Viewed or Added to Cart (0-14 Days): High intent, hot leads.
- Viewed or Added to Cart (14-30 Days): Warm leads, may need a discount code to convert.
- Cross-Sell: Target people who purchased Product X with ads for Product Y.
- Ad Creative: Select “Carousel” format. This allows users to swipe through multiple products they looked at, plus a few recommendations Meta’s algorithm thinks they will like.
Recommended Blogs for You:
👉 How to Write Facebook Ad Copy for Shopify Products
👉 Facebook Ads for Shopify: Complete Marketing Guide
👉 Instagram Marketing for Shopify: Complete Strategy Guide
Common Sync Errors That Kill Shopify Dynamic Ad Performance
If your ads aren’t delivering, or your ROAS is surprisingly low, the culprit is usually a data mismatch.
1. The ID vs. SKU Mismatch
Shopify has Variant ID, Product ID, and SKU. Meta requires a unique Content ID. If your Pixel sends the Variant ID (e.g., 12345) but your Catalog lists the product by SKU (e.g., SHIRT-RED-M), Meta cannot match the two. The ad simply won’t serve.
- Fix: Ensure your feed app and Pixel app are using the same identifier logic (usually Variant ID is safest for Shopify).
2. Missing “ViewContent” Events
If you only track “Purchase” events, Dynamic Ads won’t work effectively. The algorithm needs to know what people looked at, not just what they bought.
- Fix: Use the Meta Pixel Helper (Chrome Extension) or the Pixee AI diagnostics tool to verify that ViewContent fires on every product page load.
Read More: The Ultimate 5-Step Guide to Diagnose Your Facebook Ads Campaign in Shopify (2025)
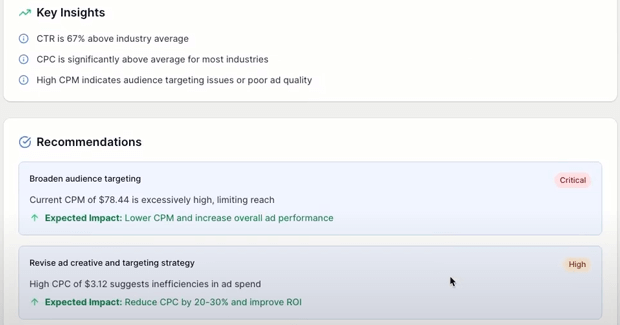
3. Low Match Quality Scores
Meta assigns a “Match Quality” score out of 10. A low score (below 5-6) means Meta is struggling to match your website visitors to their Facebook profiles.
- Fix: This is usually resolved by implementing CAPI (Server-Side Tracking) to send hashed user data (email, IP, phone) alongside the event.
Optimizing Ad Creative: Preventing “Banner Blindness” in Dynamic Ads
A common criticism of Dynamic Ads is that they look “boring”—usually just a product on a white background. While relevant, they can blend into the feed.
To combat this, use Meta’s Creative Tools within the ad setup:
- Frames & Overlays: You can automatically add a price overlay, a “Free Shipping” badge, or your logo to every dynamic image.
- Catalog Info: Use the headline field to dynamically pull the product name and the description field to pull the current price.
- Copywriting: Since the product changes for every user, keep the primary text benefit-focused.
- Bad: “Check out this product.”
- Good: “Still thinking about it? Grab your favorites before they sell out.”
If you struggle with writing compelling copy for hundreds of products, tools like Pixee offer AI-powered Meta Ads copywriting features that can generate ad text tailored to your products with a single click, saving hours of manual work.
Frequently Asked Questions
What is the difference between standard Facebook Ads and Dynamic Ads?
Standard ads use static images or videos you manually upload to target a broad audience. Dynamic Ads automatically generate creatives based on your product catalog and show specific items to users who have already expressed interest in them on your website.
Do I need a large budget for Dynamic Product Ads?
No. Because DPAs target a smaller, warmer audience (people who visited your site), they often require a smaller daily budget than cold traffic campaigns. Many merchants start with $10–$20/day depending on their website traffic volume.
Why are my Dynamic Ads showing out-of-stock products?
This happens when your Shopify inventory does not sync to your Meta Catalog frequently enough. Ensure you are using a reliable feed sync method (like the Shopify API or a dedicated app) that updates your catalog in real-time or at least hourly.
Can I use Dynamic Ads for finding new customers (Cold Traffic)?
Yes. This is called DABA (Dynamic Ads for Broad Audiences). Instead of retargeting past visitors, Meta uses its algorithm to show your products to new people who have shown interest in similar products on other websites.
Conclusion
Dynamic Product Ads are the closest thing to “free money” in the advertising world—but only if the machine is oiled correctly.
Don’t launch your campaign and walk away. Monitor your Frequency (keep it under 3-4 for retargeting to avoid annoyance) and keep a close eye on your Catalog Match Rate.
By solidifying the link between your Shopify store and Meta’s brain, you turn window shoppers into loyal customers.