As a digital marketer and e-commerce consultant, I’ve seen countless Shopify entrepreneurs hit the same wall. You’ve chosen a fantastic theme, set up your products, and your store looks good, but not perfect.
You have a vision for a unique feature, a specific design tweak, or a critical tracking script that requires adding a little bit of custom code.
The immediate instinct for many is to dive headfirst into the theme’s code, find the infamous theme.liquid file, and start pasting. Stop right there.
The good news? The Shopify platform has evolved dramatically. Today, there are powerful, safe, and surprisingly simple ways to implement Shopify custom code without ever touching the core files of your theme.
This comprehensive guide will walk you through modern, expert-approved methods for how to add custom code to shopify without editing theme files.
Key Takeaways: What You’ll Learn
Before we dive deep, here’s a snapshot of the invaluable knowledge you’ll gain from this post:
- Understand why modifying files like theme.liquid is a recipe for disaster, especially when it comes to theme updates.
- You’ll learn how to leverage the built-in tools for adding custom CSS, HTML, and Liquid snippets directly from your Shopify admin—no code editor required.
- Discover how App Embeds and dedicated code snippet apps provide the most flexible, powerful, and update-proof way to manage your custom code.
- We’ll cover the correct way to add crucial tracking codes for Google Analytics, Meta Pixel, and other marketing platforms to your Shopify header.
- For those who need deeper customization, we’ll show you how to create your own sections and snippets instead of editing existing ones.
- Learn how to implement your code without slowing down your store’s loading speed, a critical factor for SEO and conversions.
Why You Must Avoid Editing Your theme.liquid File Directly
For years, the internet has been littered with tutorials instructing merchants to paste code directly into their theme’s main layout file, theme.liquid.
While this technically works in the short term, it’s a fundamentally flawed approach that creates a technical debt nightmare. Here’s why industry experts universally advise against it.
The Theme Update Trap
This is the most critical reason. The talented developers behind your Shopify theme are constantly working to improve it.
They release updates to fix bugs, patch security vulnerabilities, add new features, and ensure compatibility with Shopify’s latest platform changes.
When you update your theme to get these benefits, Shopify replaces the old theme files with the new ones. Any custom code you manually added to those files will be permanently erased.
Imagine spending hours or hiring a developer to implement custom banners, unique product page layouts, and third-party integrations, only to see it all vanish with a single click on the “Update” button.
You’re then faced with a painful choice: either forego crucial security updates and new features, or spend time and money reapplying all your customizations from scratch, hoping you remember every single change you made. It’s an inefficient and stressful cycle.
The High Risk of Human Error
Theme files, especially those written in Liquid, HTML, CSS, and JavaScript, are incredibly sensitive.
A single missing bracket }, a misplaced semicolon ;, or a typo in a Liquid tag {% %} can bring your entire storefront crashing down, resulting in the dreaded “white screen of death.”
When you’re working directly in core files, there’s no safety net. A simple copy-paste error could make your site inaccessible to customers, costing you sales and damaging your brand’s reputation until you can identify and fix the minuscule error.
The safe methods we’ll discuss below isolate your code, so even if you make a mistake, it’s highly unlikely to break your entire website.
Loss of Theme Support
When you purchase a premium theme, you’re also paying for technical support from its developers.
However, this support almost always comes with a condition: they only support the theme in its original, unmodified state.
If you encounter an issue and reach out for help, their first step will be to check for custom code modifications.
If they find that you’ve heavily edited the core files, they are well within their rights to refuse support, leaving you to troubleshoot complex problems on your own.
The Maintenance Nightmare
As your business grows, so will your need for custom code. You might add a script for a pop-up, a snippet for a reviews widget, and another for a loyalty program.
When all these pieces of code are scattered throughout theme.liquid and other core files, your theme becomes a tangled mess.
Six months down the line, you (or a new developer) will have no clear record of what was added, why it was added, or if it’s even still needed.
This makes debugging, updating, or removing scripts a time-consuming and risky archeological dig.
How to Add Custom Code to Shopify Without Editing Theme Files
With the advent of Online Store 2.0, Shopify revolutionized theme customization by introducing a modular, user-friendly architecture.
This allows store owners to safely add custom code without touching theme files, reducing errors and making updates easier.
Method 1: Using Dedicated “Code Snippet” Apps
For ultimate control without needing to open a code editor, dedicated Shopify code snippet apps are a game-changer.
CodeUp ‑ Add Custom Code is a powerful app that allows you to add custom CSS and JavaScript to your Shopify store effortlessly. It supports a wide range of use cases, including:
- Google Site Verification
- Facebook Domain Verification
- Google Analytics
- Facebook Pixel
- 3rd party scripts
- Live chat scripts
- Custom CSS or JavaScript
Key Features of CodeUp
Head & Body Code Placement: Insert custom CSS or scripts directly into your site’s <head> or <body> for full flexibility and control.
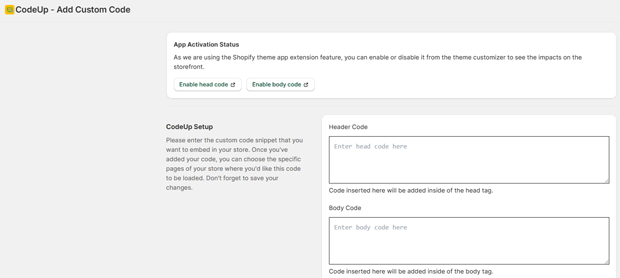
Page-Specific Code Loading: Apply scripts only to selected pages, such as Home, Product, Collection, Cart, Blog, Article, Search, Pages, or 404 pages for better performance and targeted functionality.

Simple Code Customization: Add, edit, and manage your custom code easily without touching theme files, reducing risks and making updates fast.
Easy to Use Interface: Designed for Shopify merchants of all skill levels, CodeUp streamlines the process of embedding scripts and styles, letting you focus on growing your business.
Method 2: The “Custom Liquid” Block/Section
This is your new best friend for adding small, specific pieces of code to a particular page or section. “Custom Liquid” blocks allow you to insert HTML, Liquid, and even inline CSS or JavaScript directly where you want them to appear.
Best for:
- Adding a unique welcome banner to your homepage.
- Embedding a third-party widget (like a booking calendar) on a specific page.
- Displaying custom messages or icons on product pages.
How to Add a Custom Liquid Block:
- From your Shopify Admin, go to Online Store > Themes.
- Find your current theme and click Customize.
- Navigate to the page template you want to edit (e.g., Homepage, Products, or a specific page you’ve created).
- In the left-hand sidebar, click + Add section (if adding a new full-width element) or + Add block within an existing section.
- Search for or scroll to find the Custom Liquid option and select it.
- A new block will appear. Click on it to open the settings, where you’ll find a text box.
- Paste your HTML, Liquid, or other code into this box.
- Click Save.
Example: Adding a Simple Announcement Bar
Let’s say you want to add a “Free Shipping on Orders Over $50!” banner. In your Custom Liquid block, you could add this simple HTML with inline CSS:
<div style="background-color: #007bff; color: #ffffff; text-align: center; padding: 10px; font-size: 16px;">
  <strong>FLASH SALE:</strong> Free Shipping on All Orders Over $50!
</div>
This code is now contained within that specific block. You can easily move it, delete it, or edit it without touching any other part of your theme.
Method 3: Adding Global CSS in “Theme Settings”
Ever wanted to change the color of all your buttons or tweak the font size of your headings across the entire site?
The “Custom CSS” feature in your theme settings is the perfect place for these global style changes. This directly answers the common question: Where to add custom CSS in Shopify?
Best for:
- Overriding default theme styles (colors, fonts, spacing).
- Adding custom button hover effects.
- Hiding unwanted elements across your store.
How to Add Custom CSS:
- In the Theme Editor, look at the bottom of the left-hand sidebar and click on the Theme settings (gear icon).
- In the settings menu, find the option labeled Custom CSS. It’s often at the bottom.
- A text box will appear. Here, you can write or paste any CSS code you want to apply to your entire store.
- The editor will often provide real-time feedback, and your changes will be visible in the preview window.
- Click Save.
Example: Changing All H2 Heading Colors
To make all your secondary headings a deep navy blue, you would simply add the following code to the Custom CSS box:
h2 {
  color: #1a237e;
  font-weight: bold;
}
This change is saved as a theme setting. It will persist through all theme updates because it’s stored separately from the core CSS files.
Method 4: Adding Global JavaScript and Tracking Codes
While the theme editor provides a dedicated field for Custom CSS, it doesn’t have one for global JavaScript. However, we can cleverly use the “Custom Liquid” section to achieve the same goal, which is particularly useful when you need to add tracking code to Shopify header.
Best for:
- Adding the base code for Meta Pixel (Facebook Pixel).
- Installing Google Analytics 4 (GA4) tracking tags.
- Implementing Hotjar, Clarity, or other user behavior tracking scripts.
How to Add Scripts to Your Header/Footer:
- In the Theme Editor, make sure you are on your Homepage template (or any template that uses the main header/footer).
- In the left sidebar, under the Header section, click + Add block and select Custom Liquid. (Some themes may require you to add a “Custom HTML” section instead).
- Paste your JavaScript snippet into the Custom Liquid block’s text box. Important: Make sure your script is wrapped in <script> tags, like <script>…your code here…</script>.
- Drag this new block to the very top or bottom of your Header section to ensure it loads correctly.
- Click Save.
This method injects the script into the header of every page on your site. It is vastly superior to editing theme.liquid because it’s still managed within the visual editor and is less likely to be affected by theme updates.
When You Must Edit Code
There are rare, highly advanced scenarios where none of the above methods will suffice. If you need to fundamentally alter the structure of a theme component, you might need to edit Shopify code. But even then, we will not edit the original files.
The Golden Rule: Duplicate Your Theme First!
Before you write a single line of code, this is the most crucial, non-negotiable step.
- Go to Online Store > Themes.
- Find the theme you want to edit, click the three-dots menu (…), and select Duplicate.
- Shopify will create a copy of your theme. Rename this copy to something descriptive, like “[Theme Name] – Custom Dev.”
- All your experimental code editing will happen in this duplicated, unpublished theme. You can preview it as much as you want without affecting your live store.
Creating Custom Sections and Snippets
The professional approach to adding complex logic is to create new files and then reference them in the theme templates. This minimizes your “footprint” on the original theme code.
Let’s say you want to add a complex block of information (e.g., an estimated delivery date calculator) to your product page. Instead of cramming all that logic into the main main-product.liquid file, you would:
- Go to the code editor for your duplicated theme (Actions > Edit code).
- Scroll down to the Snippets directory and click Add a new snippet.
- Name your snippet my-delivery-calculator.liquid.
- Write all of your custom HTML, Liquid, and JavaScript logic inside this new file and save it.
- Now, go to the template file where you want it to appear, likely in the Sections directory under main-product.liquid.
- Find the exact spot where you want your calculator to show up and add a single, clean line of code to include your snippet:
- Code snippet: {% render ‘my-delivery-calculator’ %}
- Save the main-product.liquid file.
The benefit? Your custom logic is neatly contained in its own file. When it’s time to update your theme, the process is much simpler.
You update the new theme, and then you only have to re-apply that one {% render ‘…’ %} line, rather than re-writing hundreds of lines of custom code.
This is the essence of safely add code to a Shopify theme for complex projects.
Practical Tips & Best Practices
Adding code is one thing; adding it well is another. Keep these expert tips in mind to ensure your store remains fast, stable, and easy to manage.
- Prioritize Performance: Every script you add can impact your page load speed. Always use the async or defer attributes on your <script> tags whenever possible. This allows the rest of your page to load without waiting for the script to finish.
- Use Browser DevTools: Your web browser’s built-in developer tools (usually accessed by pressing F12 or right-clicking and selecting “Inspect”) are invaluable. You can use the Inspector to find the exact CSS selectors you need to target and test style changes live before adding them to your theme settings.
- Comment Your Code: Leave notes for your future self. If you’re adding a piece of code, explain what it does and why. This is a lifesaver when you come back to it months later.
- HTML: “
- CSS: /* Overrides the default button color for branding */
- JavaScript: // This function calculates shipping estimates
- Leverage Shopify’s CDN: If you have custom assets like images, CSS files, or JS files, don’t link to them from external sources. Upload them to your Shopify Admin under Content > Files. Then, use Shopify’s Liquid asset_url filter to get a fast, globally distributed link to that file.
Frequently Asked Questions
What’s the absolute safest way to add custom CSS to Shopify?
The safest and recommended method is using the built-in “Custom CSS” field in the theme editor. Navigate to Online Store > Themes > Customize, then click Theme settings (gear icon) and find the Custom CSS section.
Code added here is stored separately from theme files and will not be overwritten during a theme update.
How do I add Google Analytics or Meta Pixel code to my Shopify store?
First, always check for Shopify’s native integrations. Go to Online Store > Preferences. Shopify has dedicated fields for your Google Analytics ID and Meta Pixel ID.
Using these is the best method as Shopify manages the code injection for you, including on the checkout pages.
If you need to add custom event tracking or have a tag that isn’t supported, the next best method is to use a Custom Liquid block in the Header section of the theme editor or use an App Embed from a trusted marketing app.
Can I add custom code to the Shopify checkout pages?
For stores on standard Shopify plans, you cannot directly edit the checkout files (checkout.liquid is deprecated). Customization is limited to the options in the theme editor (logos, colors, fonts).
Merchants on the Shopify Plus plan have more control and can use the new “Checkout Extensibility” framework, which allows apps to add functionality to the checkout in a secure, update-proof way.
Will adding custom code slow down my store?
It absolutely can if not done correctly. Every piece of JavaScript, CSS file, or large image you add increases your page’s weight and the number of requests the browser has to make.
To minimize the impact, follow best practices: use async or defer for JavaScript, minify your code (remove unnecessary spaces), compress images, and only load scripts on the pages where they are actually needed (a key benefit of using code snippet apps).
What’s the difference between a “Section” and a “Snippet” in the Shopify theme code?
A Section (.liquid file in the /sections directory) is a larger, modular component of a theme that merchants can add, remove, and re-order directly from the theme editor. Think of “Image with Text,” “Featured Products,” or the “Header” as sections.
A Snippet (.liquid file in the /snippets directory) is a smaller, reusable piece of code that is not meant to be edited by the merchant directly. Snippets are included within other files (like sections or templates) to avoid repeating code. For example, a product-card.liquid snippet might be used in the “Featured Products” section and on collection pages.
Conclusion
The power to customize your Shopify store is one of the platform’s greatest strengths. But with great power comes the need for great responsibility.
By moving away from the outdated and risky practice of editing core theme files, you can embrace a modern workflow that is safer, more efficient, and infinitely more scalable.