For any Shopify store owner, data is everything. Every click, every cart addition, and every purchase tells a story about your customers.
The key is knowing how to listen. Google Analytics 4 (GA4) is the professional standard for understanding this story, giving you the insights needed to grow your business.
But for many entrepreneurs, the thought of setting up GA4 brings on a major headache.
You might imagine needing to hire a developer or spend hours tangled in code just to get started.
Let’s clear that up right now.
This is your complete guide on how to set up GA4 on Shopify without coding. By the end of this guide, you’ll have a professional-grade analytics setup running in under 5 minutes, ready to capture the data that truly matters.
Key Takeaways
Here’s a quick summary of what you’ll achieve with this guide:
- You’ll understand why GA4 is the critical tool for modern e-commerce and how its event-based model helps you see the full customer journey.
- Discover the safest way to integrate GA4 with Shopify using a dedicated app, avoiding the risks of editing theme code.
- Follow clear instructions to create a new Google Analytics 4 property from the ground up, ensuring a perfect start.
- Learn how to use the Analyzely app to connect Google Analytics to your store.
- We’ll show you how to use GA4’s Real-Time reports to confirm your Shopify conversion tracking is working perfectly, from first click to final sale.
- Get practical tips to configure your GA4 property for cleaner data and more powerful business insights.
Why a Shopify Stores Need a Google Analytics
To run a successful online store, you need to answer critical questions: Where do my best customers come from? Which products do they look at most? Where in the checkout process do they abandon their carts? GA4 is built to answer these questions and more.
Here’s why a proper Shopify Google Analytics 4 integration is a non-negotiable for your business:
1. It’s Built Around Actions (Events)
GA4 thinks in terms of “events,” which are specific actions a user takes. A page view is an event. Clicking add_to_cart is an event. A purchase is a very important event. This approach lets you map the customer journey in incredible detail, seeing exactly what steps people take—or don’t take—on your site.
2. It Provides Full E-commerce Tracking
When you connect Shopify to GA4 correctly, it automatically starts tracking the events that matter most to an e-commerce store:
- view_item_list (when a customer views a collection page)
- view_item (when they look at a specific product)
- add_to_cart
- begin_checkout
- add_payment_info
- purchase
- refund
This data is the blueprint for optimizing your sales funnel.
3. It Offers AI-Powered Insights
GA4 uses Google’s machine learning to give you a competitive edge. It can predict which customers are most likely to make a purchase or which ones might not return. This allows you to create smarter marketing campaigns and audience segments, focusing your budget where it will have the most impact.
4. It Understands the Modern Shopper
People shop on multiple devices. They might see your ad on Instagram on their phone, browse your site on a tablet, and finally buy from their laptop.
GA4 is designed to understand this cross-device journey, giving you a unified view of a customer’s behavior instead of treating them like three different people.
Without this level of insight, you’re making decisions in the dark. A proper GA4 setup lights the way.
Manual Coding vs. The App Method: A Smarter Way to Connect GA4
In the past, getting analytics on your site often involved editing your store’s theme code directly. This manual process required you to:
- Navigate your Shopify admin to find specific theme files.
- Copy and paste different code snippets into the right places.
- Manually add more code for every e-commerce action you wanted to track.
This method is risky and outdated. A single typo could disrupt your website, and your custom code could be erased with a simple theme update, silently breaking your data collection.
The Modern Solution: Use a Dedicated Shopify App
The easy, reliable, and professional way to add GA4 to Shopify is with an app designed specifically for the job. This approach removes all the risks of manual coding and ensures your setup is perfect from day one.
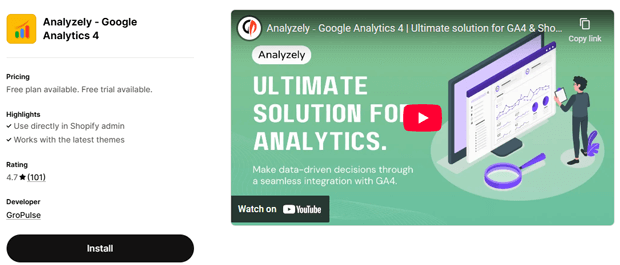
While several options exist, a specialized Shopify GA4 integration app like Analyzely – Google Analytics 4 handles all the technical heavy lifting for you. It’s more than just a simple connector; it’s a complete analytics toolkit built for Shopify merchants.
Why Analyzely Google Analytics is the Best Solution for Shopify
Using a purpose-built app provides a comprehensive and robust way to integrate Google Analytics with your store. It turns a complex technical task into a simple, guided process. Here’s a breakdown of the key benefits:
- Effortless & Error-Free Integration (No Coding Needed) The app provides a seamless setup wizard that guides you through every step. It automatically finds and integrates your GA4 Measurement ID, so you never have to worry about pasting code in the wrong place. This completely removes the risk of human error and gets you up and running in minutes.
- Superior Accuracy with Server-Side Tracking This is a major advantage. Instead of relying only on a customer’s browser to send purchase data (which can be blocked by ad-blockers), the app also sends data directly from Shopify’s server to Google’s. This means you capture more conversions with greater accuracy, giving you a much truer picture of your store’s performance.
- Complete E-commerce Event Tracking A proper setup requires tracking the entire customer journey. The app automatically configures all the crucial e-commerce events you need, including product views, add-to-carts, checkouts, and purchases. This gives you a clear view of your sales funnel, allowing you to see exactly where customers are dropping off and where you can make improvements.
- Convenient and Clear Reporting GA4 can be overwhelming. The app simplifies this by providing its own Standard & Ecommerce Reports right in the app dashboard. You can see your store’s most important metrics in one place, and even set up automatic email reports to be sent to you and your team, making performance monitoring effortless.
- Built for Modern Privacy Standards Staying compliant with data privacy laws is essential. The app comes ready with support for Google Consent Mode v2 and includes a GDPR-friendly tracking banner. This helps you maintain data protection standards without needing to become a privacy law expert.
For any Shopify GA4 setup for beginners and experts alike, using an app is the smartest and safest choice.
How to Set Up Google Analytics 4 (GA4) on Shopify Without Coding
Let’s get this done. We’ll move through three parts: creating your GA4 property, connecting it to Shopify, and verifying that it works.
Part 1: Creating Your Google Analytics 4 Property
If you already have a GA4 property, you can jump to Part 2. If not, start here.
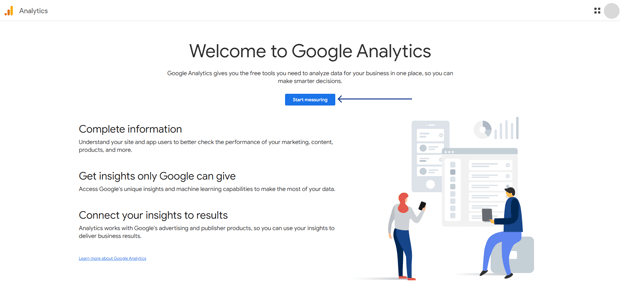
Get Started: Go to analytics.google.com. Click the “Start Measuring” button to begin.
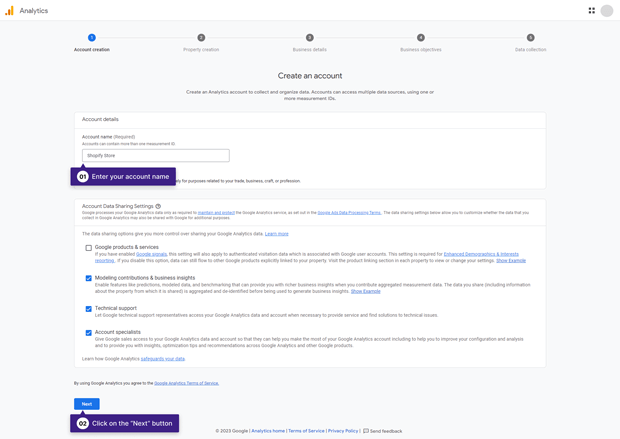
Create Your Account: The “Account” is the top-level folder for your business.
- Account Name: Use your business name (e.g., “Spectra Gadgets”).
- Account Data Sharing Settings: The default settings are fine for most people. Review them and click Next.
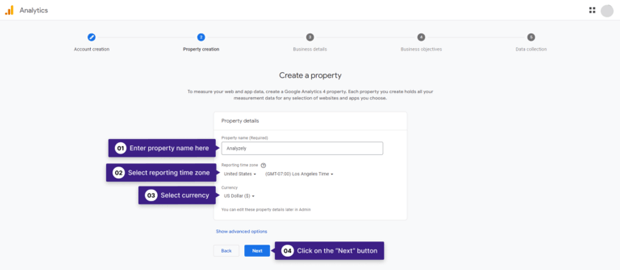
Create Your Property: A “Property” represents your website or app.
- Property Name: Name it something clear (e.g., “Spectra Gadgets Website”).
- Reporting Time Zone & Currency: This is critical. Choose the time zone and currency your store uses. Incorrect settings here will lead to inaccurate sales and timing data.
- Click Next.
Provide Business Details: Answer a few quick questions about your business.
- Select your Industry Category and Business Size. This helps GA4 provide relevant benchmark data later.
- Click Next.

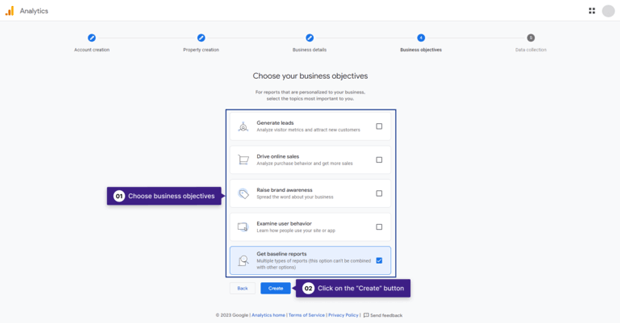
Choose Your Business Objectives: Check the boxes that match your goals, like “Drive online sales” and “Examine user behavior.” Click Create.
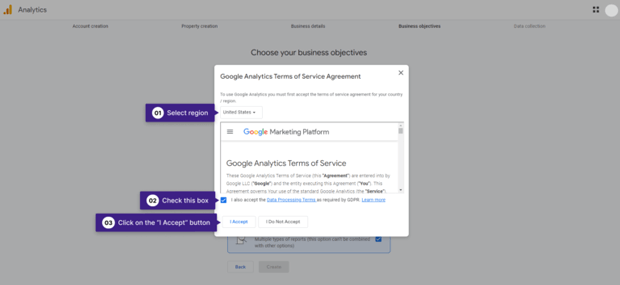
Accept the Terms: A pop-up will appear. Choose your country, accept the terms, and click “I Accept.”
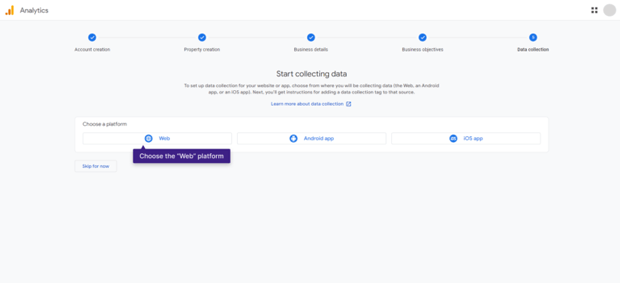
Create Your Data Stream: A data stream is the source of data for your property.
Choose Web as the platform.
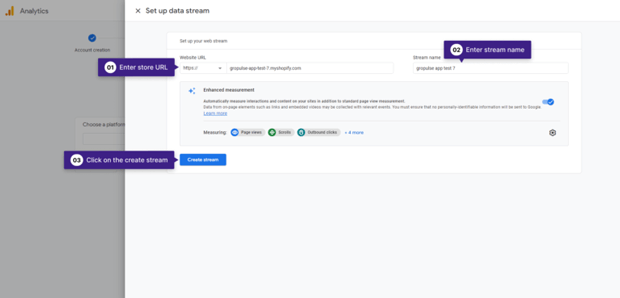
- In the Website URL field, enter your store’s domain (e.g., spectragadgets.com), leaving out the https://.
- Give the stream a Stream Name, like “Shopify Store Stream.”
- Make sure “Enhanced measurement” is turned on. It automatically tracks useful events like scrolls and site searches.
- Click Create stream.
Get Your Measurement ID: This is the key that connects your store to GA4. The next screen will show your “Web stream details.”
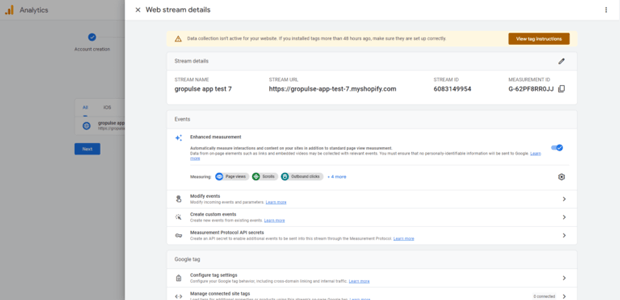
Look for the Measurement ID that starts with G- (e.g., G-123ABC456D).
Copy this ID. You will need it in the next part.
That’s it! Your Google Analytics 4 property is now set up and ready to receive data.
Part 2: Connecting Shopify to GA4 with the Analyzely App
Now, let’s connect your store to the property you just created using our no-code method.
Install the App: Head to the Shopify App Store, find the Analyzely Google Analytics 4 app, and add it to your store.
Begin the Setup: Once installed, the app will launch a simple setup wizard to guide you.
Activate the App Embed. The app needs to be enabled in your theme. Click the activation link provided in the wizard.
You’ll be taken to your theme editor. Find the toggle switch for Analyzely in the “App embeds” panel and turn it on. Hit the Save button in the top corner.

Close that tab and go back to the Analyzely wizard. It will confirm the activation. Click Next.
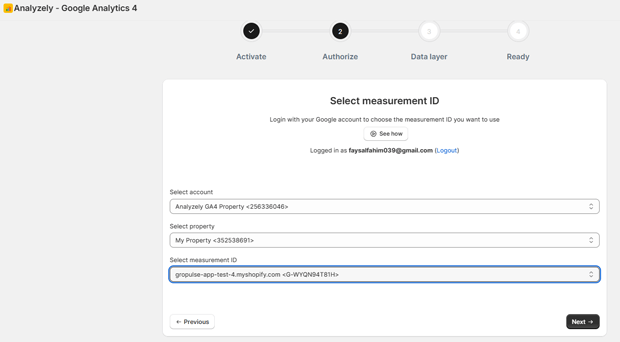
Authorize with Google: Click the Sign In with Google button.
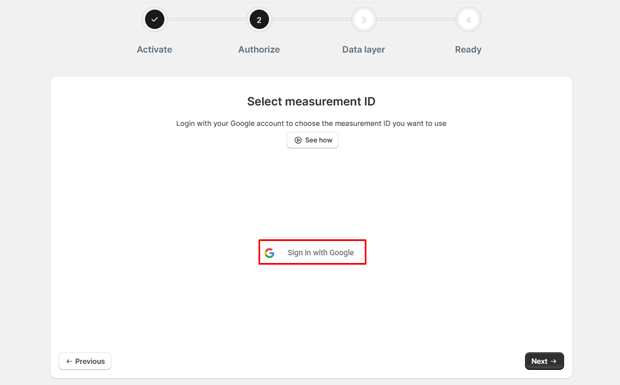
In the pop-up window, choose the same Google account you used to create your GA4 property. This is very important.
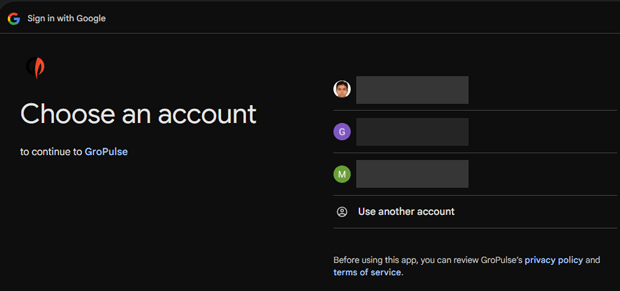
Grant the app permission to access your Google Analytics data. This allows it to find your property and send data to it.
Select the Account and Property you just created. The Measurement ID field should fill in automatically. Double-check that it’s the same G- ID you copied earlier. Click Next.
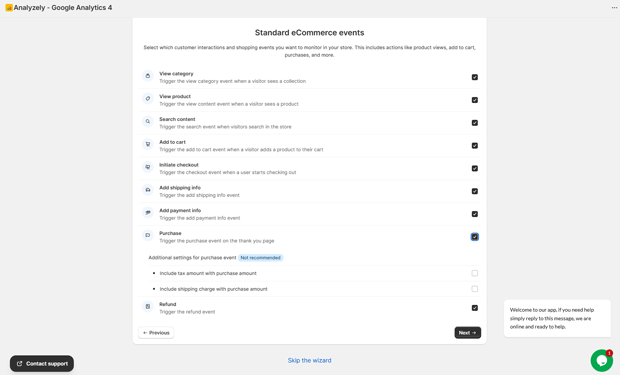
The app shows a list of all the e-commerce events it will track for you. Review the list to see the depth of tracking you’re getting, and click Next.
Congratulations! You have successfully installed and configured GA4 on your Shopify store without touching a single line of code.
Part 3: Verify That Your GA4 Setup is Working
Never assume; always verify. Let’s make sure data is flowing correctly using GA4’s Real-Time report.
- Open Real-Time Report:
- In your Google Analytics account, navigate to Reports > Real-time. Keep this page open.
- Visit Your Store:
- In a new browser tab, go to your live Shopify store. Within a minute, you should see yourself appear as a new user in the GA4 Real-Time report. This confirms the basic connection is live.
- Perform a Test Purchase:
- Now, act like a customer on your own site.
- View a collection page.
- Click on a product.
- Add it to your cart.
- Start the checkout process.
- Complete a test purchase (you can use a 100% discount code or a test payment method).
- Watch the Events Appear:
- As you complete each step, check the “Event count by Event name” card in the GA4 Real-Time report. You should see the events pop up one by one: view_item_list, view_item, add_to_cart, begin_checkout, and finally, purchase.
- Seeing the purchase event is the ultimate confirmation that your Shopify conversion tracking is working perfectly.
Practical Tips & Best Practices for Your New GA4 Setup
Your integration is active, but a few quick settings will make your data even more valuable.
- Increase Data Retention: By default, GA4 stores detailed user data for only 2 months. You need more for proper analysis. Go to Admin > Data Settings > Data Retention and change this to 14 months.
- Enable Google Signals: This feature helps GA4 track users across different devices and enables you to build remarketing audiences. Go to Admin > Data Settings > Data Collection and follow the prompts to activate Google Signals.
- Filter Internal Traffic: Prevent your own visits from skewing your data. In Admin > Data Streams, click your stream, go to Configure tag settings > Define internal traffic, and create a rule to exclude traffic from your IP address.
- Link Your Google Ads Account: If you use Google Ads, this is a must. Go to Admin > Product Links and connect your Google Ads account. This lets you import your e-commerce conversions for better ad optimization.
Frequently Asked Questions
How do I track refunds in GA4 on Shopify?
Refund tracking in GA4 requires server-side integration because refunds occur in Shopify Admin -not on the storefront.
Tools like Analyzely can automate this by using Shopify webhooks to send refund events to GA4. This ensures your analytics reflect true revenue and refunded transactions.
What is a stream name in Google Analytics 4?
A stream name refers to the data stream you create in GA4. A data stream is the source from which GA4 collects data, such as:
Web stream (your Shopify store)
iOS stream (mobile app)
Android stream (mobile app)
The stream name is simply the label you give to the stream to identify it in GA4. For example, “Shopify Store Web” can be a web stream name.
How to enable ecommerce events in Google Analytics 4?
To track ecommerce events like purchases, add-to-carts, or checkouts:
1. Go to Admin → Data Streams → Web → Enhanced Measurement in GA4.
2. Turn on Enhanced Ecommerce (if available).
3. For Shopify, use an app like Analyzely or implement GA4 e-commerce events via GTM**.
4. Ensure events like `purchase`, `add_to_cart`, `view_item` are sent to GA4 either via Gtag.js, GTM, or server-side integration.
What is the difference between Shopify Analytics and Google Analytics?
Shopify Analytics: Built-in reporting showing sales, traffic, and customer behavior. It’s easy to use but limited in customization and advanced tracking.
Google Analytics 4: A robust, flexible tool for tracking users, events, funnels, and cross-platform behavior. GA4 gives you deeper insights, custom reports, and integration with ads platforms, but requires setup and technical knowledge.
In short: Shopify Analytics = simple and immediate. GA4 = advanced, customizable, and scalable.
5. How to get the Measurement Protocol API secret key in GA4?
The Measurement Protocol API secret key allows server-side event tracking. To get it:
1. Go to Admin → Data Streams → Choose your Web Stream.
2. Scroll down to Measurement Protocol API secrets.
3. Click Create to generate a secret key.
4. Use this key in your server-side integration (e.g., sending refunds, purchases, or custom events to GA4).
Conclusion
You’ve successfully set up Google Analytics 4 on your Shopify store—all without the stress of coding.
By using a modern, app-based solution, you’ve built a powerful and reliable system for collecting customer data.
This isn’t just about checking a box. It’s about empowering your business. The insights waiting in your GA4 reports are the key to understanding your customers, optimizing your marketing, and making smarter decisions that lead to real growth.
You’re now equipped to turn clicks into customers more effectively than ever before.