You’ve poured your heart, soul, and countless hours into creating a beautiful Shopify store. Your products are perfect, your photos are stunning, and your brand story is compelling.
But there’s a nagging question that keeps many store owners up at night: “Now that I’ve built it, will they come?”
In the vast, crowded digital marketplace, just existing isn’t enough. You need to be visible. You need to be discoverable. And for that, you need to speak the languages of your two most important audiences: search engines and human customers.
This is where the concept of a Shopify sitemap comes into play. It’s the digital roadmap that guides both Google’s web crawlers and your potential buyers directly to your products.
But then the confusion sets in. You hear terms like “XML sitemap” and “HTML sitemap” thrown around. Are they the same thing? Do you need one, the other, or both? It feels like another technical hurdle in your already complex journey of e-commerce SEO.
Relax. This guide is here to demystify the XML vs HTML sitemap debate once and for all. We’ll break down exactly what each sitemap does, explain Shopify’s brilliant built-in features, and provide a clear, actionable strategy to ensure your store is perfectly optimized for discovery.
Key Takeaways: Your Quick Guide to Shopify Sitemaps
Pressed for time? Here’s the executive summary of what you’ll learn in this comprehensive guide:
- An XML sitemap is a technical file written for search engine bots (like Googlebot). An HTML sitemap is a visible page on your website designed for human visitors. They serve two entirely different purposes.
- The XML sitemap is crucial for helping search engines efficiently find, crawl, and index all of your store’s pages (products, collections, blogs, etc.). It’s a foundational element of technical SEO.
- The great news is that Shopify automatically generates and maintains a perfect XML sitemap for your Shopify store. You don’t need to build it, but you do need to know where it is and how to submit it to Google.
- An HTML sitemap improves site navigation for your customers, helping them find exactly what they’re looking for. While not a direct, powerful ranking factor, the enhanced UX it provides can lead to lower bounce rates and better engagement, both of which are positive signals to Google.
- For the ultimate Shopify SEO sitemap strategy, you need your auto-generated XML sitemap for search engines and a well-structured HTML sitemap for your users. One is essential; the other is a high-impact best practice.
What is a Sitemap? The Digital Blueprint for Your Store
Before we dive into the XML vs. HTML specifics, let’s establish a clear foundation. What exactly is a sitemap?
Think of your Shopify store as a massive, multi-level shopping mall. A customer or a delivery driver (the search engine bot) arrives at the entrance. How do they find the specific store they’re looking for? They use the mall directory.
A sitemap is that directory for your website. It’s a file or a page that lists all the important URLs on your store, your home page, product pages, collection pages, blog posts, and “About Us” page.
It provides a complete and organized overview of your site’s structure, making it incredibly easy for both search engines and users to understand and navigate your content. Without it, some of your deeper pages might be like a small boutique tucked away in a basement corner of the mall, hard to find and easily missed.
Now, let’s look at the two distinct types of directories you can have for your store.
Recommended Blogs For You:
👉 How to Add a Free Shipping Progress Bar in Shopify
👉 The Ultimate 5-Step Guide to Diagnose Your Facebook Ads Campaign in Shopify
👉 Tiered Pricing Strategies: Get Customers to Buy More with Less Effort
The XML Sitemap: Your Direct Line to Search Engines
The XML sitemap is your formal line of communication with search engines like Google, Bing, and DuckDuckGo. It’s the single most important type of sitemap for your Shopify SEO sitemap strategy.
What is an XML Sitemap?
An XML sitemap is a file written in XML (eXtensible Markup Language), a markup language that is both human-readable and machine-readable. However, it’s designed almost exclusively for machines—specifically, the web crawlers (or “bots”) that search engines use to discover and index content on the internet.
This file isn’t a pretty page for your customers to look at. It’s a raw list of URLs accompanied by important metadata. A typical entry in an XML sitemap looks something like this:
XML
<url>
  <loc>https://www.yourstore.com/products/awesome-product</loc>
  <lastmod>2025-09-27T10:00:00-04:00</lastmod>
  <changefreq>weekly</changefreq>
  <priority>0.8</priority>
</url>
Let’s quickly break down what this tells Google:
- <loc>: The location, or the exact URL of the page.
- <lastmod>: The date the file was last modified. This tells Google if there’s new content to crawl.
- <changefreq>: How frequently the page is likely to change (e.g., always, hourly, daily, weekly).
- <priority>: Indicates the importance of this URL relative to other URLs on your site, on a scale of 0.0 to 1.0.
While these last two tags (changefreq and priority) are now largely ignored by Google, the <loc> and <lastmod> tags remain critical for efficient crawling.
Why Your Shopify Store Needs an XML Sitemap
An XML sitemap is a cornerstone of technical SEO for several key reasons:
- Guaranteed Discoverability: It ensures that search engines know about every single important page on your store, even if you don’t have a lot of internal links pointing to them yet. This is especially crucial for new stores or for product pages that are deep within your site’s structure.
- Faster Indexing: When you add a new collection or a new line of products, the XML sitemap gets updated. This signals to Google that there’s fresh content to crawl and index, getting your new products into search results much faster. This is vital to improve Shopify indexing.
- Intelligent Crawling: The metadata helps search engines prioritize their crawling efforts. If they see a page has been recently updated via the <lastmod> tag, they know to crawl it again.
- A Single Source of Truth: It provides a definitive list of all the URLs you want to be indexed, helping to clear up any confusion from complex navigation or duplicate content issues.
The Best Part: Shopify Handles Your XML Sitemap Automatically!
Here’s where Shopify truly shines. You don’t need to worry about learning to code XML files or buying expensive tools. Shopify automatically generates and dynamically updates your XML sitemap for you.
Whenever you add a new product, create a blog post, or publish a new page, Shopify instantly adds it to your sitemap file. When you delete something, it’s removed. It’s a seamless, hands-off process that handles a major piece of technical SEO for you right out of the box.
How to Find and Submit Your Shopify Sitemap to Google
Even though Shopify creates the file, you still need to tell Google where it is. This is a simple, one-time process.
Step 1: Find Your Sitemap URL
Your Shopify sitemap is always located at the same address. Simply go to your domain and add /sitemap.xml to the end.
URL: https://yourstore.com/sitemap.xml
When you visit this URL, you won’t see a single giant file. Shopify intelligently creates a “Sitemap Index File” that links to separate sitemaps for your different content types (products, collections, pages, and blogs). This is a best practice for organization and efficiency. It will look something like this:
- sitemap_products_1.xml
- sitemap_collections_1.xml
- sitemap_pages_1.xml
- sitemap_blogs_1.xml
You don’t need to worry about these individual files. You only need to submit the main sitemap.xml index file, and Google will automatically find the rest.
Step 2: Submit to Google Search Console
Google Search Console (GSC) is a free tool from Google that helps you monitor your site’s performance in search. If you haven’t set it up, it’s your absolute first step in any SEO endeavor.
- Log in to your Google Search Console account.
- Select your property (your Shopify store’s domain).
- In the left-hand menu, navigate to the “Indexing” section and click on “Sitemaps”.
- Under “Add a new sitemap,” you’ll see your domain name followed by a text box. Simply type sitemap.xml into the box.
- Click the “Submit” button.
That’s it! Google will now process your sitemap. The status will initially show as “Couldn’t fetch” or “Processing” and should change to “Success” within a few hours or days. Once submitted, you never have to do it again. Google will periodically re-crawl this file to look for updates.
The HTML Sitemap: Enhancing the User Experience (UX)
Now let’s switch gears and talk about the other type of sitemap. The HTML sitemap for your Shopify store is built not for bots, but for the human beings browsing your website.
What is an HTML Sitemap?
Unlike the code-heavy XML file, an HTML sitemap is just a regular page on your website (e.g., yourstore.com/sitemap). It’s designed to be visually clean and easy to navigate. It presents a structured, organized, and hyperlinked list of all the major sections and pages of your store.
Think of it as a super-detailed table of contents. A good HTML sitemap will typically be organized with clear headings for:
- Main Pages (Home, About Us, Contact)
- Product Collections
- Blog Categories
- Information Pages (Shipping Policy, Returns, FAQ)
Its primary goal is to help a lost or curious user find exactly what they’re looking for without having to click through complex navigation menus.
Do You Really Need an HTML Sitemap for Your Shopify Store?
This is where the debate often centers. The honest answer is: it’s highly recommended, especially for larger stores.
Shopify does not generate an HTML sitemap for you automatically. It’s something you have to create yourself. While it’s not as critically essential for technical SEO as the XML sitemap, it provides several powerful, albeit indirect, benefits.
Key Benefits of an HTML Sitemap:
- Vastly Improved User Navigation: If a user can’t find a product category in your main menu, their next logical stop might be a sitemap link in the footer. It acts as a safety net, preventing user frustration and potential abandonment of your site.
- Enhanced User Experience (UX): Providing a clear, comprehensive overview of your store shows a commitment to user-friendliness. A positive UX leads to lower bounce rates, longer time on site, and higher conversion rates. Google pays close attention to these user engagement metrics, and they can indirectly boost your rankings.
- A Boost to Your Internal Linking Structure: An HTML sitemap is a single page that links out to dozens, or even hundreds, of other pages on your site. This helps distribute “link equity” or “link juice” throughout your store, potentially giving a small SEO lift to deeper pages.
- A Secondary Path for Crawlers: While Google’s primary discovery method will be your XML sitemap, its crawlers still follow links. They will crawl your HTML sitemap, providing a secondary method for them to discover your pages and understand your site’s hierarchy.
When is an HTML sitemap most valuable?
You should strongly consider creating one if:
- Your store has a large number of products and collections.
- You have a deep and complex site structure with many sub-categories.
- Your main navigation menu can’t possibly accommodate links to all your important pages.
- You want to provide an impeccable, frustration-free experience for every visitor.
How to Create an HTML Sitemap in Shopify
Since Shopify doesn’t do this for you, you have two main options for creating an HTML sitemap in your Shopify store.
Method 1: Using a Shopify App (Best Way)
Manually maintaining a sitemap can quickly become a headache. Every time you add a new product, collection, or page, your sitemap becomes outdated, forcing you to update it manually.
The smarter solution is to use an app like NoIndexly Sitemap Manager, which automatically creates and updates your HTML sitemap whenever changes happen in your Shopify store.
This ensures your sitemap is always fresh, accurate, and SEO-friendly—without any extra effort on your part.
How to Generate an HTML Sitemap with NoIndexly in Shopify
From the Shopify App Store, install and open the NoIndexly Sitemap Manager app.

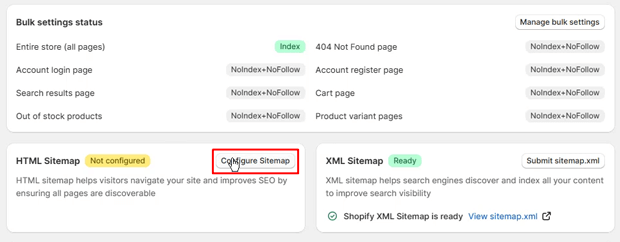
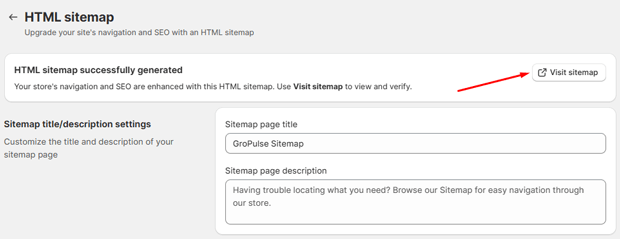
In the dashboard, go to HTML Sitemap and click Configure.
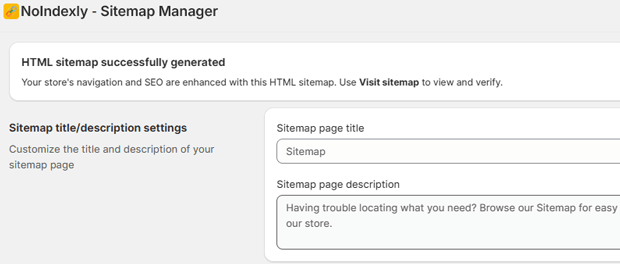
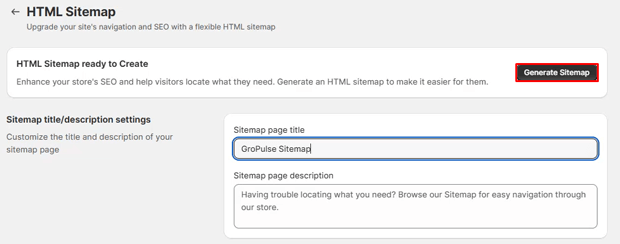
Enter a Title for your sitemap page. Add a Page Description (optional, but recommended for SEO).
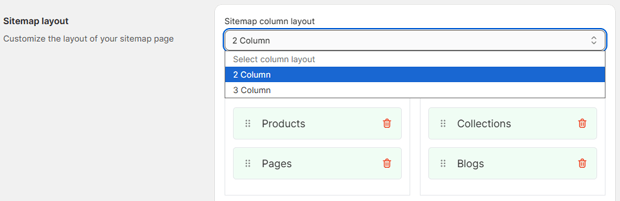
Select your preferred layout:
2 Column
3 Column
Click Generate Sitemap.
A confirmation message will appear: “HTML sitemap successfully generated .” Visit the sitemap page on your store to see the live version.
Customization Options
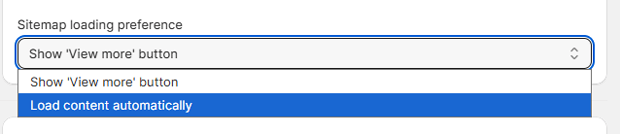
Infinite Loading: For stores with many products, you can enable infinite loading or use a “Load More” button for better performanc.
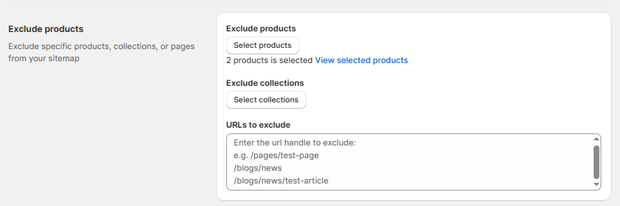
Exclude Items: You can remove specific products, collections, or pages from your HTML sitemap by deselecting them in the settings.
This is one of the best “set it and forget it” ways to improve your Shopify SEO structure and user experience simultaneously.
Method 2: The Manual Approach
If your store has a manageable number of pages (e.g., under 50-75 important URLs), you can easily build one yourself.
- From your Shopify Admin, go to Online Store > Pages.
- Click “Add page”.
- Title the page “Sitemap” or “Site Map”.
- In the content editor, start building your sitemap. Use headings (H2, H3) to create a clear hierarchy.
- Create bulleted lists of links under each heading. For example:
- Main Pages
- Home
- About Us
- Contact Us
- Shop by Category
- Collection A
- Collection B
- Collection C
- Customer Service
- FAQ
- Shipping Policy
- Returns & Exchanges
- Main Pages
- Click “Save”.
- Finally, go to Online Store > Navigation. Select your “Footer menu” and add a link to your new Sitemap page. The footer is the most common and expected place for users to find this link.
XML vs HTML Sitemap: The Head-to-Head Comparison
To make the distinction crystal clear, here’s a direct comparison of the two sitemap types. This is a perfect reference for understanding the core differences at a glance.
| Feature | XML Sitemap | HTML Sitemap |
| Target Audience | Search Engine Crawlers (Bots) | Human Visitors |
| Primary Purpose | Indexing: To help search engines discover and index all site content efficiently. | Navigation & UX: To help users find pages and understand the site structure. |
| Format | XML (Extensible Markup Language) – a code file. | HTML (HyperText Markup Language) – a standard web page. |
| Location | Root directory: yourstore.com/sitemap.xml | A visible page, linked from the footer: yourstore.com/sitemap |
| Creation in Shopify | Automatic. Generated and updated by Shopify. | Manual or via a third-party Shopify App. |
| Direct SEO Impact | High. Directly affects crawling and indexing, which are foundational to SEO. | Low/Indirect. Improves UX and internal linking, which are positive SEO signals. |
| Is it Essential? | Yes. Absolutely non-negotiable. | No, but highly recommended as a best practice. |
The Verdict: Should I Use XML or HTML Sitemap for Shopify?
After all this, the answer becomes incredibly clear. This isn’t an “either/or” question. The best sitemap strategy for your Shopify store involves using both.
- You NEED an XML Sitemap. It’s the technical backbone of your store’s relationship with Google. Without it, you are severely hindering your ability to get ranked. Thankfully, Shopify does 99% of the work for you. Your only job is to submit it to Google Search Console.
- You SHOULD HAVE an HTML Sitemap. It’s a low-effort, high-impact feature for improving your customer’s experience. It reduces frustration, helps users find products, and sends positive engagement signals to search engines. For any store that is serious about growth and customer service, it’s a no-brainer.
The best sitemap type for Shopify SEO is a combination of a perfectly submitted XML sitemap and a well-structured, user-friendly HTML sitemap. They work in tandem to satisfy the
Practical Tips & Shopify Sitemap Best Practices
Now that you know what to do, let’s cover how to do it perfectly. Follow these expert tips to maximize the effectiveness of your sitemaps.
- Don’t Just Submit, Monitor: Submitting your XML sitemap to GSC isn’t the end of the story. Check in on the “Sitemaps” report once a month. Look for any errors or warnings. Google will tell you if it’s having trouble fetching the file or if it’s finding a large number of blocked URLs.
- Use noindex to Control Your Sitemap: Your XML sitemap should only contain URLs that you want search engines to index. If you have pages with thin content (e.g., tag pages with only one or two products) or internal policy pages you don’t want in search results, you should use a “noindex” tag.
You can do this with Shopify SEO apps or by editing your theme’s code (theme.liquid) to exclude certain page types. Shopify’s sitemap will automatically respect the noindex tag and remove those URLs.
- Keep Your Site Structure Clean: A sitemap can’t fix a messy store. A logical and intuitive navigation structure is paramount. Use clear collection hierarchies and breadcrumbs.
A clean Shopify SEO structure makes your store better for users and easier for Google to understand, making your sitemaps more effective.
- Link Your HTML Sitemap Prominently: Don’t bury your HTML sitemap. The standard and most effective place to link to it is in your website’s footer, alongside links to your contact page and policies. This is where users have been trained to look for it.
- Audit for Cannibalization: While not a direct sitemap issue, a well-organized HTML sitemap can help you spot potential keyword cannibalization issues, where multiple pages are competing for the same search terms. When you see your whole structure laid out, these overlaps can become more obvious.
Freequently Asked Questions
Does Shopify create a sitemap automatically?
Yes and no. Shopify automatically creates and updates the XML sitemap, which is the technical file for search engines. It does not automatically create the HTML sitemap, which is the user-facing page. You must create the HTML sitemap manually or by using an app.
Where is my Shopify sitemap file located?
Your main XML sitemap index file is always at yourdomain.com/sitemap.xml. You can’t see this file in your Shopify admin files or edit it directly; it’s a virtual file that Shopify generates on the fly when requested by a browser or bot.
How often should I submit my Shopify sitemap to Google?
Only once. After you perform the initial submission in Google Search Console, you’re done. Google knows where to find the file and will re-crawl it periodically to check for any changes or updates that Shopify has automatically made. Resubmitting it repeatedly does not make Google crawl your site any faster.
My sitemap has an error in Google Search Console. What should I do?
Don’t panic. This is common. First, click on the error to see what Google is reporting. Common issues include:
“Couldn’t fetch”: This is often a temporary server issue either on Shopify’s or Google’s end. Wait a day or two and see if it resolves itself.
“URLs blocked by robots.txt”: Shopify’s default robots.txt file blocks certain URLs from being crawled (like admin pages and cart pages). It’s normal to see a number of “excluded” URLs. This is not an error; it’s by design.
If the error persists for several days, you can check the Shopify Status page for any known issues or contact Shopify support.
Can I edit my Shopify XML sitemap?
No, not directly. Shopify locks down access to the sitemap.xml file for stability and security. You control its contents indirectly.
The sitemap is built from your published content. So, to remove a page from the sitemap, you can either un-publish it or add a noindex tag to it. To add a page, simply publish it.
Conclusion: Building a Better Roadmap for Your Shopify Success
Navigating the world of Shopify SEO can feel like trying to read a map in a foreign language. But when it comes to sitemaps, the language is surprisingly simple.
- The XML sitemap is your formal introduction to search engines. It’s the technical handshake that says, “Here is a complete list of my inventory. Please show it to the world.” It’s essential, and Shopify’s automation is a powerful ally.
- The HTML sitemap is your friendly concierge for customers. It’s the helpful guide that says, “Welcome to my store. Let me help you find exactly what you’re looking for.” It’s a hallmark of a great user experience and an underrated part of a holistic SEO strategy.
Your store doesn’t need to choose between them. It needs both.
By ensuring your automatically generated XML sitemap is submitted to Google and by taking a few minutes to create a user-friendly HTML sitemap, you are building a clear, accessible, and powerful foundation for growth.