Most Shopify merchants set up a Facebook Pixel, run some ads, and assume tracking is working. Then they notice their reported purchases in Meta Ads Manager don’t match their Shopify order count.
Or their ROAS looks great in Meta but the bank account tells a different story. Or they try to set up a retargeting audience and nothing fires the way they expect.
The common thread in almost all of these problems is Events Manager — or rather, not understanding it.
Facebook Events Manager is the nerve center of your entire Meta advertising operation. It’s where your tracking signals live, where errors surface, where you verify that data is actually flowing correctly, and where you connect server-side events through the Conversions API.
If you’re spending money on Meta ads without regularly checking Events Manager, you’re essentially flying blind.
And the stakes have only gotten higher. After Apple’s iOS 14.5 update, browser-based pixel tracking took a significant hit. Meta itself has stated that advertisers relying solely on browser-side events can expect meaningful underreporting of conversions.
The solution — Conversions API — lives entirely within Events Manager. Understanding this tool isn’t optional anymore. It’s foundational.
This guide is written specifically for Shopify merchants: what Events Manager actually shows you, how pixels and CAPI work together, how to read your event data, and what to do when things break.
Summary:
Facebook Events Manager is Meta’s hub for managing, testing, and troubleshooting the data signals sent from your Shopify store — including browser-based Pixel events and server-side Conversions API events — used to optimize and measure your ad campaigns.
- Facebook Events Manager is where Meta collects, verifies, and troubleshoots all conversion data from your Shopify store.
- The Facebook Pixel tracks browser-side events; the Conversions API (CAPI) tracks server-side — together they give you the most complete, accurate picture.
- iOS privacy changes and browser ad blockers have made CAPI no longer optional for any Shopify merchant running Meta ads seriously.
- Misconfigured events or duplicate signals are among the most common reasons ad campaigns underperform or optimize toward the wrong actions.
- This guide walks you through exactly how Events Manager works, what each section means, and how to set it up properly for Shopify.
What Is Facebook Events Manager — and What Does It Actually Do?
Facebook Events Manager (found at business.facebook.com/events_manager) is Meta’s centralized dashboard for managing every data source connected to your ad account. Think of it as the control room between your Shopify store and Meta’s advertising algorithms.
Here’s what Events Manager does:
- It aggregates data sources: Every pixel, Conversions API connection, app SDK, and offline event set you’ve created shows up here. For a Shopify merchant, your primary data sources will be your Facebook Pixel and your CAPI connection.
- It shows real-time event activity: When someone visits a product page, adds to cart, initiates checkout, or completes a purchase on your store, those actions are sent to Meta as “events.” Events Manager shows you these events as they fire — which is invaluable for troubleshooting.
- It flags errors and warnings: If events aren’t matching correctly, if there are duplicate signals, or if required parameters are missing, Events Manager surfaces these as actionable alerts.
- It manages your pixel settings: From automatic advanced matching to event deduplication keys, the configuration options that affect data quality all live here.
- It connects to your ad campaigns: The events verified in Events Manager are what power your campaign optimization targets, custom audiences, and attribution windows.
For Shopify merchants specifically, Events Manager is the place where your store’s customer behavior data gets translated into the signals Meta uses to find more buyers, optimize bids, and report on your results.
Understanding the Facebook Pixel: Browser-Side Tracking on Shopify
The Facebook Pixel is a snippet of JavaScript code placed in the <head> of your Shopify store. When a shopper visits a page, the pixel fires and sends an event to Meta’s servers — all from the customer’s browser.
Standard events that matter most for Shopify:
- ViewContent — Fires when a product page loads. Used for retargeting audiences and dynamic product ads.
- AddToCart — Fires when a shopper adds an item to their cart. Critical for abandoned cart audiences.
- InitiateCheckout — Fires when checkout begins. Useful for retargeting high-intent shoppers.
- AddPaymentInfo — Fires when payment details are entered. Indicates very high purchase intent.
- Purchase — The most important event. Fires when an order is confirmed. This is what campaign optimization is based on.
Shopify has a native Facebook & Instagram sales channel that installs the pixel automatically and fires these standard events. However, this native integration has limitations — it fires only one pixel at a time, and it doesn’t include server-side CAPI tracking on its own.
The core weakness of browser-only pixel tracking:
Browser events are vulnerable. Ad blockers can prevent the pixel from loading. Safari’s Intelligent Tracking Prevention (ITP) restricts cookie-based attribution. iOS users who opted out of tracking after the ATT prompt in iOS 14.5 don’t get tracked at the browser level at all. The result: a meaningful portion of your real conversions simply don’t show up in Meta.
This is not a minor issue. Experienced ecommerce advertisers have reported seeing anywhere from 20% to 40%+ of purchase events go unreported when relying solely on the pixel, depending on their audience demographics and device mix. This gap is exactly what the Conversions API was built to close.
What Is the Conversions API (CAPI) — and How Does It Work with Shopify?
The Conversions API (formerly called the Facebook Server-Side API) sends event data directly from your server — or in Shopify’s case, from Shopify’s servers — to Meta, bypassing the browser entirely.
Instead of: Shopper’s browser → pixel fires → data goes to Meta
CAPI works like: Shopper completes action → Shopify server sends event → data goes to Meta
Because this communication happens server-to-server, it’s completely unaffected by ad blockers, browser privacy restrictions, or iOS tracking opt-outs. The data arrives at Meta reliably, with higher accuracy, and often with richer customer data (hashed email, phone number, etc.) for better matching.
Why CAPI matters for Shopify ad performance:
Meta’s algorithm optimizes campaigns based on the conversion signals it receives. More signals = smarter optimization = lower cost per acquisition. When browser tracking gaps cause Meta to “miss” conversions, the algorithm has less data to work with, which leads to slower learning, worse targeting decisions, and inflated CPAs.
Merchants who implement CAPI alongside their pixel typically recover a significant portion of those lost conversion signals, giving the algorithm a fuller picture of who is actually buying.
How CAPI connects to Shopify:
There are two main paths:
- Shopify’s native integration — Shopify has a direct server-side integration with Meta that sends Purchase events (and some other events) through their Checkout. This is enabled through the Facebook & Instagram channel in Shopify admin and requires no custom code.
- Third-party apps — For merchants who need more flexibility, multiple pixels, advanced event customization, or support for TikTok and Pinterest tracking alongside Meta, dedicated apps provide more control. Apps like Pixee – Multi Pixel & Meta Ads handle both browser-side pixel firing and server-side CAPI events from a single dashboard, supporting unlimited pixel connections, custom event tracking, and product feed sync for dynamic ads — all without requiring any code editing.
How to Navigate Facebook Events Manager: A Section-by-Section Breakdown
When you open Events Manager, here’s what you’re looking at:
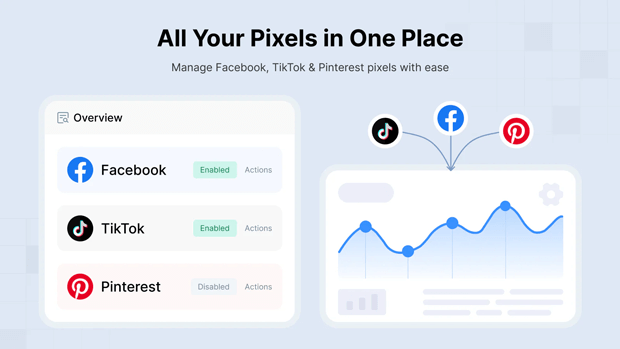
Overview Tab: Your Data Sources at a Glance
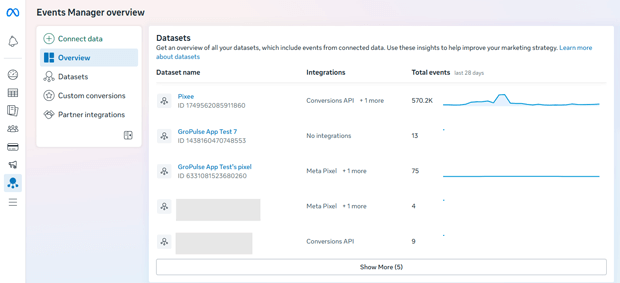
The Overview tab shows all active data sources — your pixel(s), CAPI connections, and any app or offline event sets. Each source displays its status (active, limited, error) and a summary of recent event volume. If a source shows a warning here, that’s your first signal to investigate.
Activity Tab: Real-Time Event Monitoring
This is where you watch events fire in real time. You can filter by event type (Purchase, AddToCart, etc.) and see individual events as they arrive, including which parameters were sent (currency, value, content_id, match_keys).
Use the Activity tab when:
- You’re setting up or testing a new event configuration
- You suspect an event isn’t firing correctly
- You want to verify that CAPI and browser events are both arriving
Test Events Tool: Verify Your Setup Before Going Live
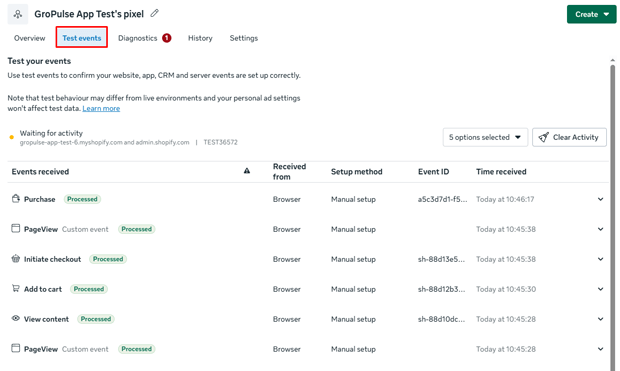
The Test Events tool is one of the most useful features in Events Manager and one of the most overlooked. You enter your store’s URL, open it in the browser provided, take actions (add to cart, go to checkout), and watch the events appear in real time with pass/fail indicators.
If a Purchase event fires from the browser pixel but not from CAPI, you’ll see it immediately here. If required parameters like value or currency are missing from a Purchase event, the tool flags it. Fix issues here before they affect live campaign data.
Settings Tab: Event Matching, Deduplication & Advanced Matching
Event Deduplication is critical when running both pixel and CAPI simultaneously. Because both are sending events, Meta will receive two signals for the same Purchase — one from the browser, one from the server. Without deduplication, Meta counts these as two separate purchases, inflating your reported conversions.
Deduplication works through an event_id parameter. Both the pixel and CAPI send the same unique event_id for the same customer action, and Meta uses this to recognize duplicates and count them only once.
Advanced Matching allows the pixel to send hashed customer data (email, phone, name) alongside events. This improves match rates significantly — meaning Meta can more reliably tie a conversion back to the ad that drove it, improving attribution and optimizing campaign delivery more accurately.
Enabling Advanced Matching is one of the highest-impact, lowest-effort configuration improvements most Shopify merchants aren’t using.
Setting Up Facebook Pixel + CAPI on Shopify: Step-by-Step
Here’s the practical workflow for getting this right.
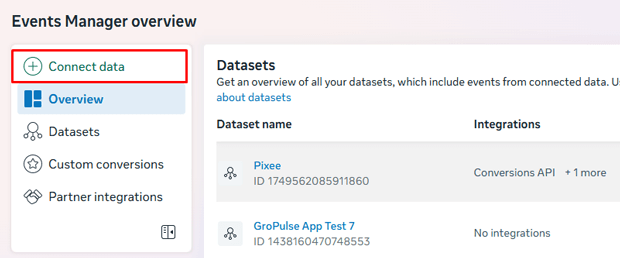
Step 1: Create your Facebook Pixel in Events Manager
In Events Manager, click “Connect data sources” → Web → Facebook Pixel. Give it a recognizable name (your store name works fine). You’ll get a Pixel ID — this is what you’ll need to connect it to Shopify.
Step 2: Connect to Shopify
For the native integration: Go to Shopify Admin → Sales channels → Facebook & Instagram. Follow the setup flow and connect your Business Manager account. Shopify will automatically install the pixel and enable their server-side purchase event.
For more advanced setups — particularly if you need multiple pixels, support for CAPI beyond just Purchase events, or multi-platform tracking — an app like Pixee allows you to connect your Facebook Pixel ID and enable Conversions API support, all from within Shopify admin without touching code. Pixee also supports syncing your product catalog to Meta automatically, which powers dynamic retargeting ads.
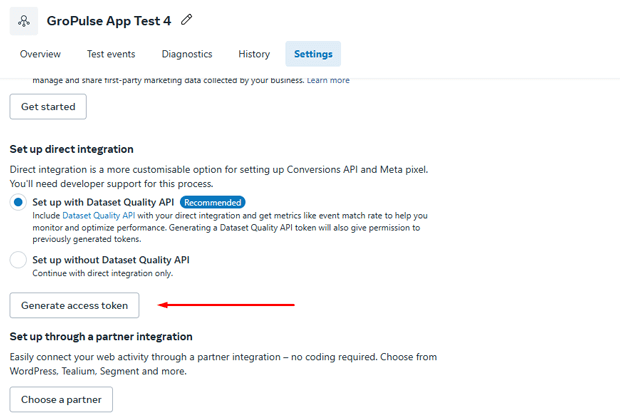
Step 3: Enable and verify CAPI
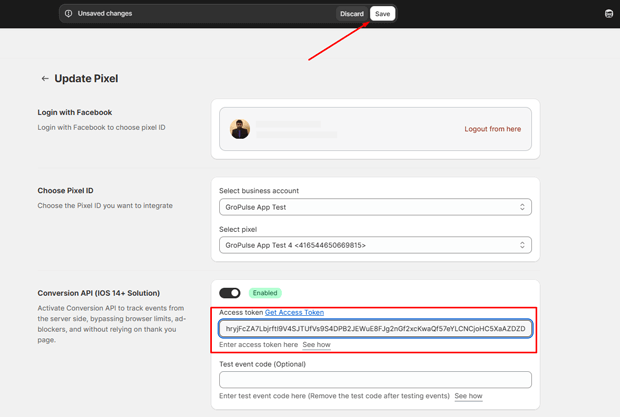
In Events Manager → your pixel → Settings → Conversions API → Click “Generate access token.”
Paste this token into the designated field in Pixee and hit Save button
If you’re using Shopify’s native channel, confirm the server-side events toggle is enabled. If you’re using an app, confirm CAPI is active in the app’s settings.
Step 4: Configure deduplication
Confirm that your pixel and CAPI both send matching event_id values for the same events. If using a dedicated app, this is typically handled automatically. If managing this manually, you’ll need to ensure your pixel’s fbq(‘track’, ‘Purchase’, {…}, {eventID: ‘unique_id’}) call sends the same ID as your CAPI event.
Step 5: Validate in Test Events
Use the Test Events tool to walk through your checkout flow. Confirm that Purchase, InitiateCheckout, and AddToCart all fire from both the browser pixel and CAPI. Check that no required parameters are missing.
Step 6: Check Event Match Quality Score
In Events Manager, each event has an Event Match Quality (EMQ) score ranging from 0–10. Higher scores mean Meta can more reliably match events to user profiles, which directly improves campaign performance. If your Purchase event EMQ is below 6–7, focus on enabling Advanced Matching and passing more customer data parameters through CAPI.
How to Read Event Match Quality Scores and Why They Affect Your ROAS
Event Match Quality deserves its own focus because most merchants ignore it until their campaigns underperform — and then wonder why.
EMQ scores are calculated based on how many and which customer data parameters are included with each event. Parameters like hashed email address, phone number, and client IP address help Meta match a conversion back to a real Meta profile.
A low EMQ score on your Purchase event means Meta is missing conversions in attribution. It can’t tell which ad drove that sale, so it can’t properly credit it. Campaigns that should show strong ROAS look worse than they actually are, which can lead merchants to incorrectly pause winning campaigns or misallocate budget.
Practically, improving EMQ comes down to:
- Enabling Advanced Matching on the pixel (collects hashed email from logged-in Meta users)
- Passing customer email and phone number through CAPI with purchase events (hashed before sending)
- Ensuring fbp and fbc cookies are captured and sent with events
Many Shopify merchants find this level of configuration complex to manage manually. This is one of the practical advantages of using a dedicated tracking app — Pixee, for instance, handles the collection and transmission of these match parameters automatically as part of its Conversions API support, without requiring custom API work.
Common Facebook Events Manager Errors Shopify Merchants Make (And How to Fix Them)
Error 1: Duplicate purchase events inflating conversion counts
Symptom: Meta reports far more purchases than Shopify order count. Cause: Browser pixel and CAPI both firing Purchase events without deduplication. Fix: Ensure both send matching event_id parameters.
Error 2: Missing required parameters on Purchase events
Symptom: Events fire but EMQ score is low; campaigns underperform. Cause: Purchase event is missing value, currency, or content_ids. Fix: Audit event parameters in the Test Events tool and ensure all required fields are populated.
Error 3: Pixel firing on wrong pages or not firing at all
Symptom: ViewContent or AddToCart events are missing or showing incorrect product IDs. Cause: Theme customization has broken pixel placement, or the pixel is installed in the wrong location. Fix: Use Test Events to walk through each page type and verify events fire with correct parameters.
Error 4: CAPI not connected or inactive
Symptom: Only browser events appear in Activity tab; no server-side events. Cause: CAPI connection was never completed or was disconnected. Fix: Re-verify connection in Events Manager Settings and in your Shopify channel or app configuration.
Error 5: Wrong pixel connected to ad campaigns
Symptom: Your campaigns are optimizing toward a test pixel or an old, inactive pixel. Fix: In Ads Manager, verify that each campaign’s tracking is tied to the correct, active Pixel ID that’s connected to your live store.
What Custom Events Are — and When Shopify Merchants Should Use Them
Standard events (Purchase, AddToCart, etc.) cover most use cases, but Meta also supports custom events for tracking actions that don’t fit standard categories.
For Shopify merchants, relevant custom events might include:
- Tracking when someone views a specific product collection
- Firing an event when a quiz or tool is completed (common in beauty and health DTC brands)
- Tracking upsell acceptance at post-purchase
- Monitoring when a loyalty program is joined or a referral link is clicked
Custom events can be used to build highly specific retargeting audiences or to measure micro-conversion steps in your funnel. They’re configured through Events Manager after being set up in your pixel code or tracking app.
For merchants using Pixee, custom event setup is available as part of the paid plan — allowing you to define and fire custom events without needing to write or edit pixel code manually.
Product Feed & Catalog Sync: How It Connects to Events Manager
One of the features inside Events Manager that many merchants overlook is the connection to your Meta product catalog — the foundation of dynamic ads.
Dynamic ads automatically show the right products to the right people based on what they’ve browsed or added to cart on your store. For this to work, three things need to be in place: your pixel firing ViewContent and AddToCart events with accurate content_id values, a product catalog in Meta with matching product IDs, and a catalog sync connection.
In Events Manager, you can see whether your pixel events are matching to catalog products — and if they’re not matching (due to ID mismatches or sync errors), your dynamic ads are showing blank products or not running at all.
For Shopify merchants running Meta dynamic retargeting, catalog sync is as critical as the pixel itself. Apps like Pixee handle this by automatically syncing your Shopify product catalog to Meta, ensuring product IDs in your pixel events match product IDs in the catalog feed.

Frequently Asked Questions: Facebook Events Manager for Shopify
What is Facebook Events Manager used for on Shopify?
Events Manager is where you manage the data sources (pixel and CAPI) that send your Shopify customer behavior data to Meta — it’s used to verify tracking is working, troubleshoot errors, and manage event configurations that power your ad campaigns.
Do I need both the Facebook Pixel and Conversions API on Shopify?
Yes. The pixel alone misses conversions from users on iOS devices and those using ad blockers. CAPI sends events server-side, recovering those lost signals and giving Meta’s algorithm more data to optimize your campaigns.
How do I check if my Facebook Pixel is working on Shopify?
Use the Test Events tool in Facebook Events Manager. Enter your store URL, walk through adding to cart and checking out, and verify that the expected events (ViewContent, AddToCart, Purchase) appear with the correct parameters.
What is Event Match Quality in Facebook Events Manager?
Event Match Quality (EMQ) is a score from 0–10 that measures how reliably Meta can match your conversion events to Meta user profiles. A higher score improves attribution accuracy and campaign optimization. You can improve it by enabling Advanced Matching and passing hashed customer data through CAPI.
Why are my Shopify purchase numbers different from Meta’s reported conversions?
Common causes include: duplicate events from pixel + CAPI without deduplication (inflating Meta numbers), browser tracking gaps from iOS/ad blockers (deflating Meta numbers), or attribution window differences. Check deduplication settings and EMQ scores first.
What is event deduplication and why does it matter?
Deduplication prevents Meta from counting the same purchase twice when both the pixel and CAPI send an event for it. It works by having both send a matching event_id — Meta then recognizes the duplicate and counts it only once.
Can I run multiple Facebook Pixels on Shopify?
Shopify’s native channel supports only one pixel. To run multiple pixels — useful for agencies managing multiple ad accounts, or merchants who want separate pixels for different ad strategies — you need a third-party app that supports multi-pixel connections.
How do I improve my Facebook Pixel’s Event Match Quality score?
Enable Advanced Matching in Events Manager, ensure your CAPI sends hashed email and phone with purchase events, and confirm that fbp and fbc parameters are being captured and transmitted correctly.
What is a Facebook product catalog and how does it connect to Events Manager?
A product catalog is a feed of your Shopify products in Meta’s system. It enables dynamic retargeting ads. Events Manager connects your pixel events (like ViewContent with content_id) to catalog products — if the IDs don’t match, dynamic ads won’t work correctly.
Is Shopify’s native Facebook integration enough, or do I need an app?
For basic single-pixel tracking with server-side Purchase events, Shopify’s native integration works. But for multiple pixels, advanced CAPI event coverage (beyond just Purchase), custom events, multi-platform tracking (TikTok, Pinterest), catalog sync control, and GDPR consent tools, a dedicated app provides significantly more capability.
What to Do After You’ve Configured Events Manager Correctly
Once your pixel and CAPI are firing correctly, events are deduplicated, and your EMQ score is solid, here’s how to build on that foundation:
- Audit your custom audiences: Now that your event data is accurate, rebuild any retargeting audiences that were built on incomplete data. AddToCart, ViewContent, and InitiateCheckout audiences are especially worth refreshing.
- Review your campaign optimization events: If campaigns were previously optimizing toward Purchase but Meta was only seeing 60% of real purchases, they may have been underperforming. With more complete data, reassess whether your current campaigns need to be relaunched or restructured.
- Set up Value-Based Lookalikes: With accurate Purchase event data including value parameter, you can build lookalike audiences weighted by purchase value — targeting people who look like your highest-revenue customers rather than just any purchaser.
- Monitor Events Manager weekly: Tracking configurations break. Shopify theme updates, new apps, and checkout changes can all affect pixel firing. Make Events Manager review a regular part of your ad operations routine.
Conclusion
Facebook Events Manager isn’t a tool you set up once and forget. It’s the foundation your entire Meta advertising operation runs on — and for Shopify merchants, getting it right means the difference between ad campaigns that compound their returns and ones that quietly bleed budget toward incomplete data.
The pixel and CAPI work best as a pair. Configured correctly, deduplicated, and verified through the Test Events tool, they give Meta’s algorithm the full signal it needs to find your buyers efficiently. Events Manager is where you make that happen.
Start with the basics — verify your pixel is firing the right standard events with correct parameters, enable CAPI, and check your Event Match Quality scores. From there, build toward custom events, catalog sync, and audience strategy. Each layer makes your ad data more valuable and your campaigns more competitive.