Google Tag Manager (GTM) is an essential tool for Shopify store owners who want to effectively track their store’s performance and manage marketing tags.
Recent studies show that while 76% of top-performing stores use GTM effectively, only 34% of all Shopify stores have implemented it correctly. Most store owners are missing out on crucial optimization opportunities.
With proper GTM setup, stores see up to 47% better marketing ROI and load their pages 23% faster compared to traditional tracking methods.
This comprehensive guide will show you two methods to implement GTM in your Shopify store: using the GroPulse GTM & Data Layer app or manual implementation.
What is Google Tag Manager (GTM)?
Google Tag Manager is a free tool from Google that revolutionizes how you handle tracking codes and marketing tags on your Shopify store. Think of it as a command center for all your marketing and analytics tools.
Instead of manually adding multiple code snippets to your website and constantly bothering your developer for updates, GTM lets you manage everything from one dashboard.
With GTM, you can easily add, update, or remove tracking codes like Google Analytics, Facebook Pixel, Google ads, or other tracking without touching your website’s code.
This not only saves time but also reduces the risk of errors that could break your site.
Plus, since GTM loads your tags efficiently, it helps keep your store running fast. Typically, stores using GTM see up to 30% faster load times compared to those implementing tags directly in their code.
Why Use Google Tag Manager On Shopify Stores?
Think of Google Tag Manager as your Shopify store’s central control panel for all things tracking and marketing. Instead of diving into code every time you need to add or update tracking pixels, GTM lets you manage everything through a user-friendly interface.
This is particularly valuable for Shopify store owners who run multiple marketing campaigns.
When you’re managing a Shopify store, you’re likely using various tools like Google Analytics, Facebook Pixel, Google ads, and other tracking.
Without GTM, adding each of these means editing your store’s code, which can be risky and time-consuming.
GTM eliminates this hassle by providing a single, secure platform to manage all your marketing and analytics tags.
Plus, it gives you the flexibility to make quick changes and run A/B tests without waiting for developer support.
Method 1: Quick Implementation Using GroPulse GTM & Data Layer App
The easiest and recommended method to implement GTM is using the GroPulse GTM & Data Layer app.
This method requires no coding knowledge and ensures proper data layer implementation.
Prerequisites:
- A Google Tag Manager account and container
- Your GTM container ID (format: GTM-XXXXXX)
Create Your GTM Account and Container (if you haven’t already)
Go to tagmanager.google.com
Click “Create Account”
Enter your account name (usually your company name). Choose your country

Enter your container name (usually your website name)

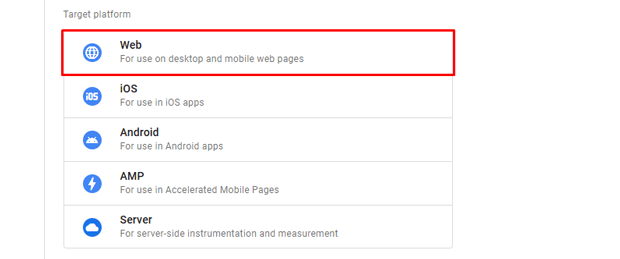
Select “Web” as the target platform
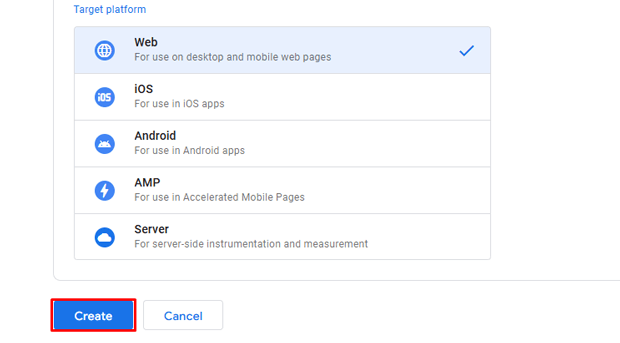
Click “Create”
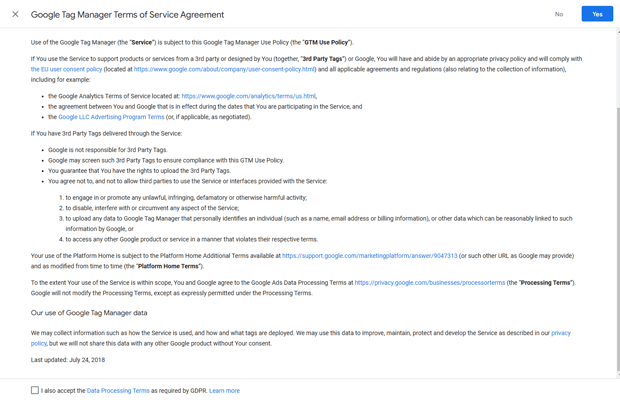
Accept the Terms of Service
Install GroPulse GTM & Data Layer
Visit the Shopify app store and
search for “GroPulse GTM & Data Layer”

Click “Install”
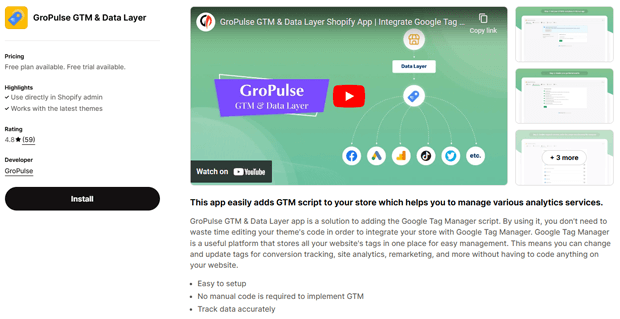
Follow the installation prompts to add it to your store
Activate the app in your store
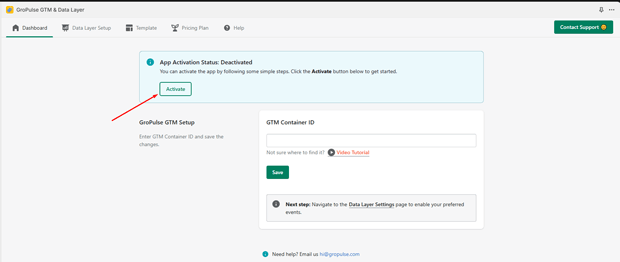
After installing the app, navigate to the app dashboard. Click the Activate button to enable the app in your store.
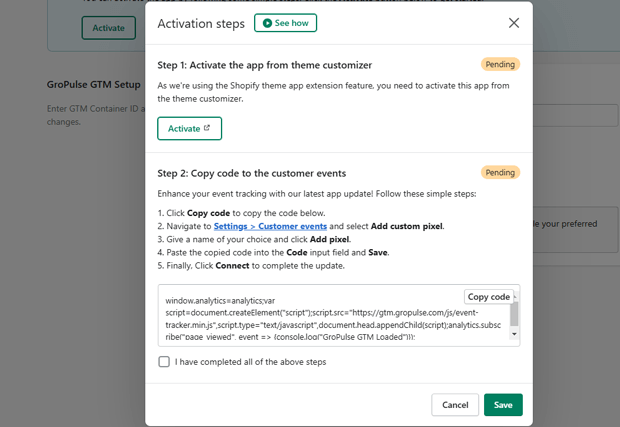
A popup will appear, guiding you through the app activation steps.
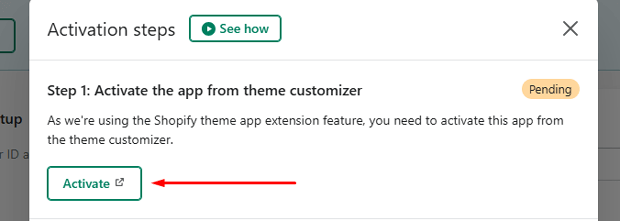
Click the Activate button to activate the app from theme customizer
Click Save to confirm the changes.

Return to the app dashboard to proceed with step 2. Click the Copy Code button to copy the required code.
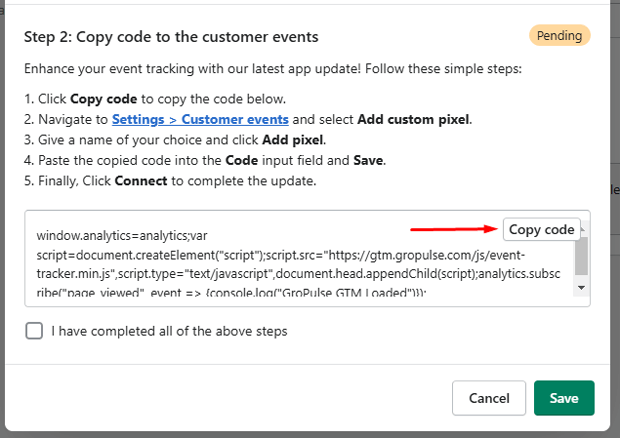
Click on the highlighted text: Settings > Customer Events to open the customer event configuration.
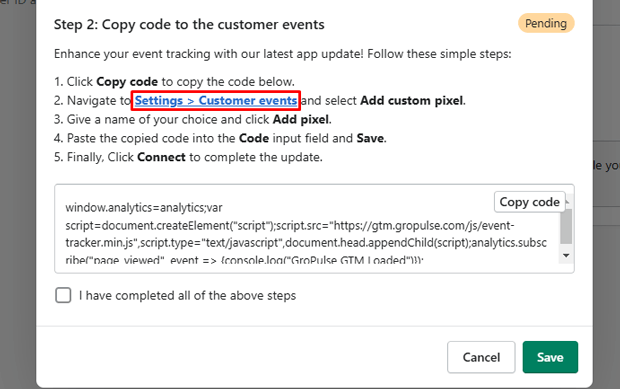
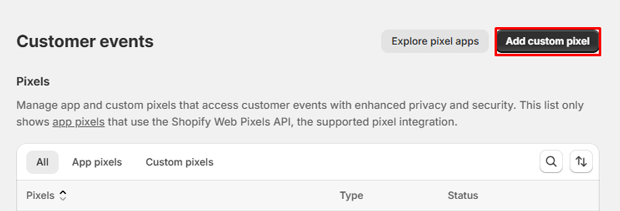
Click the Add Custom Pixel button.
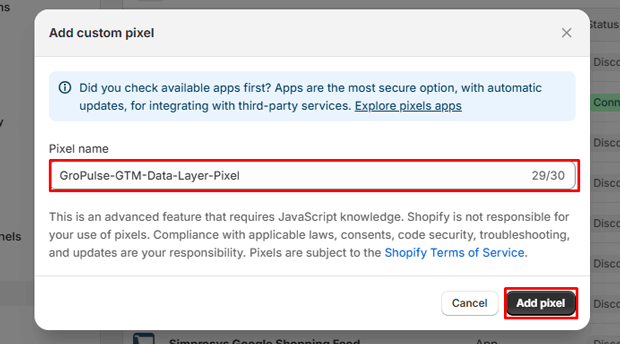
Enter a name for your custom pixel and click Add Pixel.
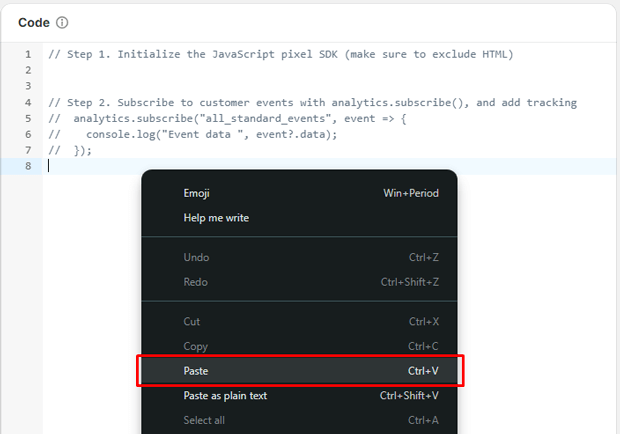
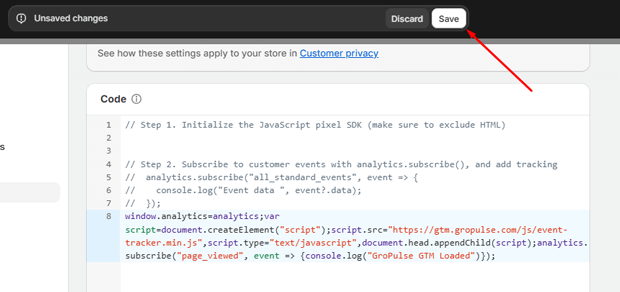
Paste the copied code into the Custom Pixel Code section.
Click Save
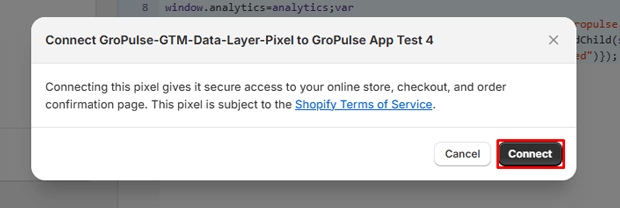
Click the Connect button to complete the app activation
3. Add Google Tag Manager
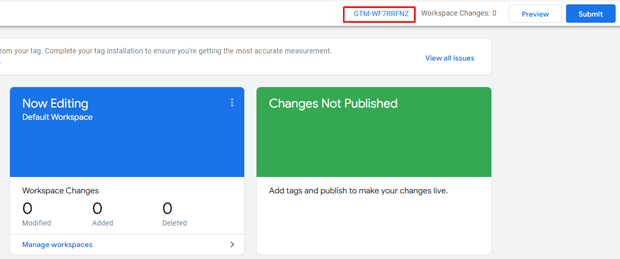
Go To your Google Tag Manager account. Copy your GTM Container ID.
Paste the GTM Container ID into the designated field in the app dashboard.
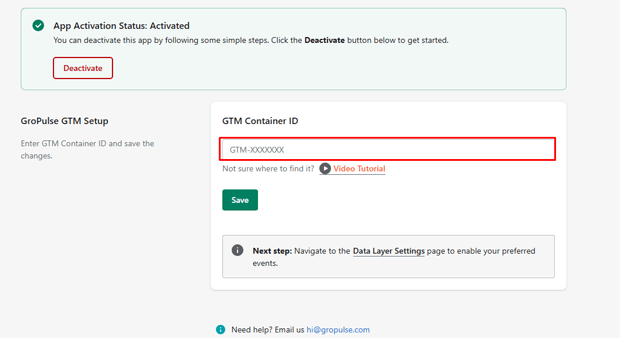
Click Save to complete the setup.

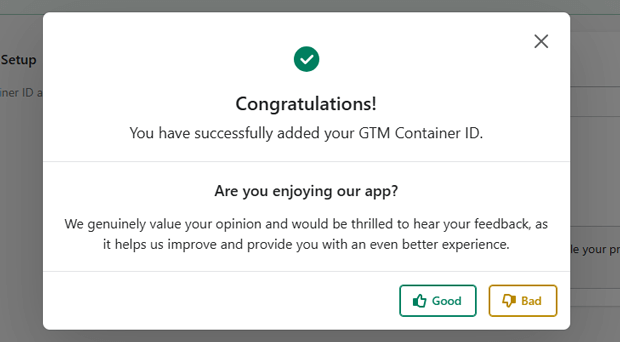
Congratulations! You have successfully set up Google Tag Manager in your store.
Verify Implementation
Install the “Tag Assistant” Chrome extension from Google
Visit your store’s frontend
Click the Tag Assistant icon
Verify that GTM is properly loading
That’s it! Your GTM implementation is now complete and ready for tag configuration.
Method 2: Manual Implementation (Editing the Shopify Theme File Code)
For store owners who prefer direct implementation or need custom configurations, the manual method gives you complete control over your GTM setup.
While this approach requires basic technical knowledge to edit code, it allows for more flexibility and advanced customizations.
Prerequisites:
- Access to your Shopify store admin
- Your GTM container ID
- Basic understanding of Shopify theme code
Step-by-Step Manual Implementation:
- Get GTM Code
Log into your Google Tag Manager account. Select your container from the dashboard
Click on “Container ID” in the top navigation

You’ll see two code snippets: one for the header and one for the body
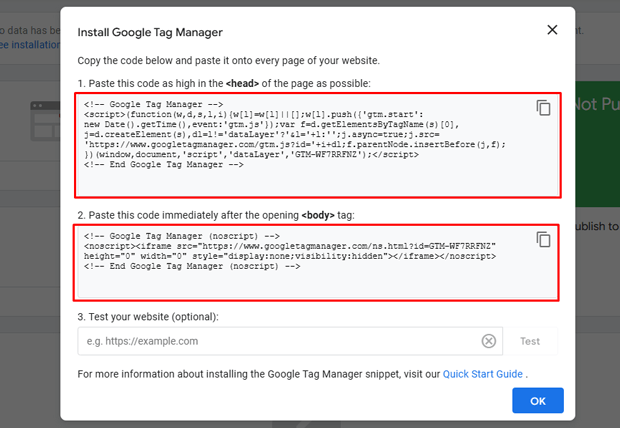
Copy both code snippets (you’ll need them for the next step)
Adding GTM to Your Shopify Theme File
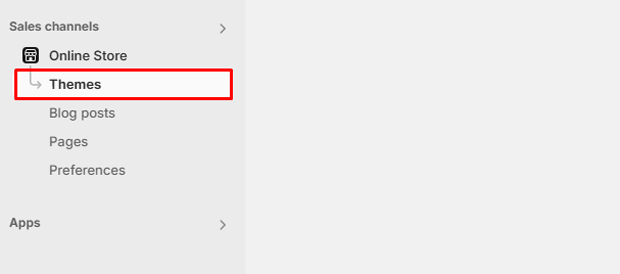
Sign in to your Shopify admin panel. Navigate to Online Store > Themes
Find your active theme and click “Actions” > “Edit code”
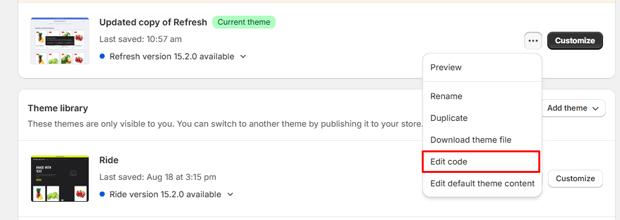
In the Layout section, locate and click on theme.liquid
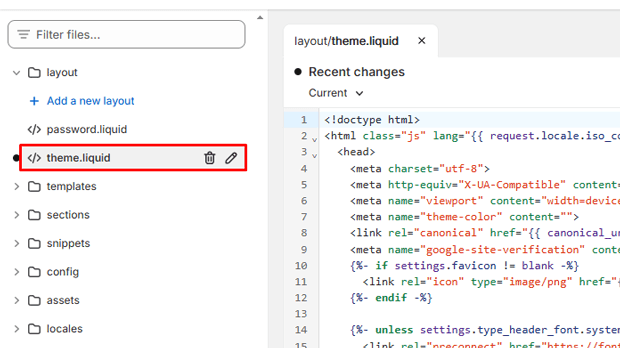
Find the <head> tag (usually near the top of the file). Paste the first GTM code snippet immediately after the opening <head> tag
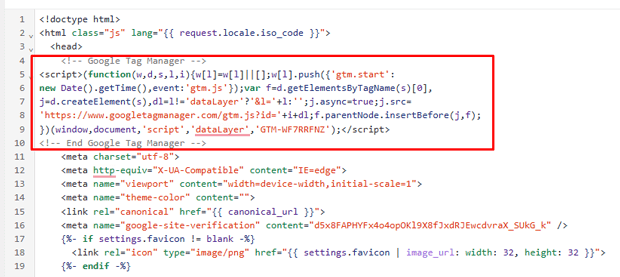
Find the <body> tag (below the head section)
Paste the second GTM code snippet (noscript) immediately after the opening <body> tag
Click “Save” to apply your changes
Important: After saving your changes, always test your store’s functionality to ensure nothing was broken during the implementation process.
Quick Tips for Manual Implementation:
- Always make a backup of your theme before making any code changes
- Test your store on multiple devices after implementation
- Use Google Tag Assistant to verify proper GTM installation
- Check your store’s loading speed before and after implementation
- Keep your GTM container ID in a safe place for future reference
Common Issues and Troubleshooting
Even with careful implementation, you might encounter some challenges with your GTM setup. Here are the most common issues and how to fix them:
GTM Not Loading
If your GTM isn’t working, first verify your container ID is correct – it should follow the format GTM-XXXXXX. Check your theme.liquid file to ensure the GTM code snippets are placed correctly: the main code should be in the <head> section, and the noscript tag right after the <body> tag.
If you set up GTM using the GroPulse app, make sure the app is active in your Shopify admin panel – a deactivated app will stop GTM from working.
If everything looks correct but still isn’t working, try clearing your browser cache and reloading the page.
Data Layer Issues
Data layer problems often cause tracking gaps. Make sure your data layer initialization code appears before the GTM code in your theme files.
Open your browser’s console (F12) to check for any JavaScript errors that might affect the data layer.
Double-check that all your data layer variables use proper JSON formatting – even a single misplaced comma can cause issues.
Tag Firing Problems
When tags aren’t firing correctly, GTM’s Preview mode is your best friend. Use it to debug by watching the firing sequence of your tags.
Check your trigger conditions carefully – a common mistake is using incorrect variable names or trigger rules. Make sure your variable names in GTM exactly match those in your data layer.
Best Practices for GTM Implementation
Implementing GTM correctly is just the first step. Following these best practices will help you maintain a clean, efficient, and reliable tracking setup for your Shopify store.
Organization
Keep your GTM container organized like a well-maintained filing system.
Use clear, descriptive names for your tags, triggers, and variables – for example, “FB_Pixel_PageView” instead of just “Pixel.”
Document each implementation with notes about its purpose and configuration.
Create folders to group related tags together, such as keeping all Facebook-related tags in one folder and Google Ads tags in another.
Performance
Your store’s speed matters.
Minimize the number of tags that fire on page load by using proper trigger conditions.
For instance, don’t fire purchase tracking tags on every page – only when needed.
Set up trigger exceptions to prevent unnecessary tag firing, and regularly audit your container to remove any unused or outdated tags.
This keeps your site running smoothly and your data clean.
Testing
Never publish changes without thorough testing.
Always use GTM’s preview mode to verify your changes work as intended.
Test across different browsers like Chrome, Firefox, and Safari, and don’t forget mobile devices – they often behave differently.
Take time to check your most important customer journeys, especially critical paths like checkout and conversion points.
FAQs
How to integrate Google Tag Manager with Shopify?
To integrate Google Tag Manager (GTM) with Shopify, you can use either the GroPulse GTM & Data Layer app for a no-code approach or manually edit the theme.liquid file in your Shopify theme to add the GTM container code.
Will Google Tag Manager slow down my Shopify store?
Actually, GTM can improve your store’s performance. Unlike traditional methods where multiple tracking codes load independently, GTM loads tags asynchronously and manages them efficiently. This means your store can load faster while still maintaining all your tracking needs.
What are the benefits of using Google Tag Manager on Shopify?
Google Tag Manager simplifies tracking code management, reduces the need for frequent code updates, improves site performance, and enables seamless integration of tools like Google Analytics, Facebook Pixel, and other marketing tags
Will Google Tag Manager slow down my Shopify store?
Actually, GTM can improve your store’s performance. Unlike traditional methods where multiple tracking codes load independently, GTM loads tags asynchronously and manages them efficiently. This means your store can load faster while still maintaining all your tracking needs.
Can I use Google Tag Manager with other Shopify apps?
Yes, GTM works seamlessly with other Shopify apps. In fact, it can help you manage tracking codes from multiple apps more efficiently. Just make sure you remove any duplicate tracking codes that might be installed directly through other apps.
Conclusion
Whether you choose the app-based or manual implementation, proper GTM setup is crucial for effective tracking and marketing.
The GroPulse GTM & Data Layer app offers the easiest way to implement, while manual installation provides more control over the setup process.
Choose the method that best fits your technical expertise and requirements.
Remember to regularly monitor your GTM setup and keep your tags updated to ensure optimal performance and accurate tracking of your Shopify store’s performance.


