Here’s a scenario that plays out constantly: a merchant installs Google Tag Manager, pastes the container code into their theme, and assumes tracking is live.
Weeks later, their Google Ads account shows suspiciously low conversions, GA4 is missing checkout events, and Facebook ROAS numbers look nothing like what Shopify reports.
Something is clearly broken , but where?
The problem almost always traces back to the same root cause: understanding that GTM exists is very different from understanding how it works.
Tags, triggers, variables, data layers, and versions aren’t just jargon. They’re the architecture that determines whether your tracking is accurate or completely unreliable.
For Shopify merchants running paid ads, inaccurate tracking isn’t just a technical annoyance , it’s a revenue problem.
When Google’s Smart Bidding algorithm or Facebook’s optimization engine receives bad conversion signals, your campaigns make bad decisions. Budget gets wasted on audiences that don’t convert.
High-performing products get starved of spend. Your ROAS looks worse than it actually is, or occasionally better, which leads to scaling campaigns that are secretly losing money.
This tutorial covers every foundational GTM concept , explained specifically through the lens of a Shopify store , so you can build a tracking setup that works reliably and gives your ad platforms the clean data they need to perform.
What is Google Tag Manager for Shopify?
Google Tag Manager is a free tag management system that lets Shopify merchants deploy tracking codes for analytics and advertising platforms, like GA4, Google Ads, and Facebook, from a single dashboard, without editing store code.
Summary:
- Google Tag Manager (GTM) is a free tool that lets you deploy and manage tracking tags on your Shopify store without editing theme code.
- This guide explains every core GTM concept , tags, triggers, variables, data layers, and versions , in plain English with Shopify-specific context.
- You’ll learn exactly how the GTM and Shopify data layer works together to power accurate conversion tracking across Google Ads, GA4, Facebook, TikTok, and more.
- Setting up GTM correctly from the start prevents double-counting, data loss, and misattributed revenue , three of the biggest tracking mistakes Shopify merchants make.
- No developer required , but you do need to understand how the pieces fit together before you start.
What You Need Before Setting Up GTM on Your Shopify Store
Before you touch a single setting in Google Tag Manager, there are a few things to have ready.
- A Google Tag Manager account and container: Head to tagmanager.google.com and create a free account. When prompted, create a “Web” container. GTM will generate a container ID formatted as GTM-XXXXXXX , this is the code that connects your store to your GTM workspace.
- A clear list of the platforms you want to track: Every platform you add to GTM (Google Analytics 4, Google Ads, Facebook Pixel, TikTok, Pinterest, etc.) will require its own IDs, access tokens, or measurement keys. Collect these before you start. Nothing slows setup down more than stopping mid-configuration to hunt for a Pixel ID.
- An understanding of Shopify’s current tracking architecture: Shopify has moved toward a “Customer Events” system and Custom Pixels.
As of 2025, traditional script injection via theme.liquid is supported for storefront pages, but checkout and post-purchase events now require either a Custom Pixel or a Shopify-approved app.
If you’re still running GTM purely through theme.liquid, you’re likely missing purchase and checkout data from Shopify’s checkout flow. - A testing browser profile: Create a separate Chrome profile , or use an incognito window , dedicated to testing GTM. GTM’s Preview Mode works by setting a debug cookie, and running it alongside your regular browsing can create confusing results.
Once you have these in place, you’re ready to actually understand what GTM is doing behind the scenes.
What Is Google Tag Manager? (And What It Isn’t)
Google Tag Manager is a tag management system , a container that sits between your Shopify store and all the third-party tools you use to track behavior and measure advertising performance.
Think of it like a switchboard. Instead of hardcoding tracking scripts for Google Analytics, Facebook, TikTok, LinkedIn, and Pinterest separately into your theme files , where they’re easy to lose track of, harder to update, and prone to creating conflicts , you add a single GTM script to your store.
GTM then becomes the central brain that decides when to fire which tracking codes, based on rules you define.
What GTM is not: GTM is not analytics software. It doesn’t store your data, show you reports, or tell you how your campaigns are performing. That’s Google Analytics 4’s job. GTM is purely the delivery mechanism , the postal service, not the mailbox.
This distinction matters in practice. When merchants say “my GA4 data is wrong,” the issue is often in GTM configuration, not in GA4 itself. Understanding that GTM and GA4 are separate tools with separate roles is the first step toward diagnosing tracking problems correctly.
Recommended Blogs for You:
👉 How to Track Conversions in GA4 for Shopify Dropshippers
👉 Best Conversion Tracking Apps for New Shopify Store Owners
👉 Google Ads Attribution Confusion? Get Clarity with Comprehensive Performance Reports
👉 How to Diagnose Google Ads Campaign in Shopify Using AdTrack
GTM Tags Explained: The Tracking Codes You Actually Deploy
A tag in Google Tag Manager is a snippet of third-party code that you want to fire on your Shopify store under certain conditions. Tags are the actual tracking scripts , the Facebook Pixel, the GA4 configuration tag, the Google Ads conversion tracking code, and so on.
The Three Most Important Tags for Shopify Stores
1. GA4 Configuration Tag This tag loads the Google Analytics 4 library on every page of your store. It sets the foundation for all subsequent GA4 event tags. It should fire on all pages (using the “All Pages” trigger, covered below) and contains your GA4 Measurement ID (G-XXXXXXXXXX).
2. GA4 Event Tags Each conversion event you want to track in GA4 , purchase, add_to_cart, begin_checkout, view_item , gets its own event tag. These tags listen for specific data layer events and forward that data to GA4. The event name in the tag must match the event name in your data layer push exactly, or nothing will track.
3. Google Ads Conversion Tag This tag fires specifically on your order confirmation page (the “thank you” page) and records a purchase conversion in your Google Ads account. It requires your Conversion ID and Conversion Label , both found in your Google Ads account under Goals > Conversions.
Tag Types Available in GTM
GTM comes pre-loaded with templates for the most common platforms, including Google Analytics, Google Ads, and Floodlight. For platforms not in the built-in library , like TikTok, Pinterest, or LinkedIn , you can use a Custom HTML tag to paste in the platform’s standard pixel code, or find community-built tag templates in the GTM Template Gallery.
Each tag has a Tag Configuration section (what code to fire and with what parameters) and a Triggering section (when to fire it). The triggering section is where triggers come in.
GTM Triggers Explained: The Rules That Tell Tags When to Fire
A trigger is a condition. It tells a tag: “fire when this specific thing happens on the store.” Without a trigger, a tag never fires. With the wrong trigger, a tag fires at the wrong time , which creates inflated, duplicate, or missing data.
The Most Common Triggers in Shopify GTM Setups
All Pages , Pageview Trigger Fires on every page load. Used for base tags like GA4 Configuration and Facebook Pixel base code. This ensures the tracking library is initialized before any other tags try to run.
Custom Event , Data Layer Trigger This is the most important trigger type for Shopify e-commerce tracking. It fires when a specific event is pushed to the data layer , for example, when your Shopify store pushes a purchase event after a completed order. You define the event name (e.g., purchase) and GTM listens for that exact string. When it matches, the associated tags fire.
DOM Ready / Window Loaded These fire after the page’s HTML structure has loaded (DOM Ready) or after all page resources have fully loaded (Window Loaded). Useful for tags that depend on specific page elements being present before they run.
Click Triggers Fires when a visitor clicks on a specific element , a button, a link, or an image. You can target by element ID, CSS class, link URL, or element text. Useful for tracking newsletter signups, “Add to Cart” button clicks, or promotional banner interactions.
Scroll Depth Fires when a visitor scrolls a certain percentage of the page. Useful for content engagement tracking.
The Most Common Trigger Mistake on Shopify
Many merchants accidentally attach a purchase conversion tag to an “All Pages” trigger instead of a purchase-specific data layer event or a page URL condition targeting /thank-you. The result: every page view on the store registers as a conversion.
This single mistake can inflate Google Ads conversion numbers by 10x, causing the platform to drastically misallocate your budget.
Always verify your conversion triggers in GTM’s Preview Mode before publishing any changes.
GTM Variables Explained: Dynamic Data That Makes Tags Smarter
A variable in GTM is a placeholder that pulls in a piece of dynamic information , a product price, a page URL, a user ID, an event name , so your tags can pass accurate, context-specific data rather than hardcoded values.
Think of variables as the “fill in the blank” component of your tracking setup. Instead of a GA4 event tag hardcoding a purchase value of $100, a variable pulls the actual transaction value from the data layer in real time.
Built-In Variables (Auto-Configured)
GTM includes a library of ready-to-use built-in variables. For Shopify tracking, the most useful built-ins include:
- Page URL , the full URL of the current page
- Page Path , the URL path without the domain (useful for thank-you page triggers)
- Click ID, Click Classes, Click URL , for click-based tracking
- Event , the name of the current data layer event
Enable the ones you need from GTM’s Variables panel under Built-In Variables.
Data Layer Variables (The Heart of E-Commerce Tracking)
Data layer variables are how your Shopify store communicates product and order information to GTM. When an add_to_cart event fires, the data layer might include the product name, variant ID, price, quantity, and currency.
You create Data Layer Variables in GTM that read specific properties from that data layer object , like ecommerce.value for order total, or ecommerce.currency for currency code.
For example: a GA4 purchase event tag needs to send transaction value, currency, and a list of items purchased. You’d create data layer variables for each of these fields and map them into the tag configuration. Without this, GA4 receives an event named “purchase” with no data attached , which is technically tracked but useless for optimization.
User-Defined Variables (Lookup Tables & Constants)
Beyond data layer variables, GTM lets you create:
- Constant variables , a fixed value reused across tags (like a GA4 Measurement ID, so you only need to update it in one place)
- Lookup tables , map one value to another (e.g., map page type to a tracking category)
- JavaScript variables , pull data from the page using custom JavaScript
The Shopify Data Layer: What It Is and Why It Determines Everything
The data layer is a JavaScript array (dataLayer) that acts as the communication channel between your Shopify store and GTM.
Whenever something significant happens on the store , a product is viewed, added to cart, checked out, purchased , your store pushes a structured data object into the data layer.
GTM listens for these pushes and uses the information they contain to fire the right tags with the right data.
Here’s a simplified example of what a data layer push looks like after a purchase:
dataLayer.push({

  event: 'purchase',

  ecommerce: {

    transaction_id: '12345',

    value: 89.99,

    currency: 'USD',

    items: [

      {

        item_name: 'Organic Face Serum',

        item_id: 'SKU-789',

        price: 89.99,

        quantity: 1,

        item_category: 'Skincare'

      }

    ]

  }

});
GTM sees the event: ‘purchase’ push, fires all tags with a matching custom event trigger, and passes the ecommerce object fields through your data layer variables to the right platforms.
Why Shopify’s Default Data Layer Falls Short
Shopify doesn’t include a robust, GA4-compatible e-commerce data layer out of the box. Its native tracking captures basic storefront events, but the data structure isn’t optimized for multi-platform advertising tracking or server-side event matching.
For merchants running campaigns across Google, Facebook, TikTok, and Pinterest simultaneously, a structured, feature-complete data layer is essential.
This is where dedicated tools become genuinely useful. GroPulse GTM & Data Layer is a Shopify app built specifically to solve this problem.
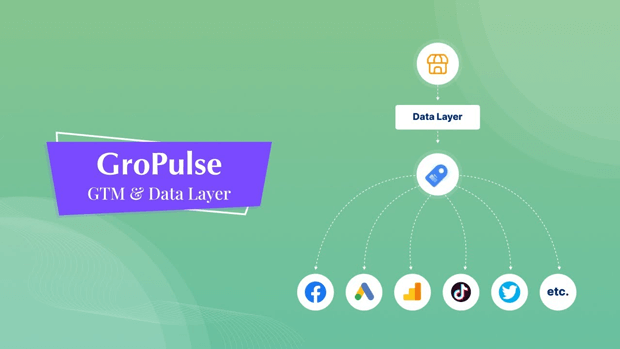
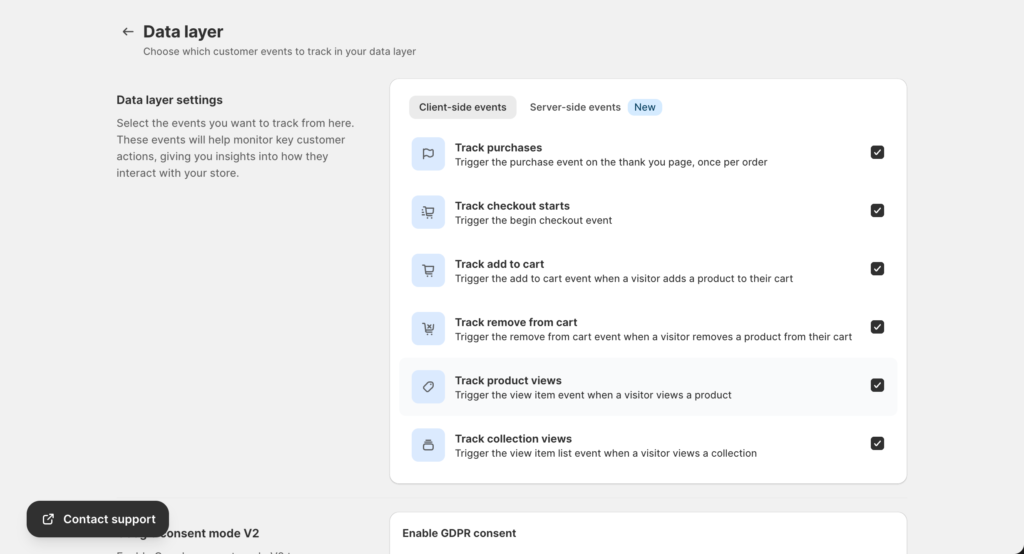
It injects a complete, standard e-commerce data layer into your store , covering purchase, begin_checkout, add_to_cart, remove_from_cart, view_item, and view_item_list events , without requiring any theme code edits.
Each event includes rich product data: item name, variant ID, price, currency, brand, up to four category levels, quantity, and position index. It also uses a custom data layer name (groPulseGTMDatalayer) to prevent conflicts with other scripts already running on your store.
For merchants who don’t want to build and maintain a data layer from scratch , which can take a developer several days to do properly , a tool like this establishes the data foundation that every other part of your GTM setup depends on.
How the GTM 1-Click Template Generator Changes the Setup Game
One of the most time-consuming parts of a full GTM setup is manually building all the tags, triggers, and variables for each advertising platform.
For a store tracking GA4, Google Ads conversions, Google Ads remarketing, Facebook, TikTok, and Pinterest , that’s easily 50 to 70 individual GTM configurations to get right. It takes hours, and each one is an opportunity for a misconfiguration.
A much faster approach is using a pre-built GTM container template , a JSON file that contains all the tags, triggers, and variables pre-configured and ready to import.
You import the JSON into your GTM workspace, enter your platform IDs, and publish. What would normally take a full day of configuration can be done in minutes. GroPulse’s 1-click Google Tag Manager (GTM) template generator does exactly this.
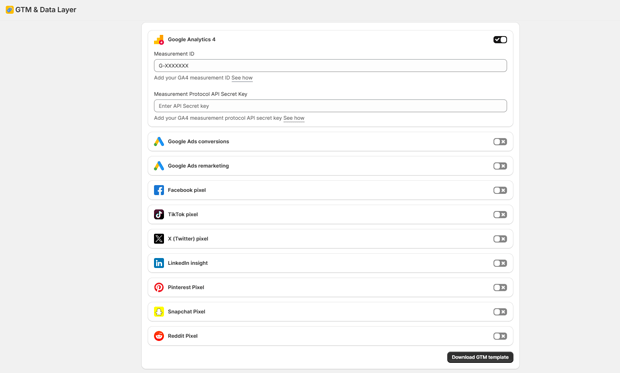
After entering your IDs for each platform (GA4 Measurement ID, Google Ads Conversion ID, Facebook Pixel ID, TikTok Pixel ID, etc.), it generates a GTM container JSON file with 40+ pre-built tags.
You import it into GTM with one click , no manual tag building required. This is particularly valuable for agencies managing multiple client stores, where reproducing the same GTM setup repeatedly across different workspaces adds up to substantial time lost.
GTM Versions Explained: Your Safety Net for Every Change You Make
Every time you publish changes in GTM, the system creates a version , a snapshot of your entire container at that moment in time. Versions serve as a complete audit trail and, critically, a rollback mechanism.
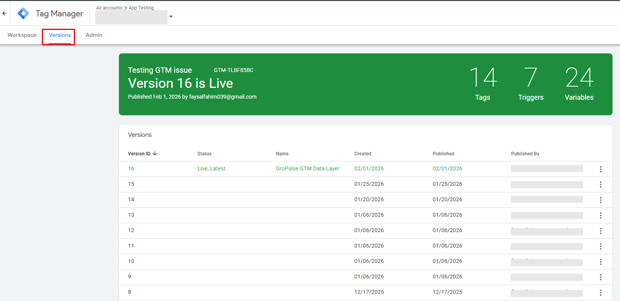
If you publish a new tag and it causes conversion tracking to break, you don’t have to frantically reverse-engineer what changed. You open GTM’s version history, find the last working version, and click “Publish” on it. Your tracking is restored in seconds.
Best Practices for GTM Versions on Shopify Stores
- Name every version before publishing: GTM lets you add a name and description when you publish. Use this. “Added Facebook CAPI tags” or “Fixed checkout trigger bug , Nov 2024” is infinitely more useful than “Version 14” when you’re troubleshooting at midnight before a major sale.
- Never edit your live container in “Workspace” without testing first: Always use GTM’s built-in Preview Mode to validate that new tags fire correctly , and that existing tags still fire correctly , before hitting publish. Preview Mode opens your Shopify store in a special debug view where you can watch every data layer event and tag fire in real time.
- Create a staging workspace for major changes: GTM supports multiple workspaces within a single container. For significant restructures , like overhauling your e-commerce tracking or adding server-side events , do the work in a separate workspace, test thoroughly, then merge into your default workspace.
- Document your version history externally for team environments: In agencies or larger e-commerce teams where multiple people have GTM access, maintain a brief changelog outside of GTM itself (a shared Notion doc, a spreadsheet). This prevents two team members unknowingly working on conflicting changes in the same workspace.
What Is Server-Side Tracking and Why Does It Matter for Shopify Merchants?
Standard GTM setup is client-side: tracking scripts run in the visitor’s browser. This has worked for years, but three converging trends have made purely client-side tracking increasingly unreliable:
- Ad blockers: are now used by roughly 40% of desktop users globally, according to data from PageFair and various industry reports. When a visitor has an ad blocker installed, Facebook Pixel and Google Ads tags running through GTM may be partially or completely blocked , and those conversions disappear from your reporting.
- Browser-level privacy restrictions: like Safari’s Intelligent Tracking Prevention (ITP) and Firefox’s Enhanced Tracking Protection limit how long first-party cookies remain valid, degrading attribution over time. A customer who visits your store, leaves, and comes back three days later may appear as a new visitor in your data.
- iOS 14+ App Tracking Transparency: further restricted the signal Facebook receives from iPhones, making Facebook’s pixel-only conversion data significantly less reliable for iOS audiences.
Server-side tracking solves these problems by sending conversion events directly from the server to advertising platform APIs , bypassing the browser entirely. A purchase on your Shopify store sends data to Facebook’s Conversions API, Google’s Measurement Protocol, and TikTok’s Events API simultaneously, from the server, regardless of what the visitor’s browser is blocking.
GroPulse GTM & Data Layer handles this end-to-end for Shopify merchants.
When server-side events are enabled, the app collects the necessary browser matching parameters, generates a unique event_id shared between the client-side data layer push and the server-side API call.
Processes events asynchronously via a message queue , ensuring reliable delivery even during high-traffic periods like Black Friday.
Supported platforms include Facebook/Meta (Conversions API), GA4 (Measurement Protocol), TikTok Events API, Pinterest Conversions API, X/Twitter Events API, LinkedIn, and Reddit.
Google Consent Mode V2 and GDPR: What Shopify Merchants Must Get Right in 2025
If you’re selling to customers in the EU , or collecting data from EU visitors at all , Google Consent Mode V2 is no longer optional. Google began requiring it for EU advertisers in March 2024, and stores without it implemented correctly lose access to conversion modeling and audience features for EU traffic.
What Consent Mode V2 Actually Does
Consent Mode V2 sends consent state signals to Google’s ad platforms , specifically: ad_storage, ad_user_data, ad_personalization, and analytics_storage. When consent has not been granted, these signals default to denied, and Google’s tags operate in a limited mode that doesn’t store personal data or drop full tracking cookies. When a user accepts your cookie banner, the consent signals update to granted and full tracking resumes.
The critical piece many merchants miss: consent signals must be set before Google’s tags fire, not after. If your GTM container loads GA4 or Google Ads tags before consent is communicated, you’re still dropping cookies before consent , which is a GDPR violation regardless of having a banner on the page.
Implementing Consent Mode V2 Correctly in GTM
The standard implementation requires a Consent Initialization trigger in GTM , a special trigger type that fires before all other triggers on the page. You use this trigger to set default consent states (all denied) via the Google Consent Mode API. A separate trigger then updates consent to granted or denied based on the visitor’s choice in your cookie banner.
The complexity here is why many merchants use integrated solutions rather than building this manually.
Shopify’s Customer Privacy API manages consent state natively, and apps that integrate with it , like GroPulse , can handle the full consent flow: defaulting all signals to denied on page load, connecting to Shopify’s Customer Privacy API, and updating consent signals when the visitor interacts with the built-in GDPR consent banner.
The banner itself is fully customizable , banner text, button colors, privacy policy link , and can be configured to display globally, in specific regions, or EU-only.
Step-by-Step: Setting Up GTM on Shopify the Right Way
Step 1: Create Your GTM Container
Go to tagmanager.google.com, create a new account, and set up a Web container. Copy your container ID (GTM-XXXXXXX).
Step 2: Install GTM on Your Shopify Store
Option A , Manual installation: Add the GTM <head> snippet immediately after the opening <head> tag in your theme.liquid file. Add the <noscript> iframe snippet immediately after the opening <body> tag. This covers all storefront pages.
Option B , No-code installation via app: Apps like GroPulse GTM & Data Layer inject the GTM code via Shopify’s theme app extension system , which means no theme file editing at all. You toggle it on through the Shopify theme customizer. This approach is more reliable across theme updates, as theme edits can be accidentally overwritten when themes are updated.
Step 3: Set Up Your Data Layer
If you’re building from scratch, your data layer implementation goes in your theme files and needs to push GA4-format e-commerce events at the right moments (product page load, add-to-cart action, checkout initiation, purchase completion). Each push must be structured correctly and fire with accurate product data.
If you’re using GroPulse, the data layer is configured through the app’s dashboard , you toggle on each event type you want to track. The app handles the data layer pushes automatically.
Step 4: Set Up the Custom Pixel for Checkout Events
Shopify’s checkout pages , including the thank-you page , require a Custom Pixel to capture events. Go to Shopify Admin > Settings > Customer events > Add custom pixel. This is where you add the code that forwards checkout and purchase events from Shopify’s checkout environment into your GTM data layer.
Step 5: Configure Tags, Triggers, and Variables in GTM
For each platform you’re tracking:
- Create a variable for each data point you need (transaction value, currency, items array, etc.)
- Create a trigger for each event (purchase, add_to_cart, begin_checkout)
- Create a tag for each platform event, mapping variables to the platform’s required parameters
If using a pre-built template, import the JSON file, enter your IDs, and most of this is done for you.
Step 6: Test in GTM Preview Mode
Enable Preview Mode in GTM and open your Shopify store in the same browser. Walk through a purchase using Shopify’s test payment mode. In the GTM debugger panel, verify:
- That the right events appear in the data layer at the right moments
- That the correct tags fire on each event
- That no tags fire when they shouldn’t
Step 7: Verify in Platform Dashboards
Before publishing:
- GA4: Use the DebugView (Admin > DebugView) to watch events arrive in real time
- Google Ads: Use Tag Assistant or check the Conversions column for “Recent conversions”
- Facebook: Use Facebook’s Test Events tool in Events Manager
Step 8: Publish Your GTM Container
Name your version (“Initial e-commerce setup”), add a description, and publish. Your tracking is now live.
Expert Tips That Make GTM Perform Better on Real Shopify Stores
Clear the ecommerce object between pushes: Before pushing any e-commerce event to the data layer, push {ecommerce: null} first. This prevents product data from a previous event (like view_item) from bleeding into the next event (like add_to_cart). A single missed null push can cause your purchase events to include phantom products from earlier in the session.
Use event deduplication IDs: When running both client-side tags and server-side API calls for the same event, both must carry the same unique event ID. Ad platforms use this ID to deduplicate , recognizing that two incoming events represent one conversion, not two. Without it, every purchase could be counted twice, distorting your ROAS and feeding bad signals to bidding algorithms.
Don’t fire your Google Ads conversion tag on page view , fire it on the data layer event. Triggering the purchase tag when the thank-you page URL contains /thank-you will double-count conversions if a customer refreshes the page. Triggering it on the purchase data layer event , which fires once per session , is more reliable.
Separate your GTM workspaces by function. Use a “Default Workspace” for your stable, live configuration and create additional workspaces for experimental tags or in-progress setups. This prevents untested work from accidentally going live.
Audit your tags quarterly. Platforms release new tag versions, privacy requirements change, and Shopify itself updates its APIs. A tag that worked perfectly in 2023 may be deprecated or producing inaccurate data by mid-2025. Set a recurring calendar reminder to review your GTM container.
How to Troubleshoot the Most Common GTM Issues on Shopify
Problem: Conversion tag fires multiple times per transaction. Likely cause: Trigger is based on page URL rather than a data layer event. Customers who reload the thank-you page or return to it from an email trigger the tag again. Fix: Switch the trigger to a custom event trigger listening for your purchase data layer push, which fires once per session.
Problem: Data layer variables returning “undefined” in tag output. Likely cause: Variable path is incorrect. Check the data layer event structure in GTM’s Preview Mode , the variable path needs to match exactly, including capitalization. Fix: In GTM Preview Mode, click on the purchase event and inspect the raw data layer object. Map your variable to the exact property path shown.
Problem: GTM Preview Mode shows tags firing but conversions aren’t appearing in platforms. Likely cause: The tag configuration is correct but the data being passed is wrong or malformed. Check individual variable values in Preview Mode. Also check: Platform-level data validation tools (GA4 DebugView, Facebook Test Events, Google Tag Assistant).
Problem: No events appearing in the GTM debugger at all. Likely cause: GTM container code isn’t installed correctly on the page, or the container ID is wrong. Fix: Open your store in a browser, right-click > View Source, and search for your GTM container ID (GTM-XXXXXXX). If it’s not there, the installation is broken.
Problem: Purchase events tracking correctly in GTM but not in Google Ads. Likely cause: The Google Ads Conversion ID or Label is incorrect, or the tag isn’t passing a value. Fix: Verify the Conversion ID and Label against your Google Ads account (Goals > Conversions > select the conversion action > Tag setup). Check that your transaction value variable is correctly mapped.
What to Do After Your GTM Setup Is Live
Getting GTM live is the beginning, not the end. Here’s what to prioritize in the weeks after launch:
Validate data for 7–14 days. Compare conversion numbers across platforms: Shopify’s native order count, GA4, Google Ads, and Facebook should tell a reasonably consistent story (with expected differences due to attribution windows and cross-device behavior). Significant discrepancies signal a tracking problem to investigate.
Enable server-side tracking if you haven’t already. Once your client-side data layer is stable, server-side events are the single highest-leverage improvement you can make to tracking accuracy , particularly for Facebook, where pixel-only data has become less reliable since iOS 14.
Set up conversion modeling segments in GA4. GA4 includes built-in tools for understanding blended attribution across channels. Understanding which touchpoints contribute to purchases , not just the last click , helps you allocate ad spend more intelligently.
Build your remarketing audiences from the data layer. With accurate view_item, add_to_cart, and begin_checkout events flowing through GTM, you can build high-intent remarketing audiences in Google Ads and Facebook , visitors who added to cart but didn’t purchase, visitors who viewed a specific product category, high-value customers by order value. These are far more effective than broad interest-based audiences and are only possible with a reliable data layer.
Revisit your custom event tracking. Beyond standard e-commerce events, consider tracking micro-conversions: email newsletter signups, “Find Your Size” interactions, review submissions, or promotional banner clicks. These behavioral signals help you understand the full customer journey and identify friction points that standard purchase tracking misses entirely.
FAQ: Google Tag Manager for Shopify
What is Google Tag Manager and how does it work with Shopify?
Google Tag Manager is a free tool from Google that acts as a central hub for deploying tracking codes on your Shopify store. Instead of manually adding each platform’s script to your theme files, you add one GTM code snippet, then manage all other tracking tags from within the GTM interface.
Do I need a developer to set up Google Tag Manager on Shopify?
You don’t need a developer to set up Google Tag Manager on Shopify. With the Gorpusle GTM Data Layer app, you can handle everything without coding. The app automatically installs your GTM container and provides a complete e-commerce data layer for accurate purchase tracking, enhanced conversions, and multi-platform integrations. Instead of dealing with technical setup or custom development, you can simply install the app and manage your tracking easily from GTM.
What is the Shopify data layer and why do I need it?
The data layer is a JavaScript array that passes structured event data (product views, cart additions, purchases) from your Shopify store to GTM. Without it, GTM has no product or order data to send to your analytics and advertising platforms , your tags fire but carry no meaningful information.
What is the difference between a GTM tag, trigger, and variable?
A tag is the tracking code you want to fire (e.g., Facebook Pixel). A trigger is the rule that tells the tag when to fire (e.g., when a purchase event occurs). A variable is dynamic data the tag uses (e.g., the actual order value). All three work together to send accurate tracking data.
What is Google Consent Mode V2 and do I need it on Shopify?
Google Consent Mode V2 is a framework that lets Google’s tags operate in a privacy-safe mode when a user hasn’t consented to tracking. It’s required for EU merchants using Google Ads or GA4, and involves setting consent signals before any Google tags fire on the page.
How do I track Shopify checkout and purchase events in GTM?
What is Google Tag Manager and how does it work with Shopify?
Google Tag Manager is a free tool from Google that acts as a central hub for deploying tracking codes on your Shopify store. Instead of manually adding each platform’s script to your theme files, you add one GTM code snippet, then manage all other tracking tags from within the GTM interface.
What is the Shopify data layer and why do I need it?
The data layer is a JavaScript array that passes structured event data (product views, cart additions, purchases) from your Shopify store to GTM. Without it, GTM has no product or order data to send to your analytics and advertising platforms , your tags fire but carry no meaningful information.
What is the difference between a GTM tag, trigger, and variable?
A tag is the tracking code you want to fire (e.g., Facebook Pixel). A trigger is the rule that tells the tag when to fire (e.g., when a purchase event occurs). A variable is dynamic data the tag uses (e.g., the actual order value). All three work together to send accurate tracking data.
What is Google Consent Mode V2 and do I need it on Shopify?
Google Consent Mode V2 is a framework that lets Google’s tags operate in a privacy-safe mode when a user hasn’t consented to tracking. It’s required for EU merchants using Google Ads or GA4, and involves setting consent signals before any Google tags fire on the page.
What are GTM versions and how do I use them?
Every time you publish changes in GTM, a new version snapshot is created. Versions allow you to roll back to a previous working state if a change breaks your tracking. Always name your versions with a brief description of what changed to make rollback straightforward.
Can I track multiple ad platforms (Facebook, TikTok, Pinterest) from one GTM container?
Yes , GTM is designed exactly for this. Each platform gets its own set of tags in GTM, all sharing the same data layer variables. You can manage GA4, Google Ads, Facebook, TikTok, Pinterest, LinkedIn, Snapchat, and more from a single GTM workspace.
Conclusion: Build Your Tracking Foundation Before You Scale
Most Shopify merchants think about tracking only after their ads stop performing the way they expect. That’s the wrong order of operations.
Google Tag Manager , properly configured with a complete e-commerce data layer, accurate triggers, the right variables, server-side event support, and consent mode compliance , is the infrastructure that makes every other marketing decision more reliable.
It’s what lets Smart Bidding algorithms optimize on real purchase data. It’s what lets you confidently shift budget between channels because you trust what your attribution data is telling you. It’s what lets you scale paid acquisition without flying blind.