Configuring an ecommerce supply chain can quickly become overwhelming. Between fluctuating carrier surcharges, complex packaging constraints, and the technical settings inside your Shopify admin, many store owners inadvertently cut into their profit margins before their first package even ships.
Getting your logistics right requires balancing three core areas: setting up clean digital logic in your store backend, choosing cost-efficient physical materials, and building a structured daily fulfillment process.
To set up Shopify shipping and fulfillment, navigate to Settings > Shipping and Delivery to configure your locations, shipping profiles, and zones. Select a core strategy (free, flat-rate, or live carrier-calculated rates), optimize your package weights, and automate fulfillment documentation.
Summary
- Who this is for: New and growing Shopify DTC brands looking to clean up their supply chain operations.
- What you will learn: How to structure profitable shipping zones, balance packaging weight against carrier costs, and create a scalable routine for picking and packing.
- Practical outcome: An optimized, error-free checkout-to-delivery pipeline that safeguards margins and satisfies customer delivery expectations.
1. Choosing Your Shopify Shipping Rates Strategy
Your choice of shipping prices directly dictates your checkout conversion rates and net margins. According to aggregated data from the Baymard Institute, high extra costs—including shipping, taxes, and fees—are the single most common reason shoppers abandon an ecommerce cart during checkout.
Merchants generally rely on three foundational methodologies to structure their rates:
Free Shipping (With Thresholds)
Offering free shipping eliminates a major psychological barrier to purchase. To protect margins, successful stores typically implement an Average Order Value (AOV) Threshold. If your median order value is $50, setting a free shipping threshold at $75 rewards larger carts and covers the underlying carriage costs safely.
Flat Rate Shipping
Flat rate pricing assigns a fixed delivery cost based on the weight or total value of an order (e.g., $5.99 ground shipping on all orders). This strategy provides complete predictability for the buyer and works exceptionally well for stores selling products with uniform weights and dimensions.
Carrier-Calculated Shipping Rates
This approach connects your Shopify checkout directly to real-time carrier APIs (such as USPS, UPS, FedEx, or DHL). The system reads the combined weight of the items in the cart, evaluates the customer’s delivery zone, and pulls a live rate dynamically.
This ensures you never undercharge a buyer, though it can occasionally expose customers to high shipping quotes for remote geographic addresses.
The Best Shipping Strategies for Ecommerce Stores Compared
1. Free Shipping
- Best for: High-margin items and high average order value (AOV) stores
- Pros: Drastically reduces cart abandonment and encourages larger purchases
- Limitations: Can reduce profit margins if free shipping thresholds are set too low
2. Flat Rate Shipping
- Best for: Stores with standardized or uniform product catalogs
- Pros: Easy for customers to understand and provides predictable shipping costs
- Limitations: Requires careful pricing tiers to avoid undercharging for heavier shipments
3. Carrier-Calculated Shipping
- Best for: Stores selling fragile, oversized, or products with varying weights
- Pros: Ensures accurate shipping charges and helps recover actual shipping costs
- Limitations: Live shipping rates may increase checkout friction if prices fluctuate significantly
Recommended Blogs for You:
👉 How to Set Up Shipping on Shopify: Complete Guide 2025
👉 5 Must-Have Elements in a Professional Shopify Packing Slip
👉 Multi Language Shopify Invoices: The Cross-Border Selling Guide
👉 How to Set Up Shopify Invoices: A 5-Minute Professional Guide
2. Step-by-Step Shopify Shipping Profile and Zone Setup
Shopify structures its shipping settings using Profiles and Zones. A shipping profile allows you to isolate specific products that require unique handling rules, while a shipping zone isolates specific geographic regions that share the same price tiers.
Step-by-Step Profile Configuration
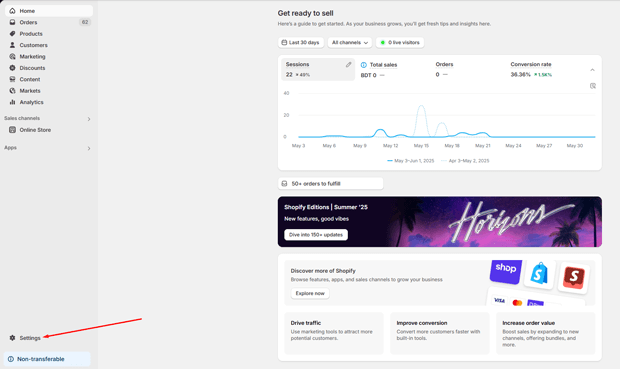
Log into your Shopify Admin dashboard and click Settings (gear icon) in the bottom left corner.
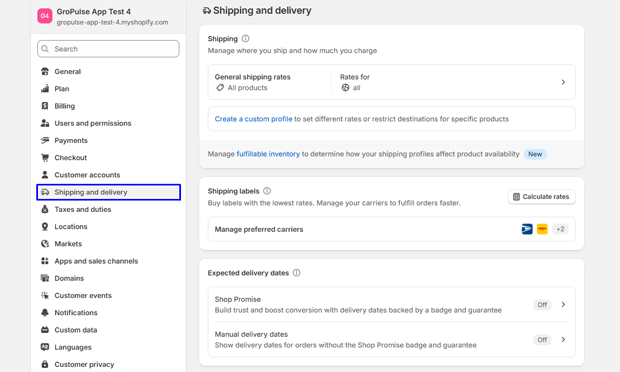
Select Shipping and Delivery.
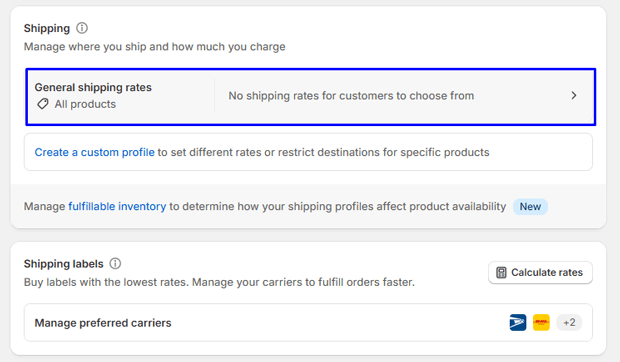
Under Shipping, locate the General shipping profile. This contains all standard products by default. (Note: If you have fragile or oversized items, click “Create new profile” to separate them).
Scroll to Shipping zones and click Create zone.
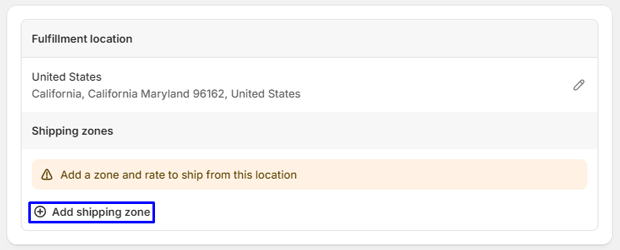
Name your zone clearly (e.g., “Domestic Ground” or “European Union”) and select the target countries or states. Click Done.
Inside your newly created zone, click Add rate.
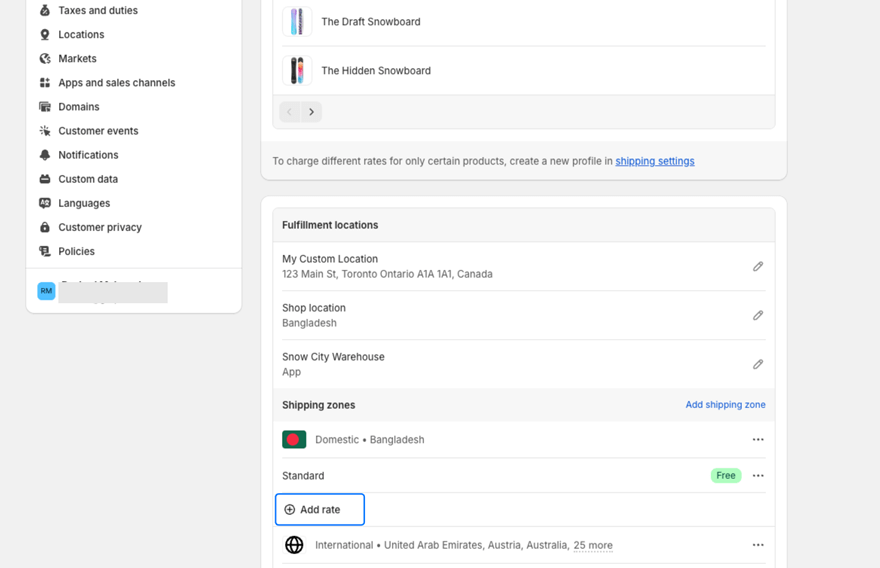
Choose between setting up your own flat rates or using a carrier app to calculate rates on the fly.
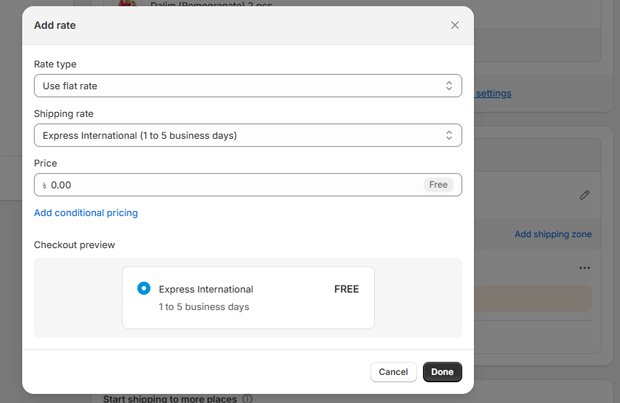
Set up your price or weight dependencies, then click Save.
Learn More: https://gropulse.com/how-to-set-up-shipping-on-shopify-complete-guide/
3. Optimizing Your Shopify Packaging Strategy
Physical packaging serves two critical functions: keeping your inventory safe during transit and controlling your final shipping metrics. Carriers charge based on both the absolute weight of a parcel and its dimensional footprint.
Understanding Dimensional Weight (DIM)
Carriers use an operational calculation known as Dimensional Weight to price packages based on the volume they occupy inside a delivery truck.
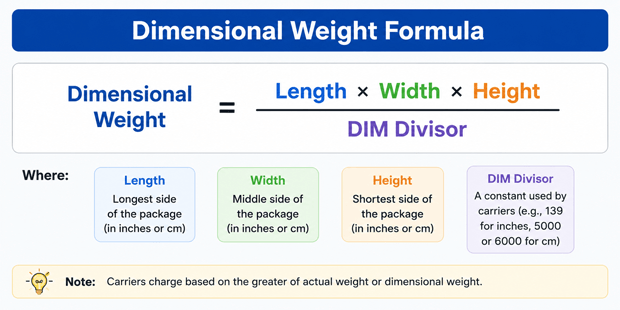
If you ship a lightweight product in an unnecessarily large cardboard box, the carrier will bill you based on the box’s size rather than its actual weight.
Choosing Shipping Supplies
- Poly Mailers: Best for apparel, textiles, and non-fragile items. They add virtually zero physical weight and take up minimal dimensional space.
- Corrugated Boxes: Non-negotiable for fragile electronics, ceramics, or multi-item bundles. Ensure you leave a 1-to-2-inch clearance margin on all sides for internal cushioning materials.
- Void Fill Options: Kraft paper, biodegradable packing peanuts, or air pillows prevent shifting during bumpy transit routes.
4. Establishing a Smooth Daily Fulfillment Workflow
Once an order bypasses your checkout, your physical fulfillment clock starts ticking. A disorganized warehouse or packing desk results in long processing windows, double-shipped packages, and wrong items arriving on doorsteps.
The Standard Pick-and-Pack Process
A clean fulfillment pipeline breaks down into four operational stages:
- Order Routing: Reviewing daily unfulfilled queues to identify inventory locations.
- Picking: Gathering products from shelves using a centralized pick list.
- Packing: Placing items safely into their designated mailers or boxes with clear documentation.
- Labeling & Shipping: Applying adhesive postage labels and tracking numbers before carrier hand-off.
[Order Recieved] ➔ [Generate Pick List & Packing Slips] ➔ [Pick Inventory] ➔ [Pack & Verify Contents] ➔ [Apply Carrier Label] ➔ [Carrier Scan]
The Critical Role of Packing Slips
Never omit a physical packing slip from an outbound box. Packing slips act as the physical source of truth for both your warehouse team and your customer. Warehouse pickers use them to verify quantities before taping a box shut, while customers use them to confirm everything they ordered has arrived safely.
For high-volume merchants, standard order sheets often lack clear formatting or necessary operational variables like item barcodes, custom location tags, or cross-border tax compliance details.
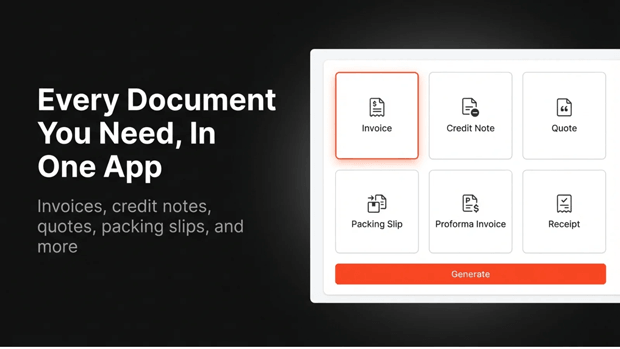
Many merchants leverage advanced documentation managers to smooth out this exact bottleneck. For example, using a dedicated extension like GP PDF Invoice Generator enables fulfillment operations to auto-generate crisp, barcode-supported packing slips, delivery notes, and shipping labels alongside their standard consumer invoices.
Having automated, pixel-perfect documentation ready the moment an order status updates prevents manual bottlenecks and keeps warehouse teams moving fast.
5. Troubleshooting Common Checkout Shipping Errors
Sometimes shipping configurations don’t execute as intended, leading to dropped checkouts. Here is how to diagnose and resolve frequent shipping configuration issues:
Shipping Error Matrix
1. “This Order Can’t Be Shipped to Your Location” Error at Checkout
- Probable Cause: The customer’s shipping address falls outside your configured shipping zones, or one or more products in the cart are not assigned to an active shipping profile.
- Corrective Action: Go to Settings → Shipping and Delivery and review your Shipping Zones. Make sure all countries or regions you serve are included, and verify that every product is assigned to an active shipping profile.
2. Calculated Carrier Rates Look Suspiciously High or Low
- Probable Cause: Your default package dimensions or weights are configured incorrectly in Shopify.
- Corrective Action: Navigate to Settings → Shipping and Delivery, then scroll to Saved Packages. Confirm that your default package dimensions and weights accurately match the boxes you use for shipping.
3. Free Shipping Rule Isn’t Triggering
- Probable Cause: Shopify calculates the free shipping threshold based on the post-discount cart total instead of the subtotal.
- Corrective Action: Update your coupon policy to clarify how free shipping is calculated, or reduce your minimum order threshold so it still applies after common discounts are deducted.
Final Recap: Keeping Your Shopify Logistics Profitable
Building a high-quality shipping engine requires continuous refinement. Set clean, transparent shipping profiles, use tight packaging that minimizes empty volume charges, and give your packing team clear, scannable documentation to prevent errors. Protect your margins at checkout, stay organized at the packing table, and your delivery metrics will scale smoothly alongside your brand.
Frequently Asked Questions
What is the difference between a shipping zone and a shipping profile in Shopify?
A shipping zone is a collection of geographic locations that share identical shipping rates. A shipping profile allows you to group specific products together so you can charge distinct rates for heavy, fragile, or specialized catalog items.
How do I offer free shipping on Shopify without hurting my profits?
Implement an Average Order Value threshold that sits roughly 15% to 25% higher than your standard average checkout value. This increases your margin per order, allowing you to absorb the carrier delivery fee safely.
Why do I need packing slips if customers get an email confirmation?
Email confirmations can sit unread in junk folders or look confusing. A physical packing slip inside the box serves as a functional picking guide for your packers and gives the customer an instant receipt to verify their order contents upon delivery.