Page targeting allows you to control exactly which pages of your Shopify store will load your custom code. This feature is useful when you need different code on different page types, or when you want to limit where certain scripts run.
How Page Targeting Works
By default, when no pages are selected, your code will load on all pages of your store. When you select specific pages, your code will only load on those selected page types.
Available Page Types
CodeUp supports targeting the following Shopify page templates:
| Page Type | Description | Example URLs |
|---|---|---|
| Home | Your store’s homepage | yourstore.com/ |
| Collection | Collection/category pages | yourstore.com/collections/summer-sale |
| Product | Individual product pages | yourstore.com/products/blue-shirt |
| Cart | The shopping cart page | yourstore.com/cart |
| Blog | Blog listing pages | yourstore.com/blogs/news |
| Article | Individual blog post pages | yourstore.com/blogs/news/my-article |
| Search | Search results page | yourstore.com/search?q=shirt |
| Pages | Static/custom pages | yourstore.com/pages/about-us |
| 404 | Page not found error page | yourstore.com/invalid-page |
Configuring Page Targeting
Step-by-Step Instructions
- Navigate to the Setup page in the CodeUp app
- Add your code to the Header code and/or Body code text areas
- Scroll down to the Select pages to apply section
- Check the boxes for the pages where you want your code to appear
- Click Save to apply your changes
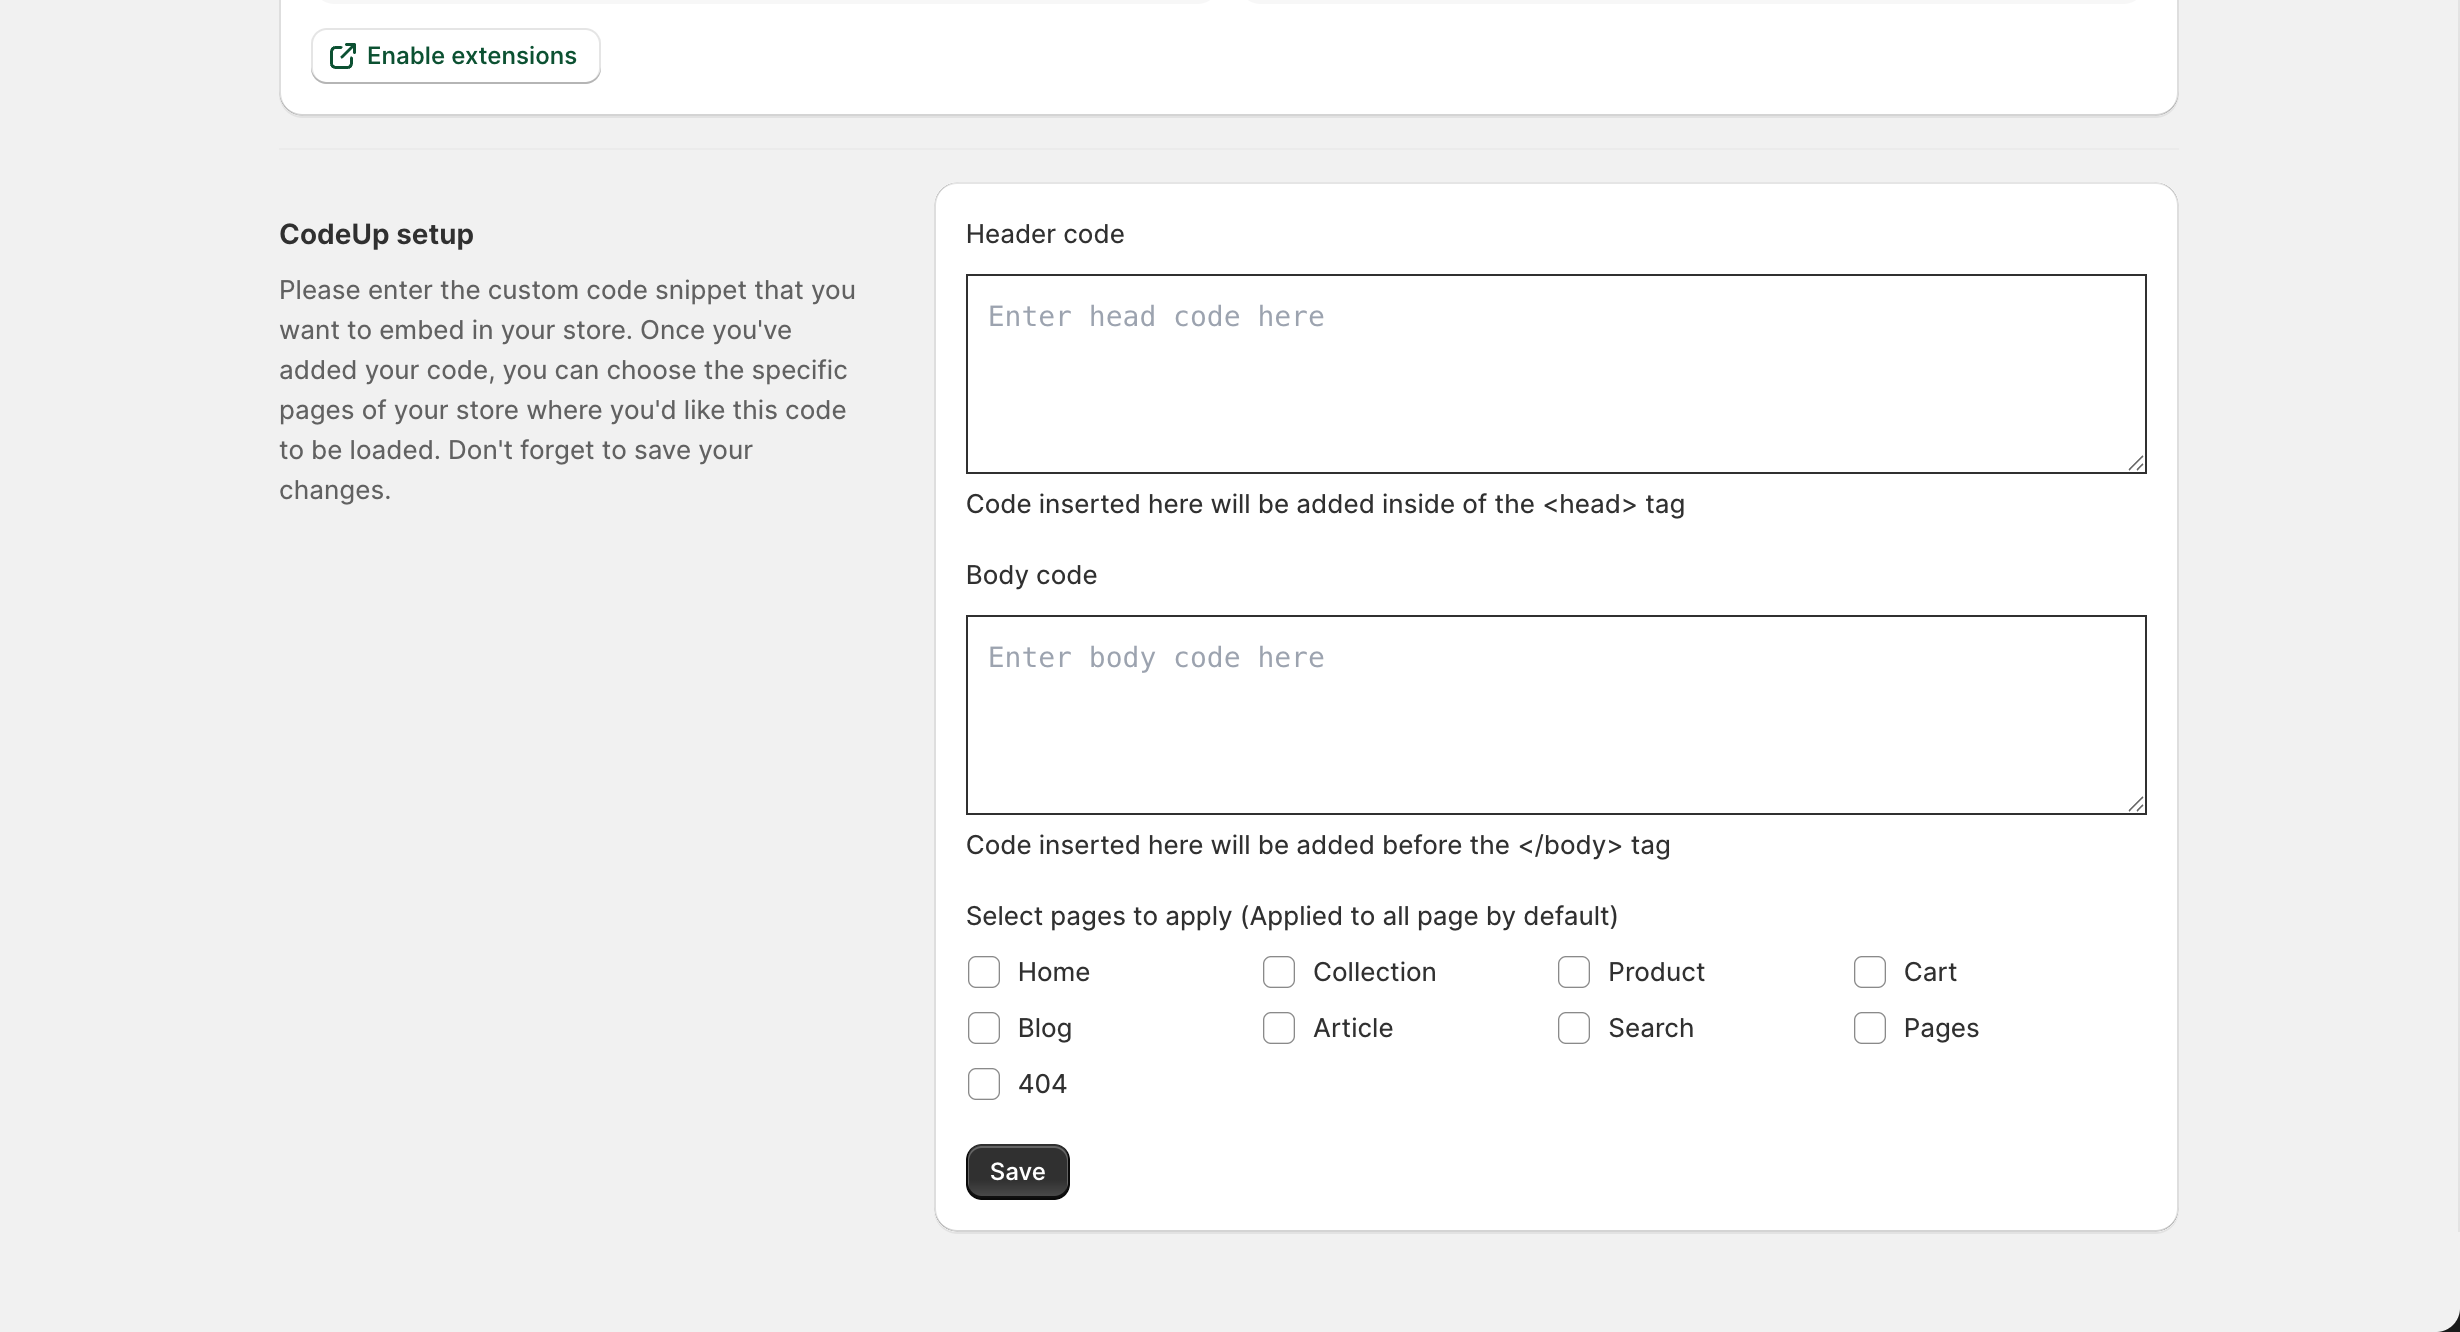
Default Behavior
When no pages are selected:
- Code loads on ALL pages of your store
- This is the default behavior
- Best for tracking codes that should run everywhere (like Google Analytics)
When specific pages are selected:
- Code loads ONLY on selected page types
- Other pages will not include your code
- Best for page-specific functionality or targeted scripts
Common Use Cases
Track All Pages (Analytics)
For analytics and tracking pixels that need to run on every page:
- Selection: Leave all checkboxes unchecked
- Result: Code loads on all pages
Suitable for:
- Google Analytics
- Facebook Pixel
- TikTok Pixel
- General site-wide tracking
Product Page Only
For code that should only run on product pages:
- Selection: Check only “Product”
- Result: Code loads only on product pages
Suitable for:
- Product-specific tracking events
- Product page customizations
- Review widgets that display on products
- Size guides or fit finders
Check only the “Product” checkbox to limit code to product pages only.
Cart and Checkout Related
For code that should run when customers are in the buying process:
- Selection: Check “Cart” and optionally “Product”
- Result: Code loads on cart page (and product pages if selected)
Suitable for:
- Cart abandonment tracking
- Upsell/cross-sell widgets
- Shipping calculator scripts
Content Pages Only
For code that should only run on blog and static pages:
- Selection: Check “Blog”, “Article”, and “Pages”
- Result: Code loads only on content pages
Suitable for:
- Reading time calculators
- Social sharing widgets for articles
- Content-specific styling
Homepage Only
For code that should only appear on your homepage:
- Selection: Check only “Home”
- Result: Code loads only on the homepage
Suitable for:
- Homepage-specific banners or popups
- Homepage sliders or carousels
- Seasonal/promotional scripts
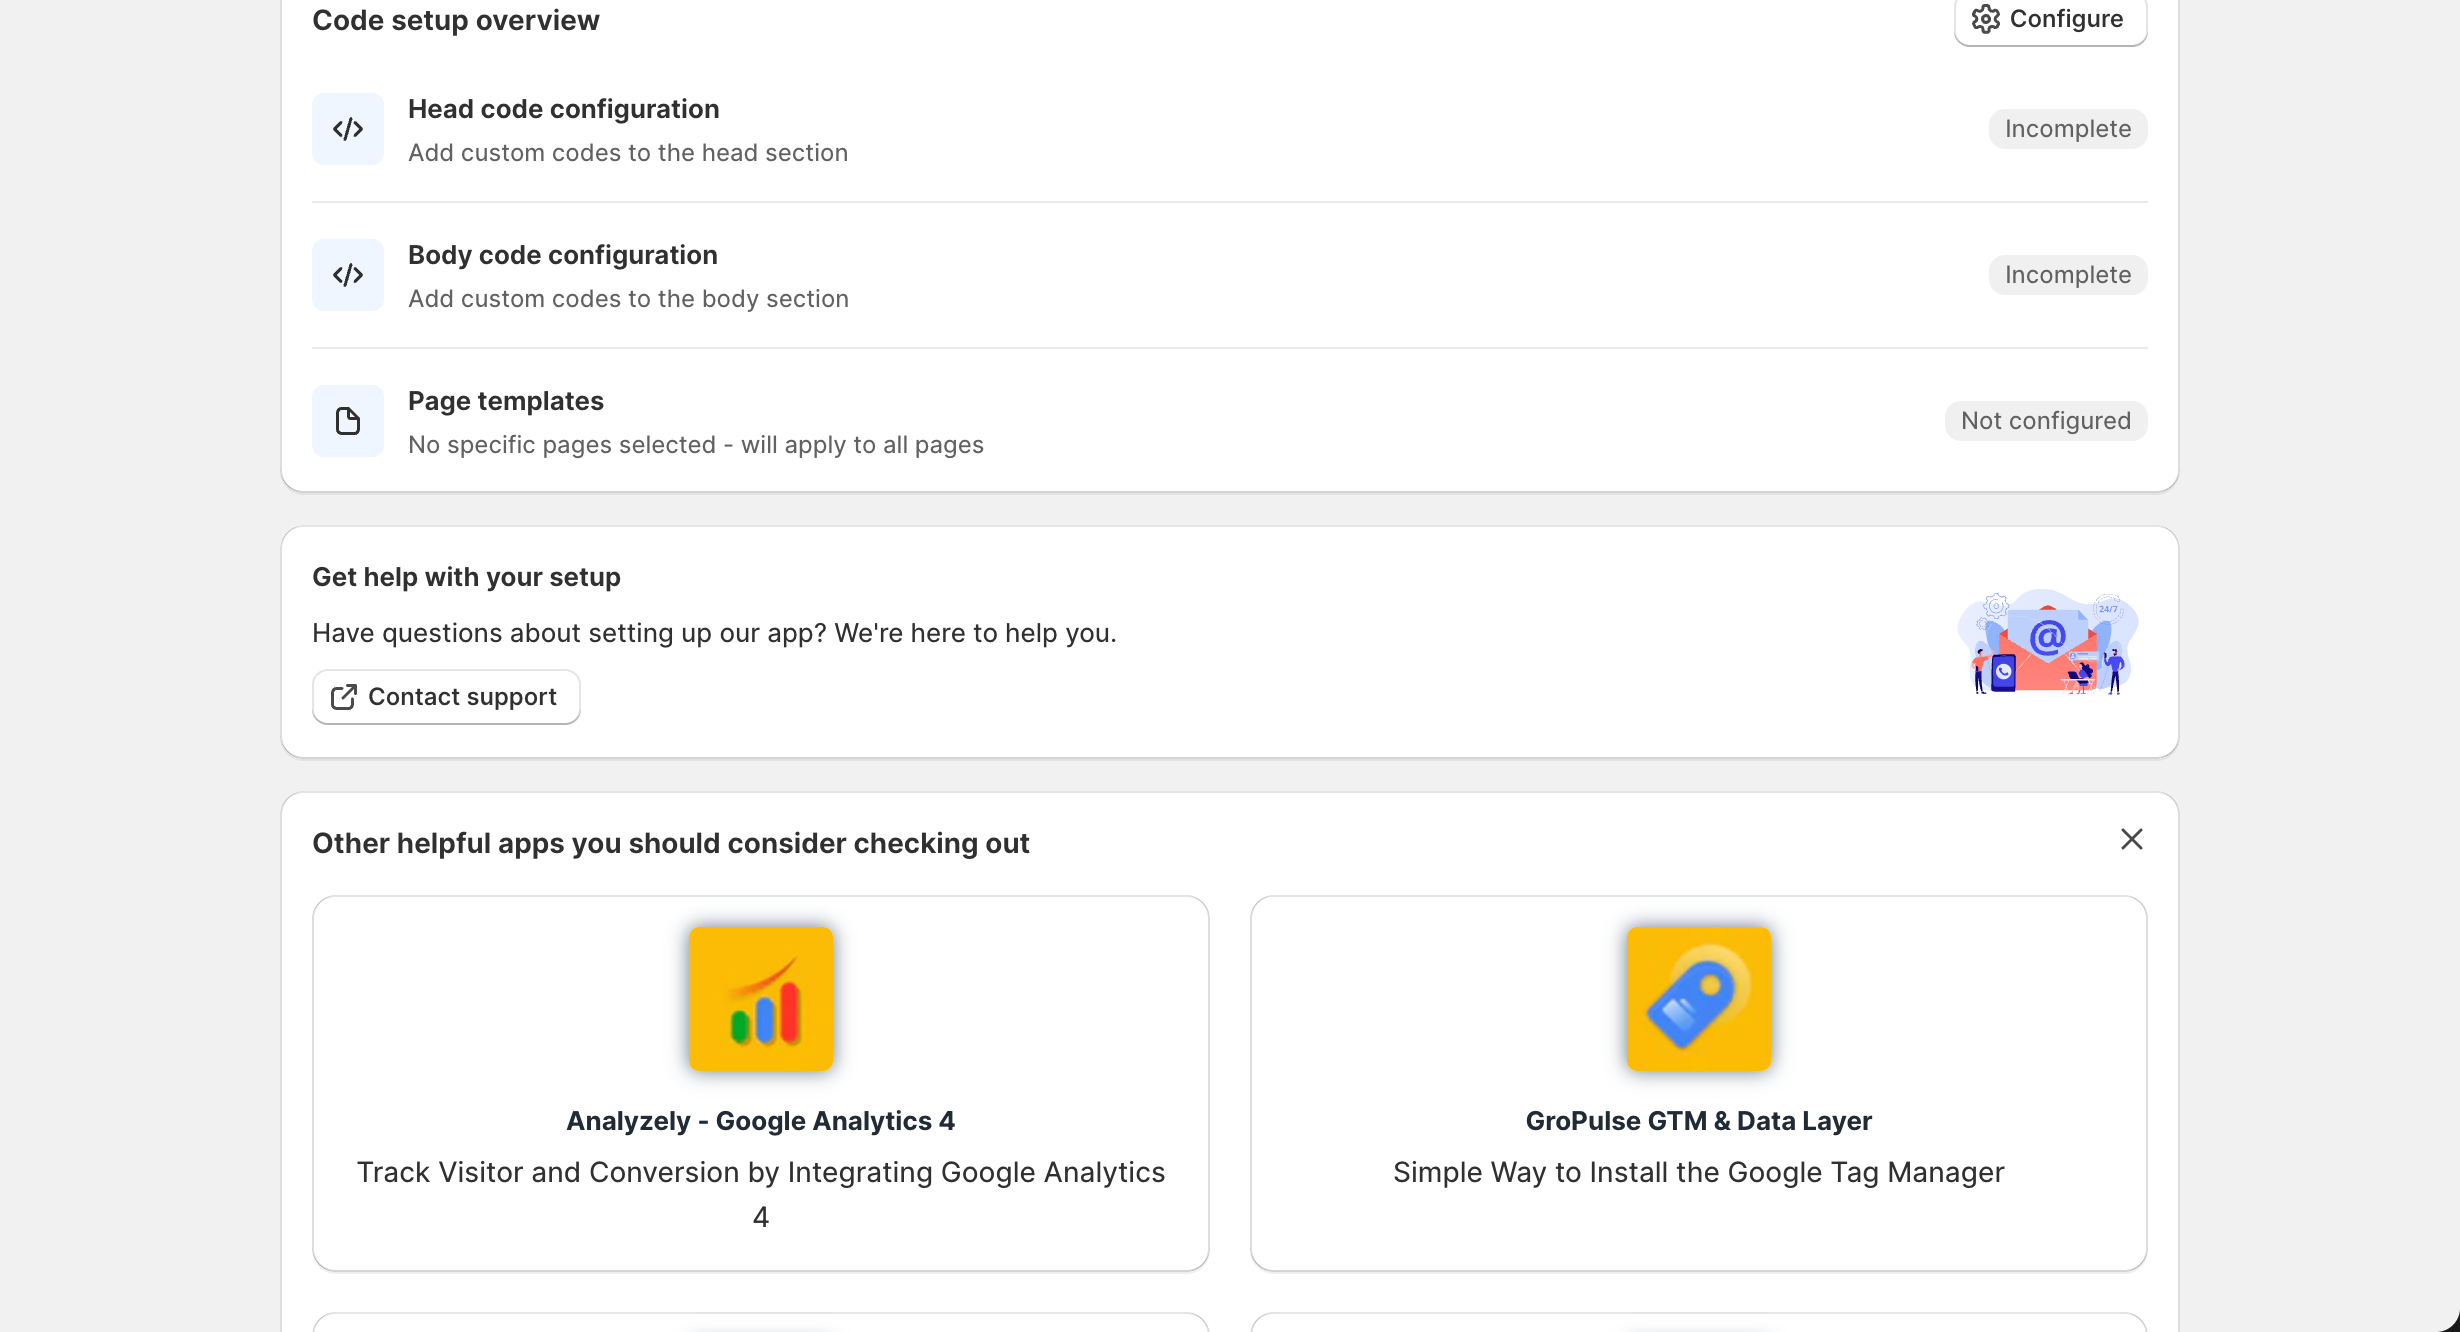
Viewing Your Page Targeting Configuration
Your current page targeting settings are displayed on the Dashboard in the Code setup overview section:
- Page templates row shows which pages have your code applied
- If specific pages are selected, you will see: “Applied to: Home, Product, Cart…”
- If all pages are targeted, you will see: “All pages”
Tips and Best Practices
Performance Optimization
- Be specific: Only load code on pages where it is needed
- Reduce overhead: Don’t load heavy scripts on pages that don’t need them
- Consider user experience: Page-specific code loads faster than bloated global scripts
Multiple Code Snippets
If you need different code on different pages, you have two options:
- Use conditional logic in your code: Add JavaScript that checks the current page before executing
- Prioritize: Add the most important/universal code and use page targeting for specific needs
Testing Your Configuration
After configuring page targeting:
- Save your changes
- Visit different page types on your store
- Check the page source (Ctrl+U or Cmd+U) to verify your code appears only where expected
- Use browser developer tools to confirm scripts are loading correctly
Troubleshooting Page Targeting
Code appears on all pages despite selecting specific pages
- Make sure you clicked Save after making changes
- Clear your browser cache and check again
- Verify the theme extension is enabled (see Theme Extension Management)
Code doesn’t appear on selected pages
- Confirm the theme extension (Head code or Body code) is enabled
- Check if your code has any errors that prevent it from rendering
- Verify you have code entered in the appropriate text area
Need more granular control?
If you need to target more specific pages (like a single product or collection), you can add conditional logic directly in your code:
<script>
  // Only run on a specific product
  if (window.location.pathname.includes('/products/specific-product-handle')) {
    // Your code here
  }
</script>
Related Guides
- Setting Up Custom Code – Learn how to add your code
- Theme Extension Management – Enable code injection
- Troubleshooting – Fix common issues