This guide explains how to add custom HTML, CSS, and JavaScript code to your Shopify store using CodeUp.
Accessing the Setup Page
To access the code setup page:
- Open the CodeUp app from your Shopify admin
- Click Setup in the navigation menu, OR
- Click the Configure button on the Dashboard
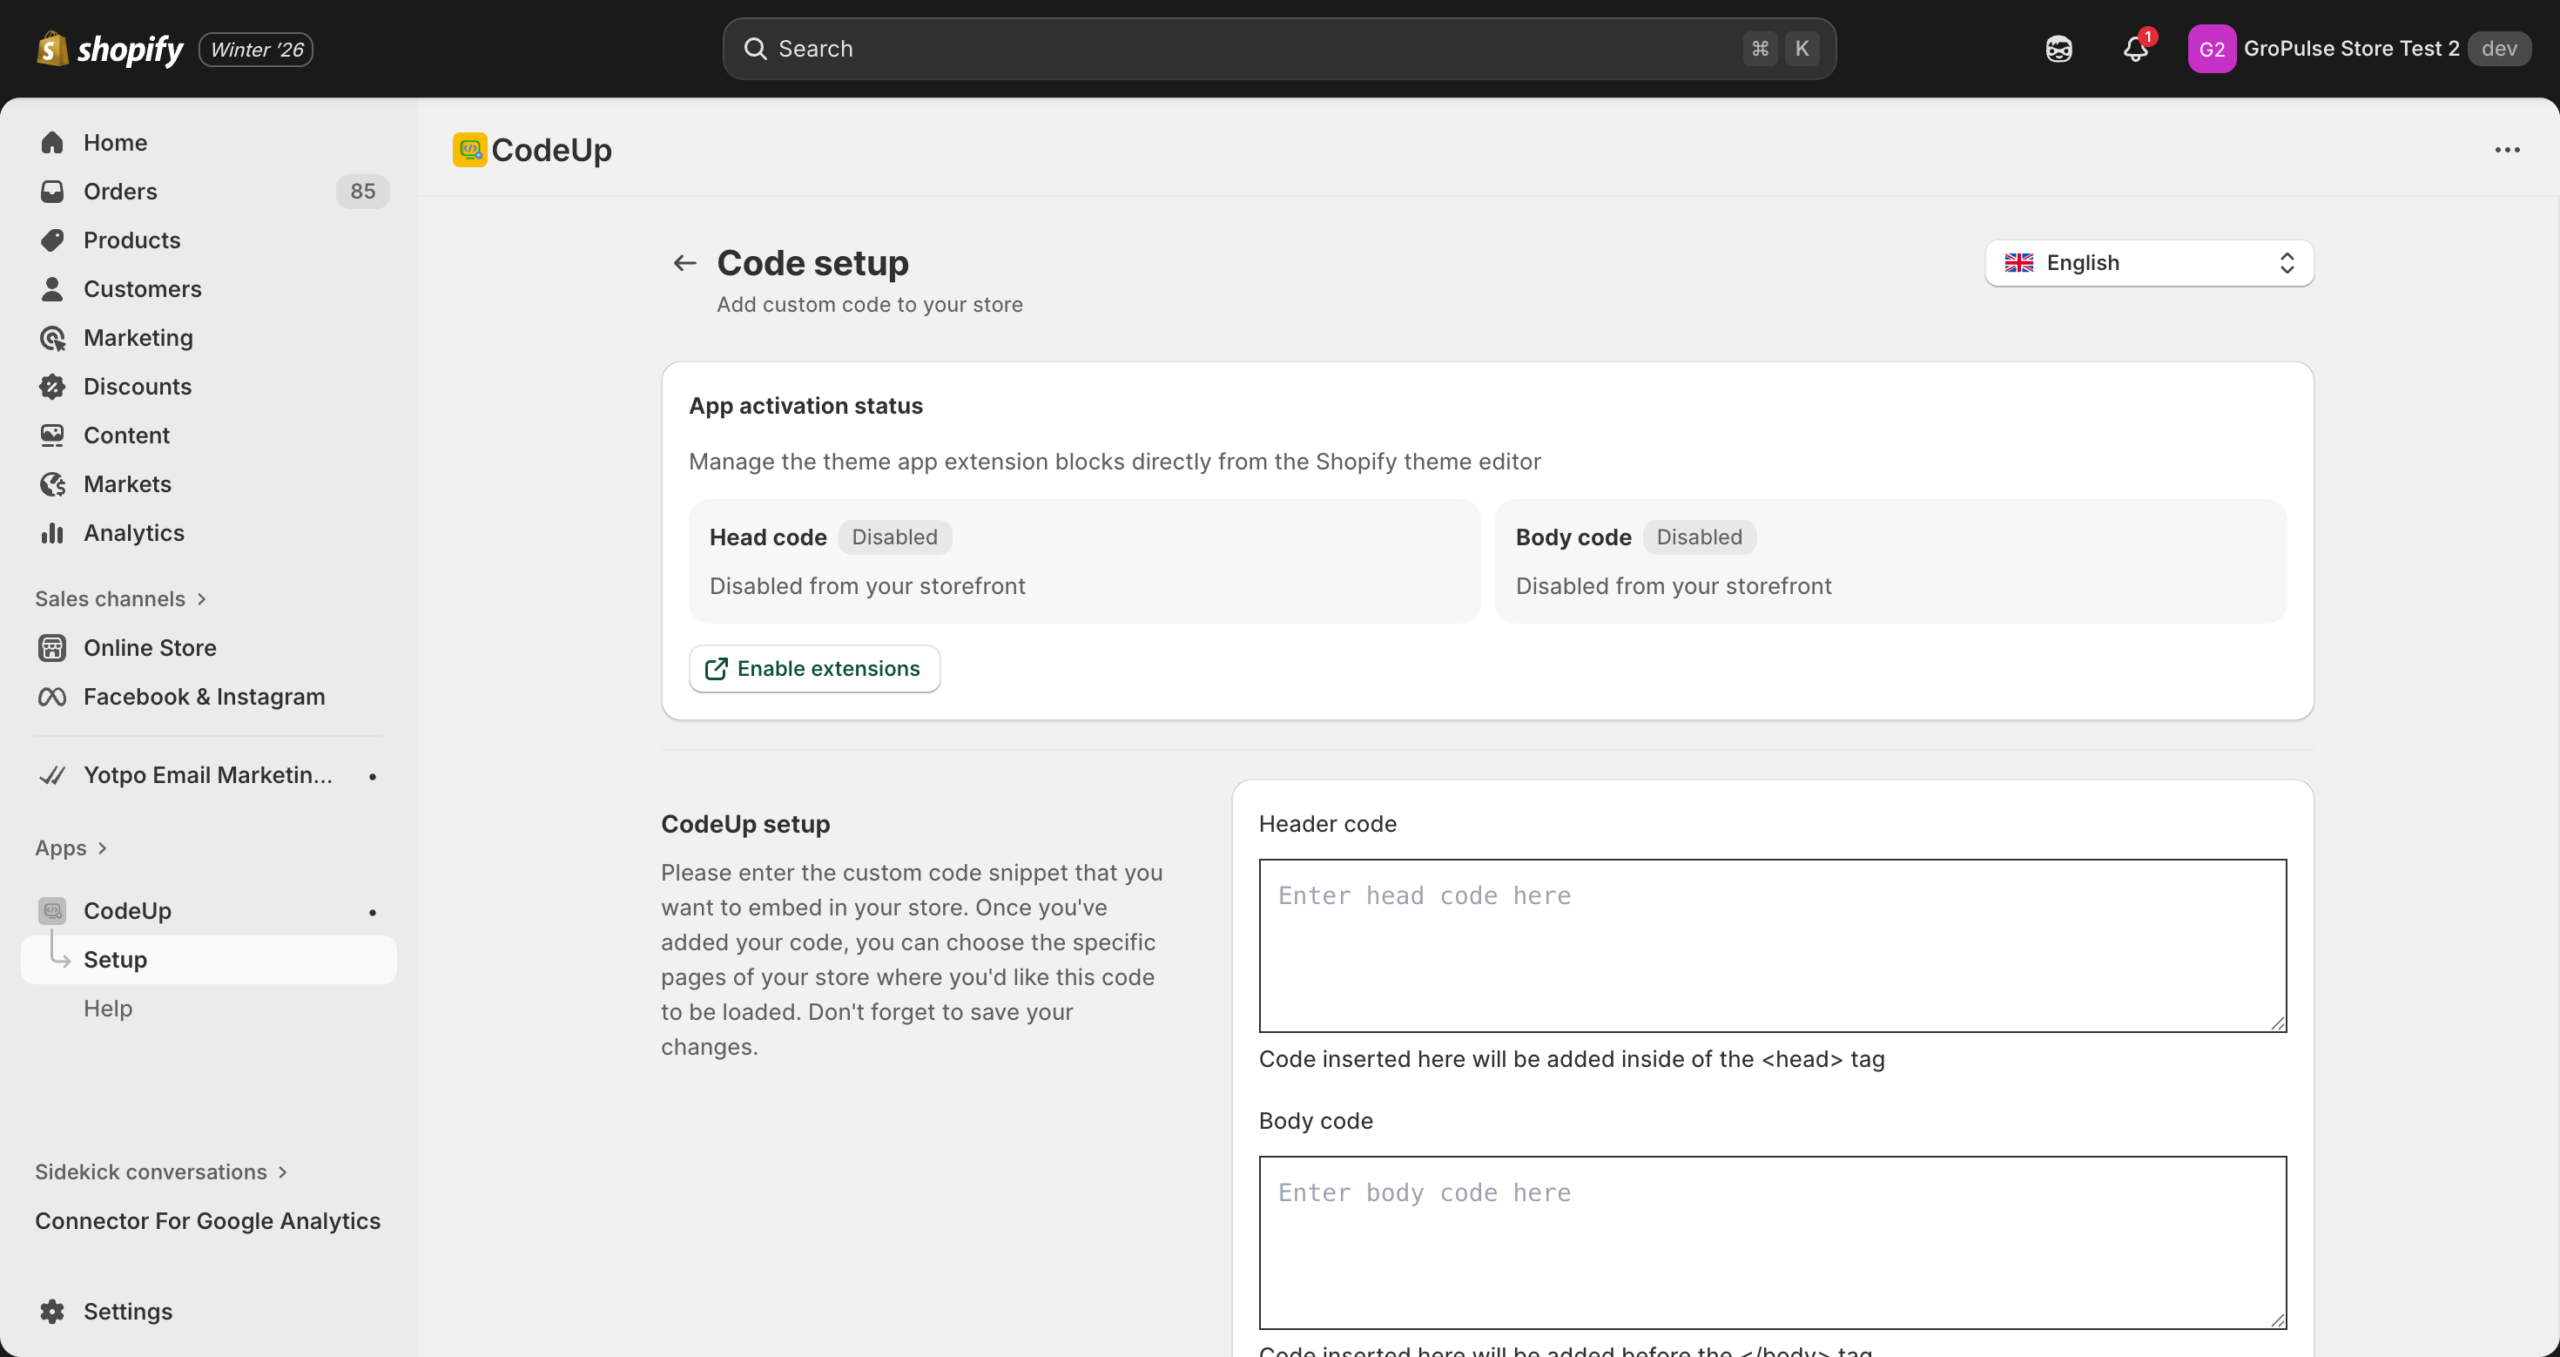
Understanding the Code Areas
CodeUp provides two separate areas for adding code, each injecting content into different parts of your store’s HTML:
Header Code (Head Section)
Location in HTML: Inside the <head> tag
Best for:
- Tracking pixels (Google Analytics, Facebook Pixel, etc.)
- Meta tags (verification tags, Open Graph, etc.)
- CSS stylesheets
- Font imports
- Any code that should load before the page content
Example uses:
<!-- Google Analytics 4 -->
<script async src="https://www.googletagmanager.com/gtag/js?id=G-XXXXXXXXXX"></script>
<script>
  window.dataLayer = window.dataLayer || [];
  function gtag(){dataLayer.push(arguments);}
  gtag('js', new Date());
  gtag('config', 'G-XXXXXXXXXX');
</script>
<!-- Custom CSS -->
<style>
.product-title {
color: #333;
font-size: 24px;
}
</style><!-- Meta verification tag -->
<meta name="google-site-verification" content="your-verification-code" />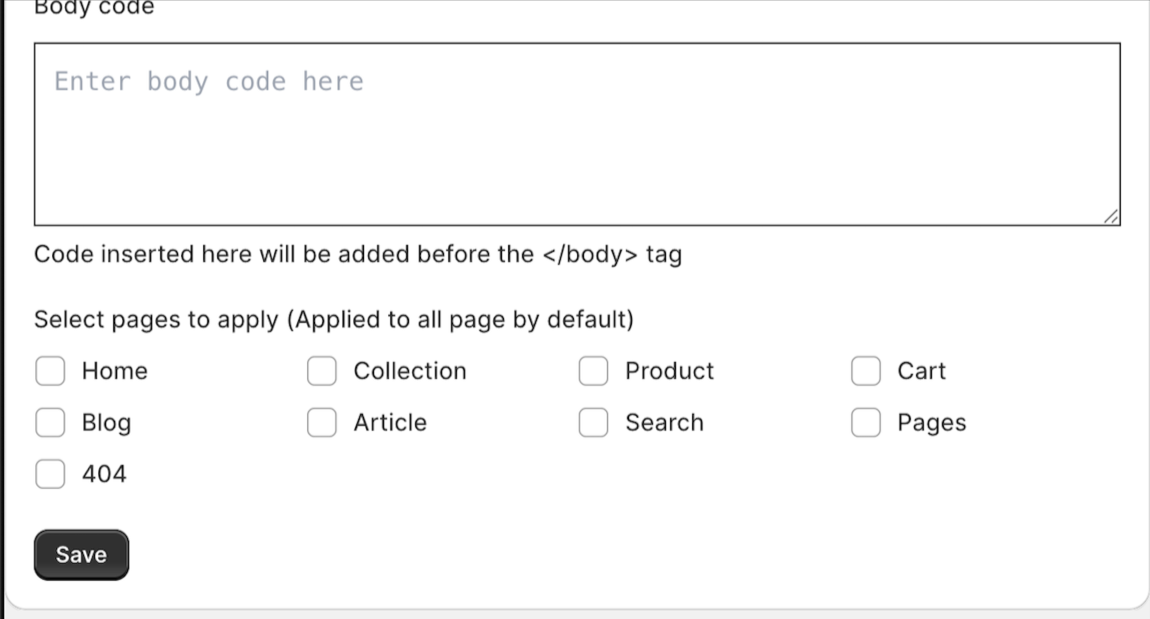
Body Code (Before Closing Body Tag)
Location in HTML: Just before the closing </body> tag
Best for:
- JavaScript that needs to run after the page loads
- Chat widgets
- Pop-up tools
- Analytics scripts that can load later
- Any code that should load after the page content
Example uses:
<!-- Chat widget -->
<script>
  (function(w,d,s,l,i){
    // Your chat widget initialization code
  })(window,document,'script','dataLayer','GTM-XXXX');
</script>
<!-- Custom JavaScript -->
<script>
document.addEventListener('DOMContentLoaded', function() {
console.log('Page loaded!');
// Your custom functionality
});
</script>The Body code textarea is located below the Header code section on the Setup page.
Adding Your Code
Step-by-Step Instructions
- Navigate to Setup page: Click Setup in the navigation menu
- Enter your header code (if needed):
- Click in the “Header code” text area
- Paste or type your code
- The code editor supports syntax highlighting for easier reading
- Enter your body code (if needed):
- Click in the “Body code” text area
- Paste or type your code
- Select target pages (optional):
- By default, code loads on all pages
- Check specific page types if you want to limit where code appears
- See Page Targeting for details
- Save your changes:
- Click the Save button at the bottom of the form
- You will see a “Saved successfully” message confirming your changes
Click the Save button at the bottom of the page to save your changes.
Unsaved Changes Protection
CodeUp protects you from accidentally losing your work:
- When you make changes, a save bar appears at the top of the page
- The save bar shows options to Save or Discard your changes
- If you try to navigate away with unsaved changes, you will be prompted to confirm
When you make changes, a save bar with Save and Discard buttons appears at the top of the page.
Code Examples for Common Use Cases
Adding Google Analytics 4
<!-- Add to Header Code -->
<script async src="https://www.googletagmanager.com/gtag/js?id=G-XXXXXXXXXX"></script>
<script>
  window.dataLayer = window.dataLayer || [];
  function gtag(){dataLayer.push(arguments);}
  gtag('js', new Date());
  gtag('config', 'G-XXXXXXXXXX');
</script>
Replace G-XXXXXXXXXX with your actual GA4 measurement ID.
Adding Facebook Pixel
<!-- Add to Header Code -->
<script>
  !function(f,b,e,v,n,t,s)
  {if(f.fbq)return;n=f.fbq=function(){n.callMethod?
  n.callMethod.apply(n,arguments):n.queue.push(arguments)};
  if(!f._fbq)f._fbq=n;n.push=n;n.loaded=!0;n.version='2.0';
  n.queue=[];t=b.createElement(e);t.async=!0;
  t.src=v;s=b.getElementsByTagName(e)[0];
  s.parentNode.insertBefore(t,s)}(window, document,'script',
  'https://connect.facebook.net/en_US/fbevents.js');
  fbq('init', 'YOUR_PIXEL_ID');
  fbq('track', 'PageView');
</script>
<noscript>
  <img height="1" width="1" style="display:none"
  src="https://www.facebook.net/tr?id=YOUR_PIXEL_ID&ev=PageView&noscript=1"/>
</noscript>
Replace YOUR_PIXEL_ID with your actual Facebook Pixel ID.
Adding Custom CSS
<!-- Add to Header Code -->
<style>
  /* Hide add to cart button on sold out products */
  .product-form__submit[disabled] {
    display: none;
  }

  /* Custom font for headings */
  h1, h2, h3 {
    font-family: 'Your Custom Font', sans-serif;
  }

  /* Change button colors */
  .btn, .button {
    background-color: #your-color;
    color: #ffffff;
  }
</style>
Adding a Chat Widget (Tawk.to Example)
<!-- Add to Body Code -->
<script type="text/javascript">
  var Tawk_API=Tawk_API||{}, Tawk_LoadStart=new Date();
  (function(){
    var s1=document.createElement("script"),s0=document.getElementsByTagName("script")[0];
    s1.async=true;
    s1.src='https://embed.tawk.to/YOUR_WIDGET_ID/default';
    s1.charset='UTF-8';
    s1.setAttribute('crossorigin','*');
    s0.parentNode.insertBefore(s1,s0);
  })();
</script>
Adding TikTok Pixel
<!-- Add to Header Code -->
<script>
  !function (w, d, t) {
    w.TiktokAnalyticsObject=t;var ttq=w[t]=w[t]||[];
    ttq.methods=["page","track","identify","instances","debug","on","off","once","ready","alias","group","enableCookie","disableCookie"];
    ttq.setAndDefer=function(t,e){t[e]=function(){t.push([e].concat(Array.prototype.slice.call(arguments,0)))}};
    for(var i=0;i<ttq.methods.length;i++)ttq.setAndDefer(ttq,ttq.methods[i]);
    ttq.instance=function(t){for(var e=ttq._i[t]||[],n=0;n<ttq.methods.length;n++)ttq.setAndDefer(e,ttq.methods[n]);return e};
    ttq.load=function(e,n){var i="https://analytics.tiktok.com/i18n/pixel/events.js";
    ttq._i=ttq._i||{},ttq._i[e]=[],ttq._i[e]._u=i,ttq._t=ttq._t||{},ttq._t[e]=+new Date,ttq._o=ttq._o||{},ttq._o[e]=n||{};
    var o=document.createElement("script");o.type="text/javascript",o.async=!0,o.src=i+"?sdkid="+e+"&lib="+t;
    var a=document.getElementsByTagName("script")[0];a.parentNode.insertBefore(o,a)};
    ttq.load('YOUR_PIXEL_ID');
    ttq.page();
  }(window, document, 'ttq');
</script>
Best Practices
Do:
- Test your code on a preview or development store first
- Use valid HTML/CSS/JavaScript – syntax errors can break your store
- Keep code organized – add comments to explain what each section does
- Backup your code – save a copy of your code snippets externally
- Check for conflicts – some code may conflict with your theme
Don’t:
- Don’t add sensitive information – never include passwords or API secrets in frontend code
- Don’t add duplicate tracking codes – this can skew your analytics data
- Don’t add untrusted third-party code – only use code from verified sources
- Don’t forget to enable the theme extension – code won’t appear until enabled
After Adding Code
After saving your code, you need to:
- Enable the theme extension – See Theme Extension Management
- Verify the code is working – Check your store’s source code
- Test functionality – Make sure the code works as expected
Related Guides
- Page Targeting – Control where your code loads
- Theme Extension Management – Enable/disable code injection
- Troubleshooting – Fix common issues