Create a navigable sitemap page for your store visitors. An HTML sitemap helps customers find content easily and improves your store’s SEO by ensuring all pages are discoverable.
Overview
The HTML Sitemap feature allows you to:
- Generate a dedicated sitemap page at
/a/sitemap - Customize the page title and description
- Choose between 2-column or 3-column layouts
- Drag and drop to reorder content sections
- Exclude specific products, collections, or URLs
- Add the sitemap to your store’s footer menu
Note: HTML Sitemap is a Pro feature. You need a Monthly or Yearly plan to use this feature.
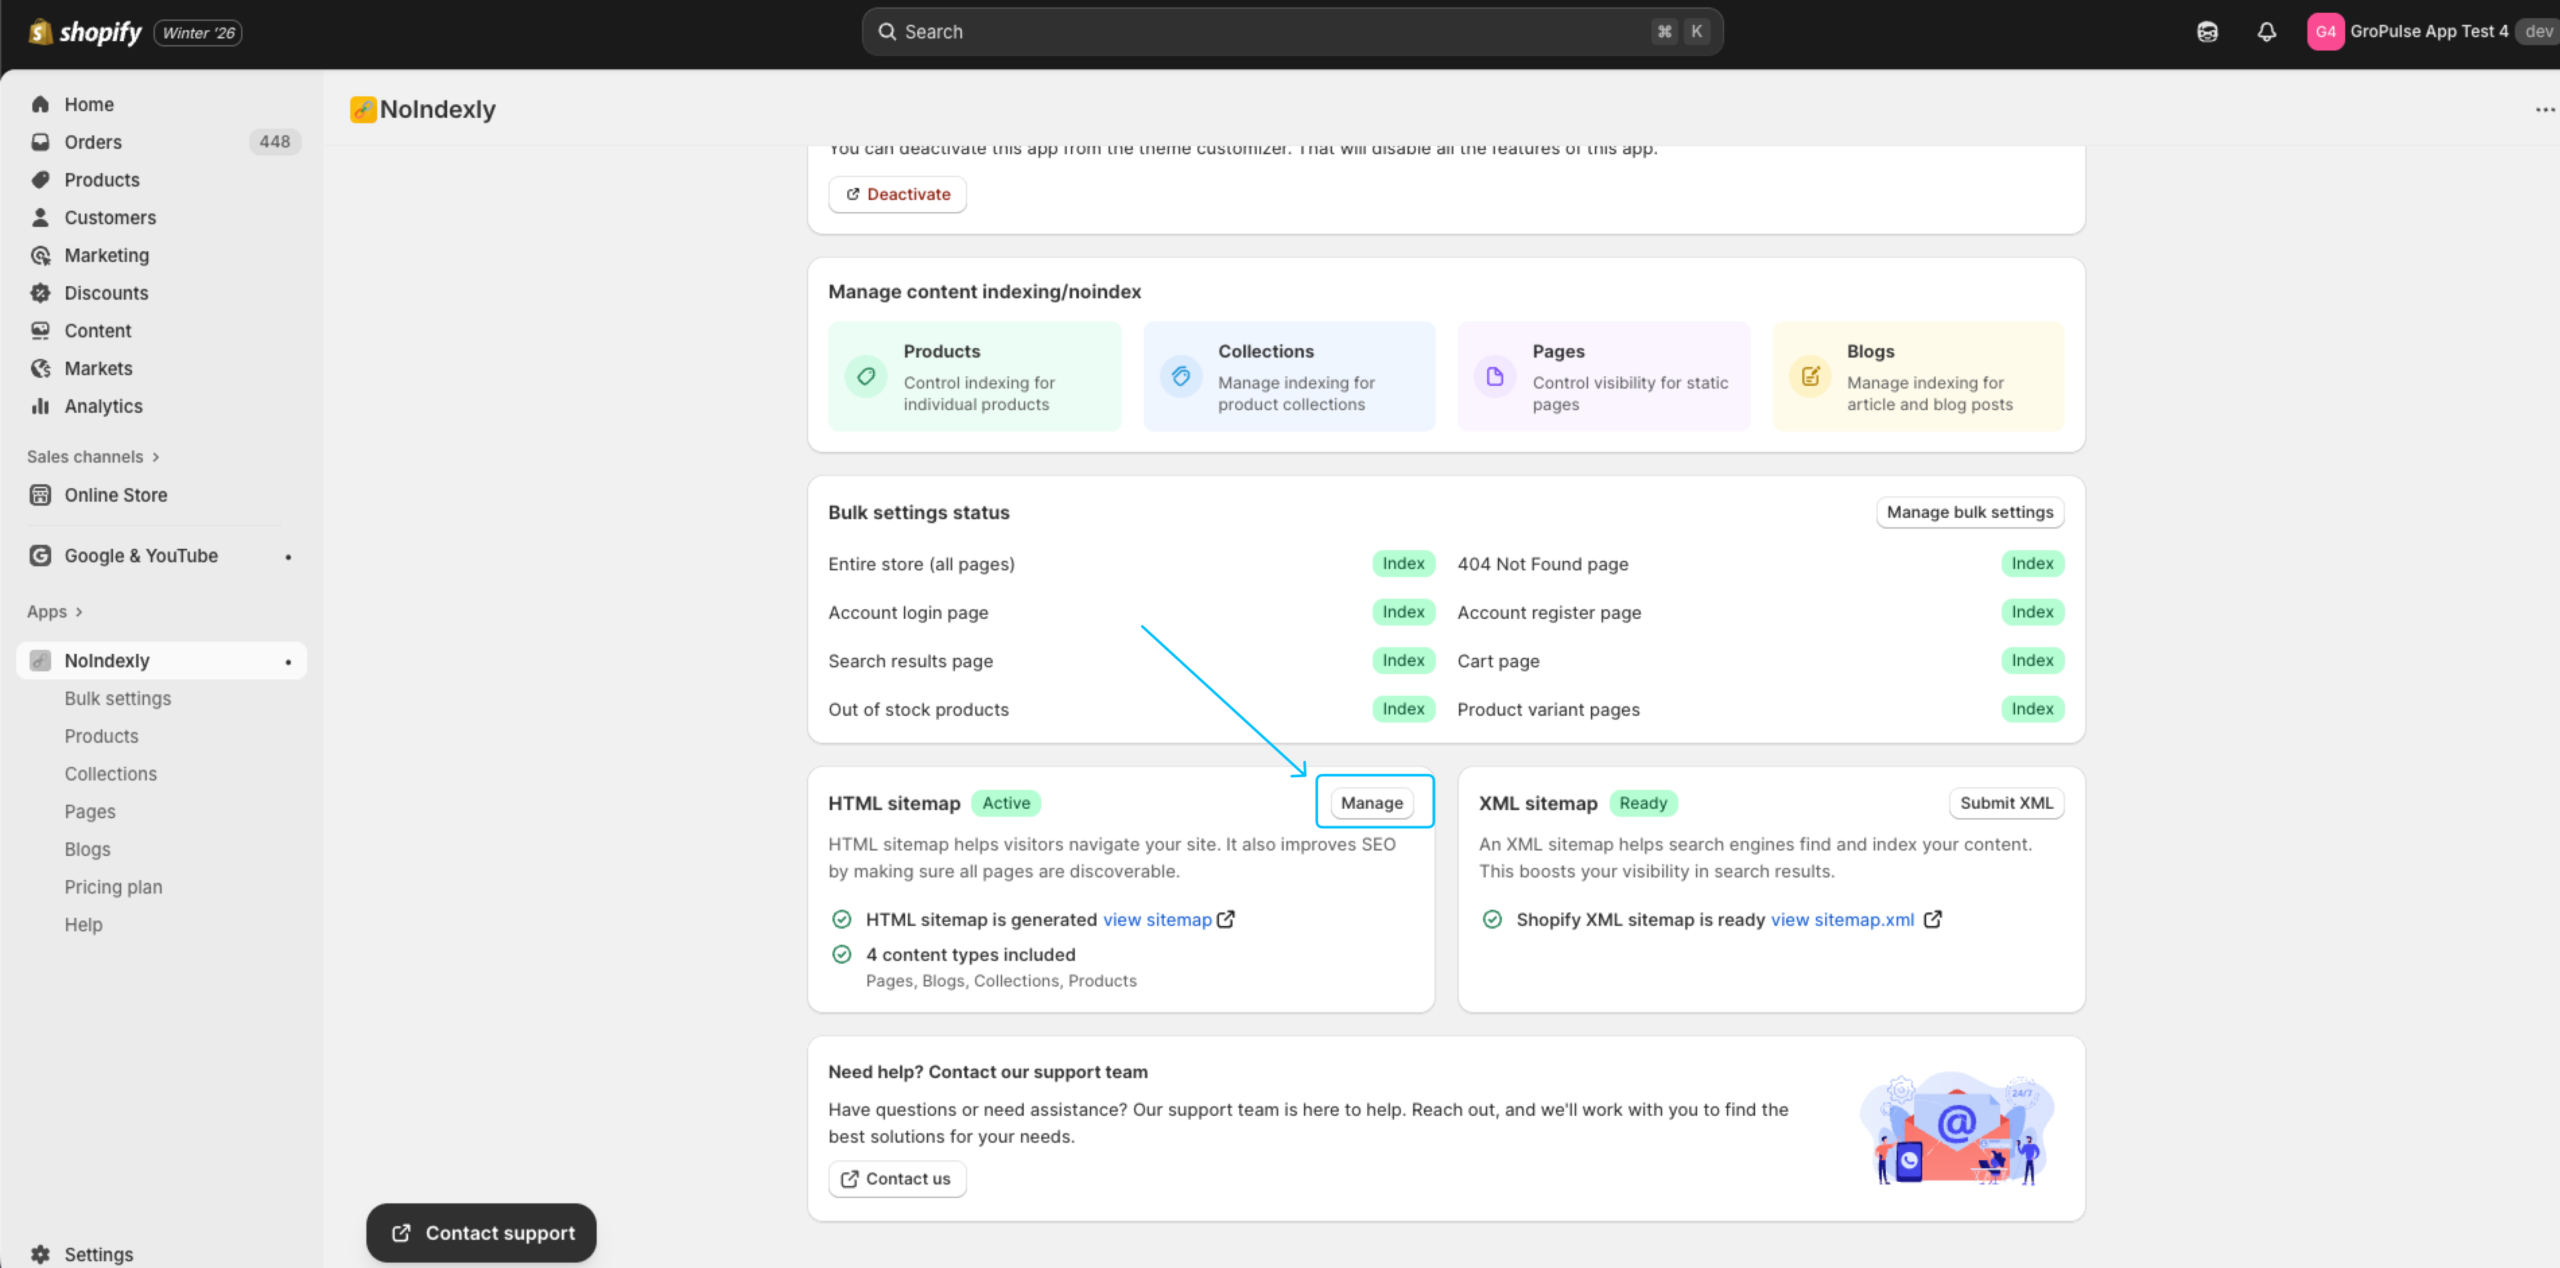
Accessing HTML Sitemap Settings
From the dashboard, click Manage on the HTML Sitemap card
Creating Your First Sitemap
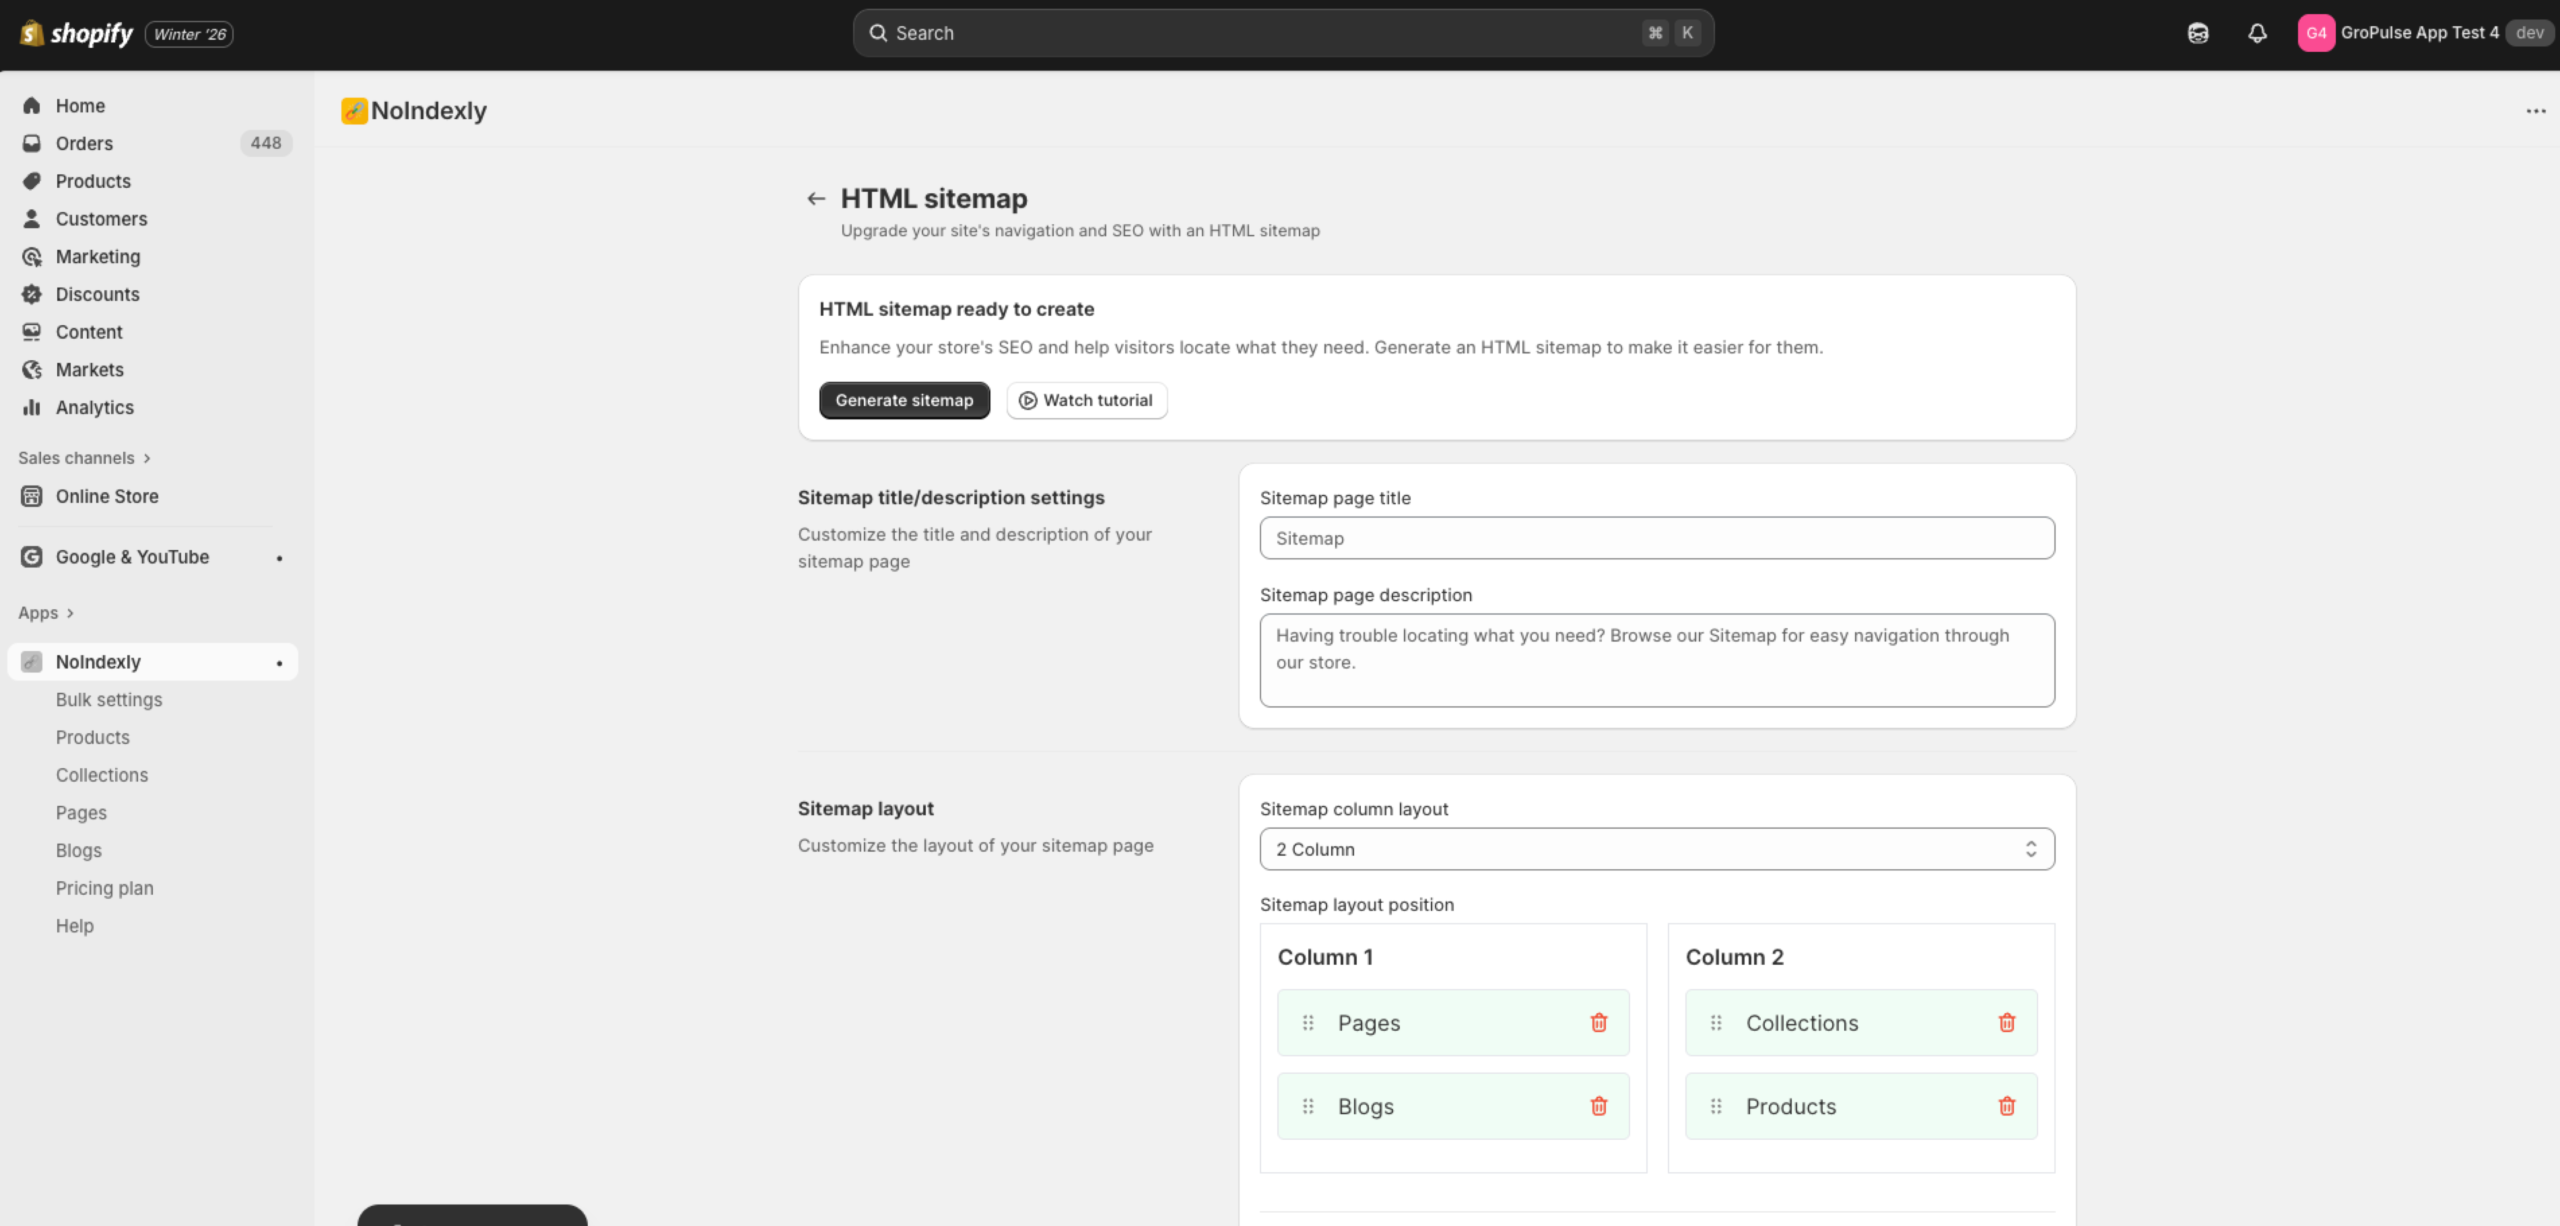
If you have not created an HTML sitemap yet, you will see a “ready to create” message:
- Click the Generate sitemap button
- Your sitemap will be created with default settings
- You can then customize it using the options below
Sitemap Configuration Sections
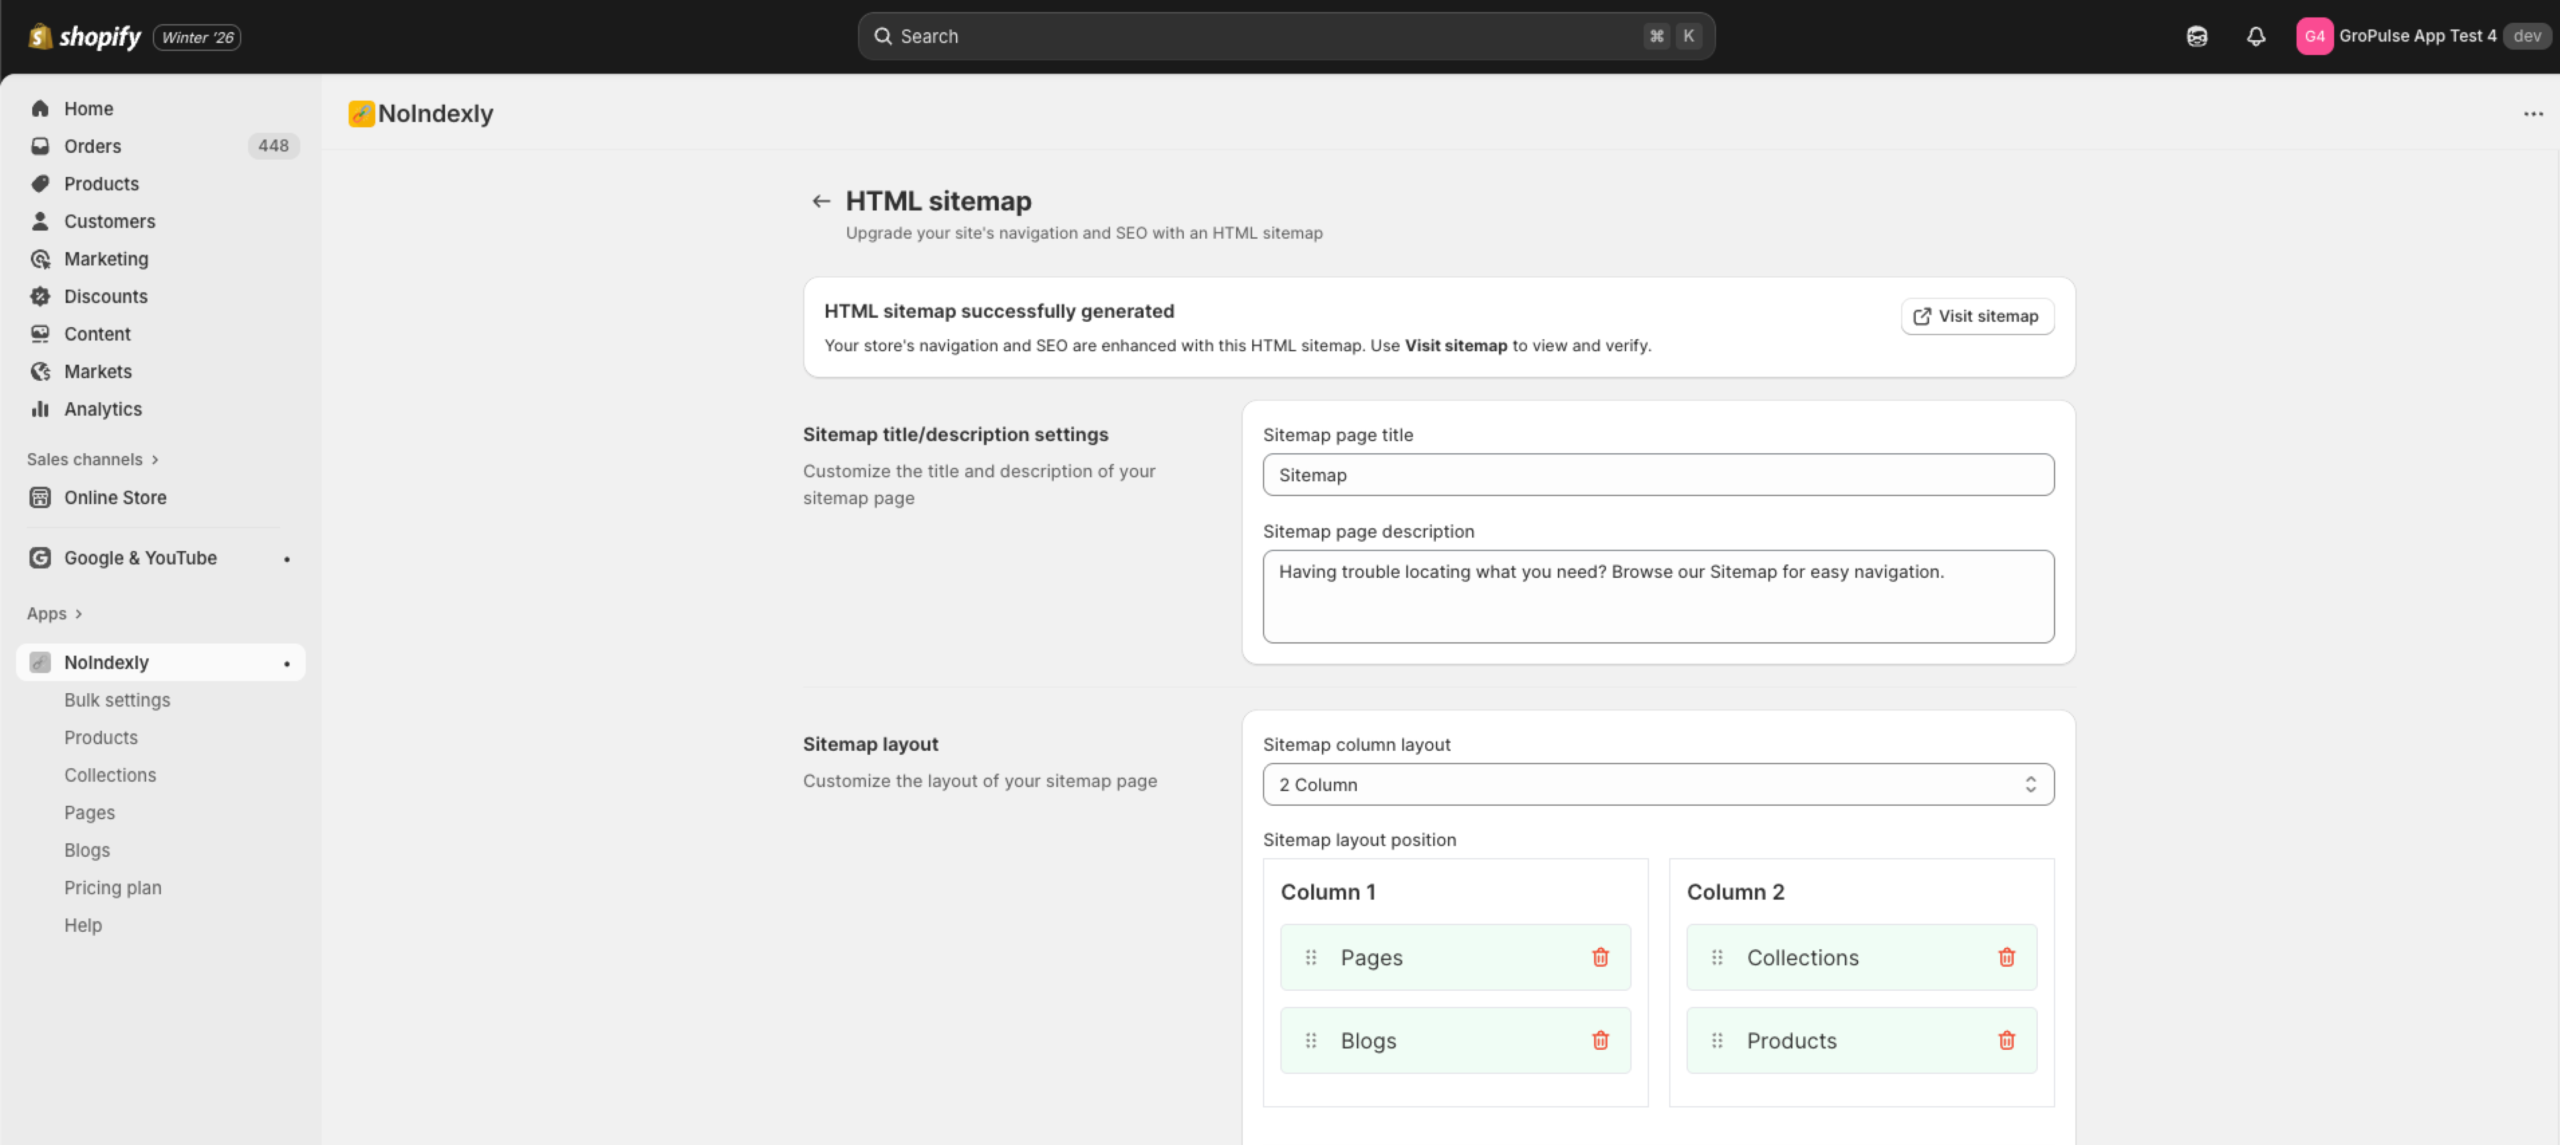
Sitemap Title and Description
Customize what visitors see at the top of your sitemap page:
| Field | Description | Example |
|---|---|---|
| Sitemap page title | The main heading of the sitemap | “Sitemap” |
| Sitemap page description | Helpful text below the title | “Having trouble locating what you need? Browse our Sitemap for easy navigation.” |
Sitemap Layout
Control how your sitemap content is organized:
Column Layout
Choose how many columns to display:
| Option | Best for |
|---|---|
| 2 Column | Stores with moderate content, easier to read |
| 3 Column | Stores with lots of content, more compact |
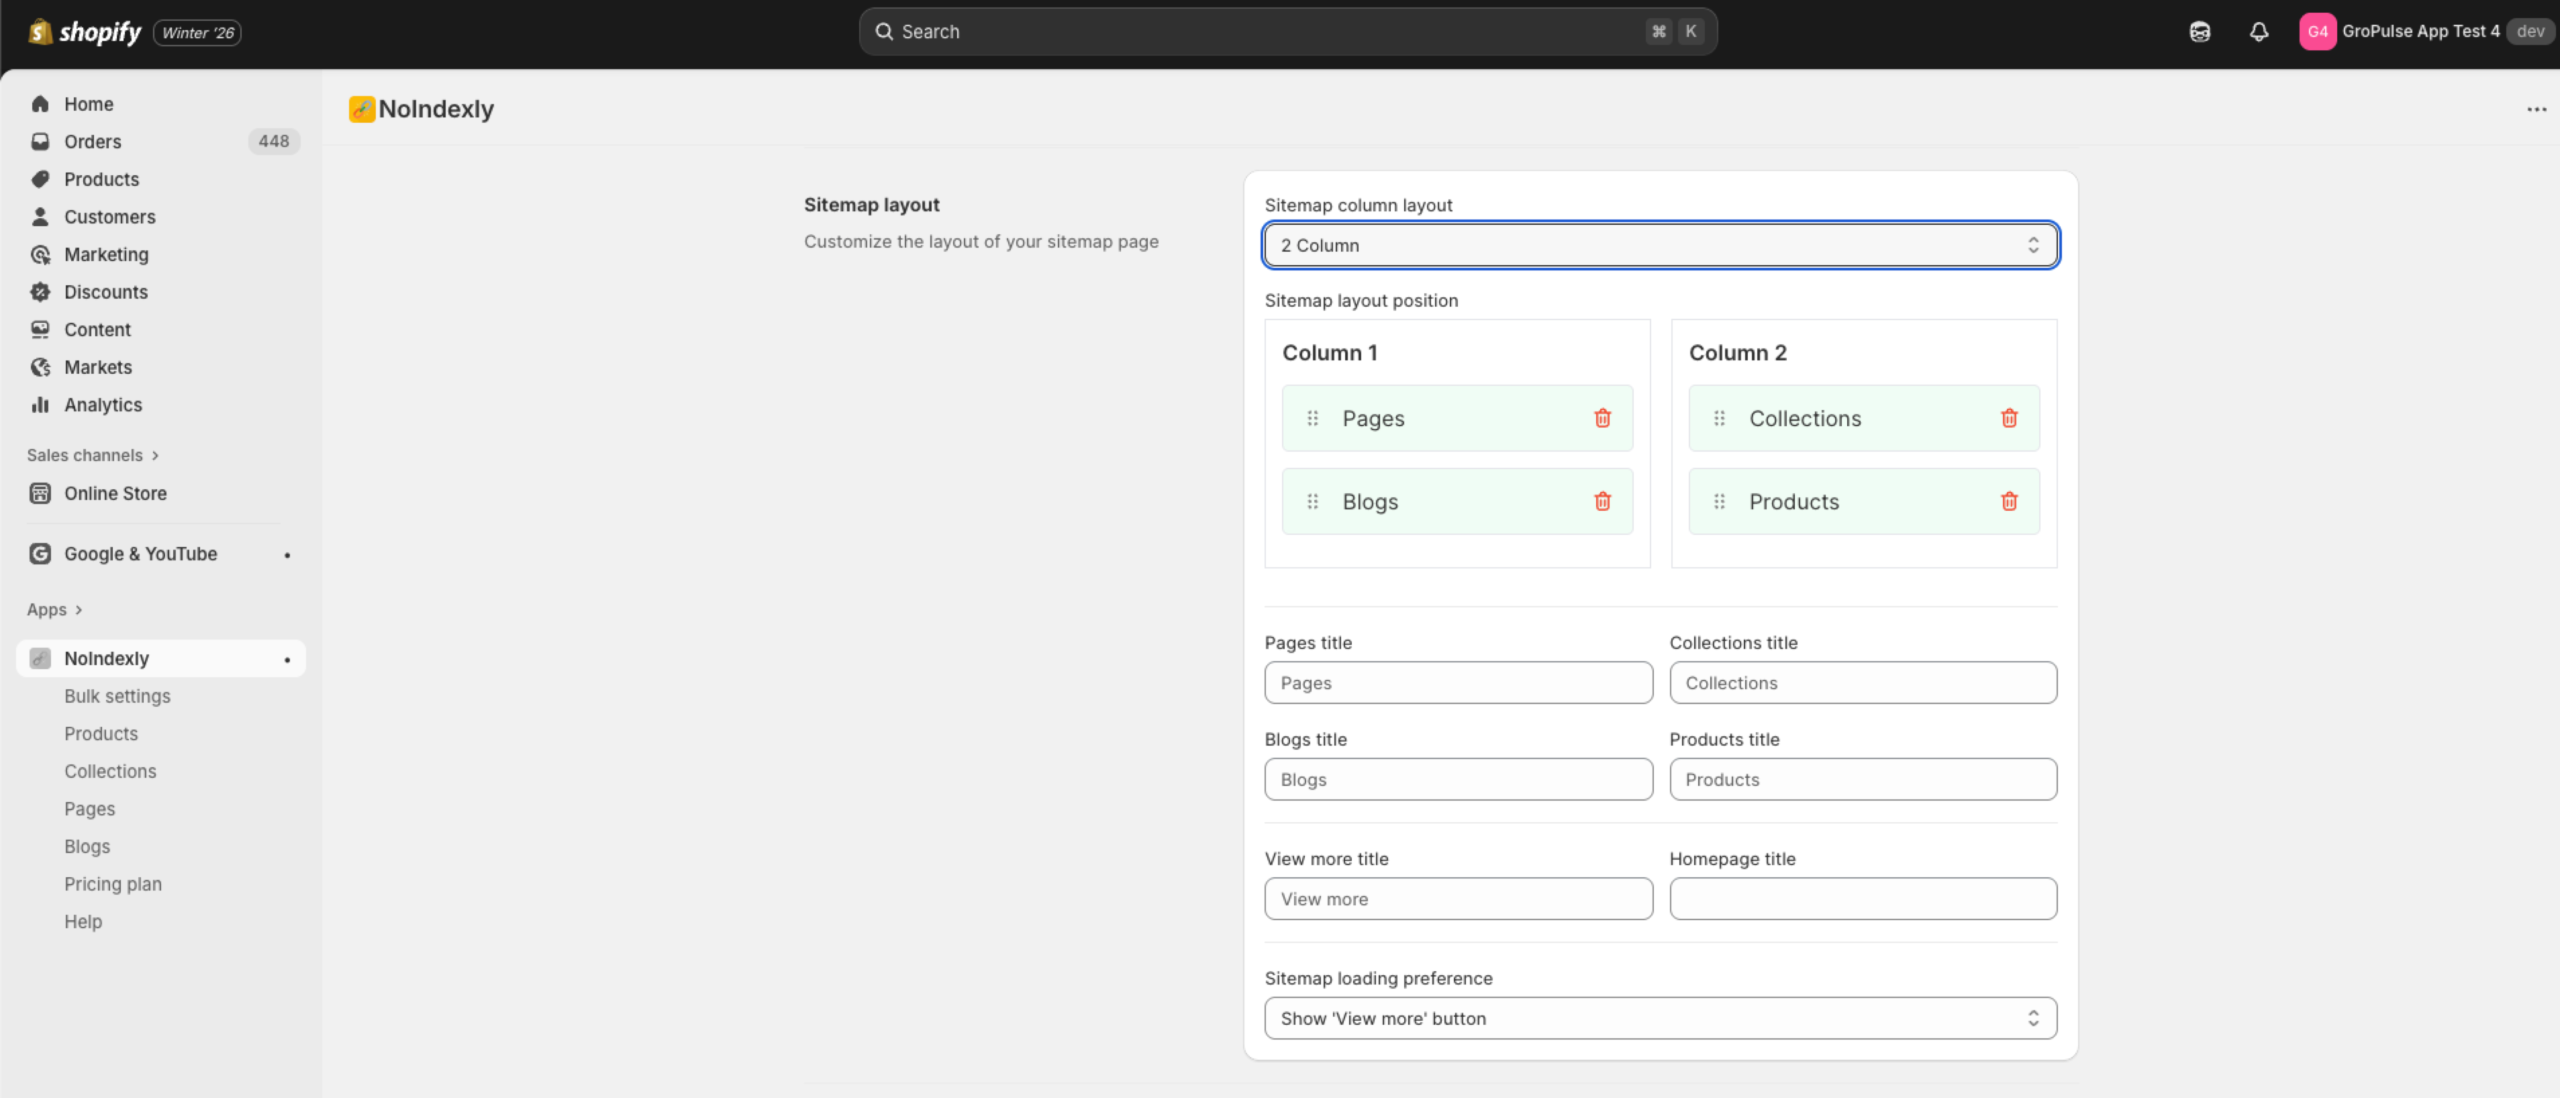
Layout Position (Drag and Drop)
Rearrange the order of content sections:
- The sitemap includes four sections: Pages, Blogs, Collections, Products
- Drag sections to reorder them
- Drag sections between columns to reorganize
- Click the Delete icon on a section to remove it from the sitemap
Adding Removed Sections
If you remove a section, it appears in the “Removed sitemap items” area:
- Find the removed item below the drag-and-drop area
- Click the + button to add it back to the sitemap
Section Titles
Customize the heading for each content section:
| Field | Default | Purpose |
|---|---|---|
| Pages title | Pages | Heading for the pages section |
| Collections title | Collections | Heading for collections |
| Blogs title | Blogs | Heading for blogs |
| Products title | Products | Heading for products |
| View more title | View more | Text on the “load more” button |
| Homepage title | (empty) | Optional title for homepage link |
Loading Preference
Choose how additional items load on the sitemap page:
| Option | Description |
|---|---|
| Show “View more” button | Visitors click a button to load more items |
| Load content automatically | Items load automatically as visitors scroll (lazy load) |
Excluding Content
You can exclude specific items from your HTML sitemap:
Exclude Products
- Click Select products
- Choose products from the picker
- Selected products will not appear on the sitemap
- Click “View selected products” to manage your exclusions
Exclude Collections
- Click Select collections
- Choose collections from the picker
- Selected collections will not appear on the sitemap
- Click “View selected collections” to manage your exclusions
Exclude URLs
Manually exclude specific URLs:
- Enter URL handles in the text box, one per line
- Use relative paths starting with
/ - Examples:
/pages/test-page/blogs/news/blogs/news/test-article
Adding Sitemap to Footer Menu
After generating your sitemap, add it to your footer for easy customer access:
Step-by-Step Instructions
- In the Shopify Admin dashboard, click on Content. Then select Menus.
- On the Menus page, click on your Footer menu
- Click on Add Menu item to add a new menu
- Enter Sitemap in the Name field and
/a/sitemapin the Link field, then click Add - Click on Save menu to save the menu
Tip: You can copy the
/a/sitemaplink by clicking on it in the app – it will be copied to your clipboard.
Saving Your Changes
When you make changes to any settings:
- A save bar appears at the top of the page
- Click Save to apply your changes
- Click Discard to undo your changes

Viewing Your Sitemap
After creating your sitemap:
- Click the Visit sitemap button to open it in a new tab
- Your sitemap URL is:
https://your-store.myshopify.com/a/sitemap
How is this different from XML sitemap?
| HTML Sitemap | XML Sitemap |
|---|---|
| For human visitors | For search engines |
| Visual navigation page | Technical file |
Located at /a/sitemap | Located at /sitemap.xml |
| You create and customize it | Shopify generates it automatically |
Troubleshooting
Excluded items still appearing
- Make sure you saved your changes
- Refresh the sitemap page
- Check that items are properly selected in the exclusion list
Changes not saving
- Look for error messages in the save bar
- Try refreshing the page and making changes again
- Contact support if the issue persists