This guide explains how to activate AdTrack’s tracking features on your Shopify store and connect your Google Ads account.
Overview
After installing AdTrack, you need to complete two main steps:
- Activate the app – Enable the tracking pixel on your store
- Configure your account – Connect your Google Ads account for conversion tracking
Step 1: Find the App Status Section
- Open AdTrack from your Shopify admin
- Navigate to the Dashboard (home page)
- Locate the App status section which shows “Inactive” status
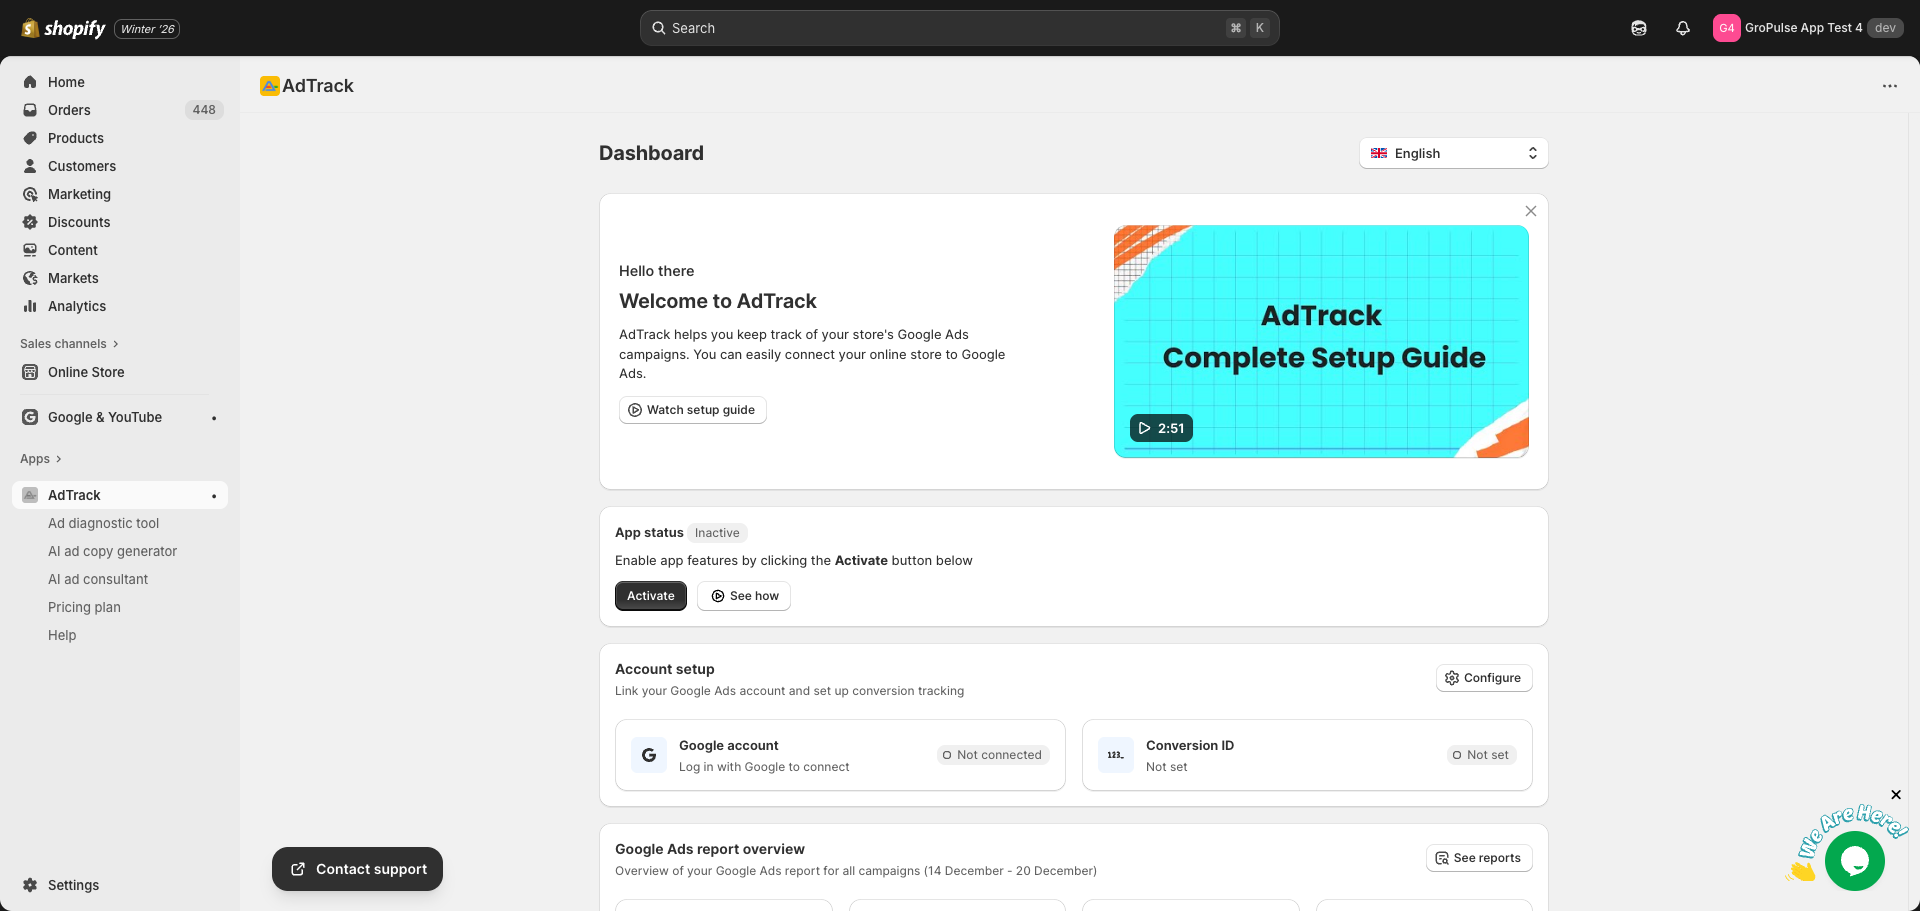
Step 2: Click the Activate Button
- In the App status section, click the Activate button
- An activation modal will appear with two steps to complete
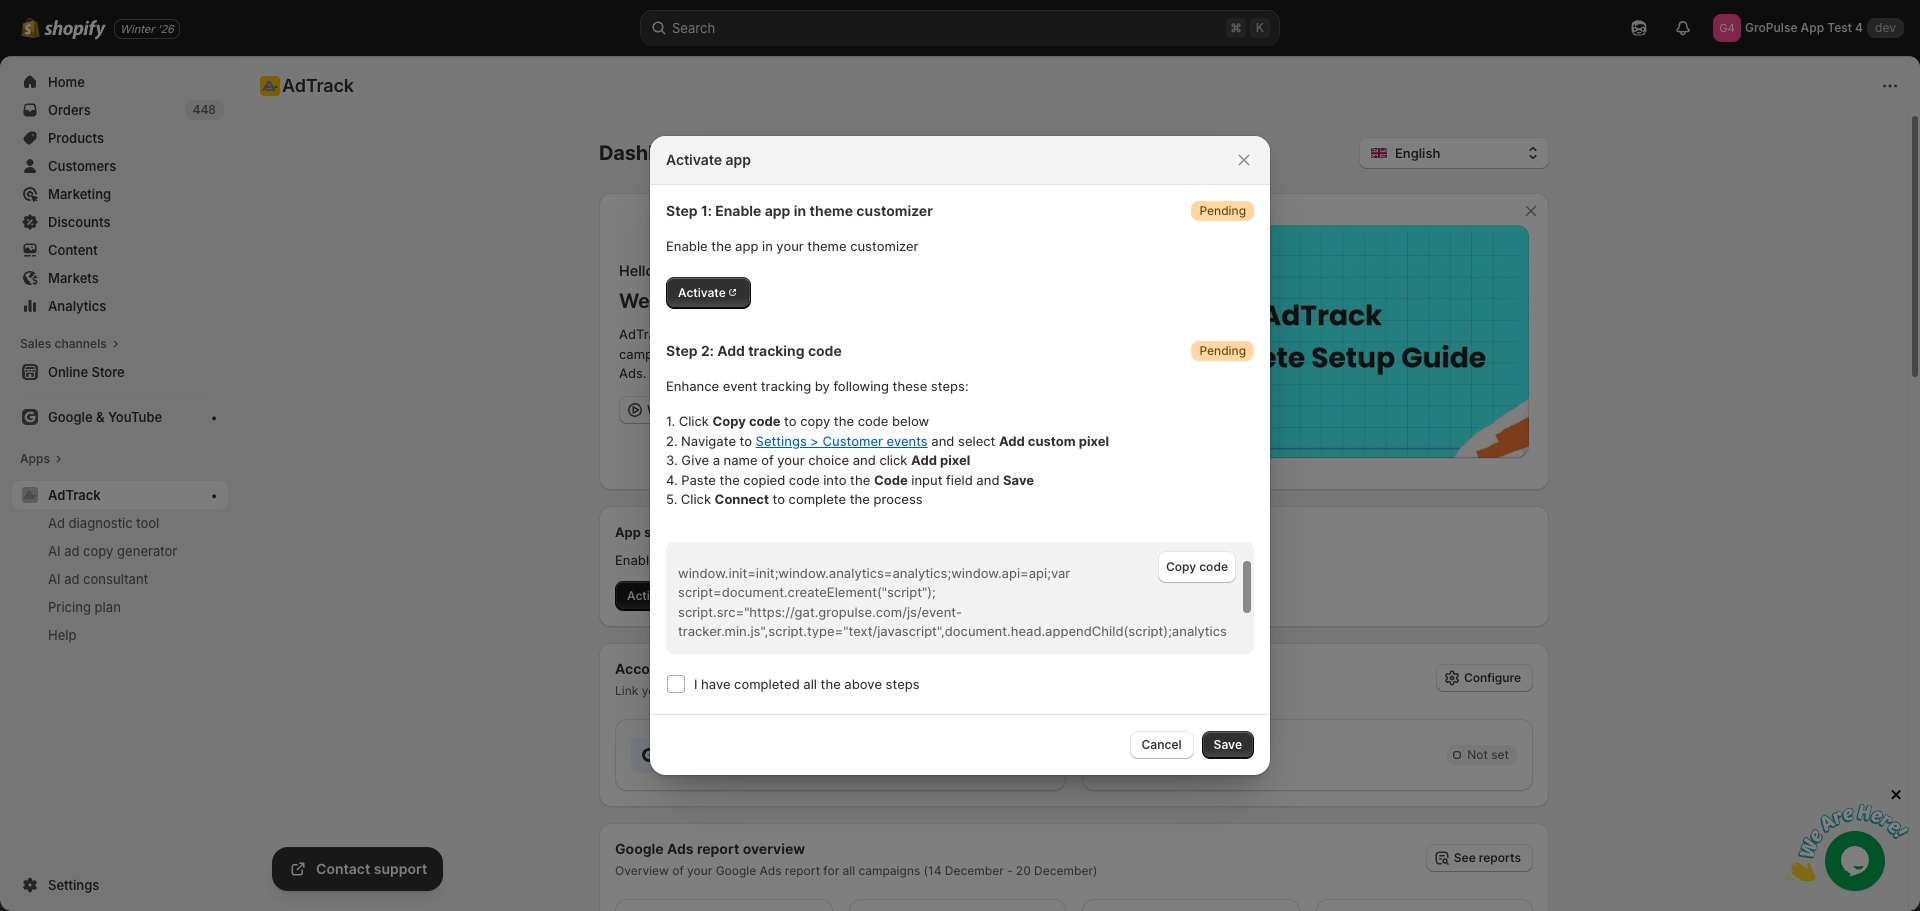
Step 3: Follow the Activation Steps
The activation modal contains two steps:
Step 1: Enable App in Theme Customizer
- Click the Activate button in the modal
- This will open your Shopify theme customizer
- Enable the AdTrack app embed in your theme
- Save the changes in theme customizer
- Return to AdTrack
Step 2: Add Tracking Code
This step enhances event tracking by adding a custom pixel to Shopify’s Customer Events:
- Click Copy code to copy the tracking code
- Navigate to Settings > Customer events in your Shopify admin (use the provided link)
- Click Add custom pixel
- Give the pixel a name of your choice (e.g., “AdTrack”)
- Click Add pixel
- Paste the copied code into the Code input field
- Click Save
- Click Connect to complete the process
After completing both steps:
- Check the I have completed all the above steps checkbox
- Click Save to confirm
Step 4: Find the Account Setup Section
After activation, return to the Dashboard:
- Scroll to the Account setup section
- This section shows your Google account connection status and Conversion ID status
- Click the Configure button to proceed to integration setup
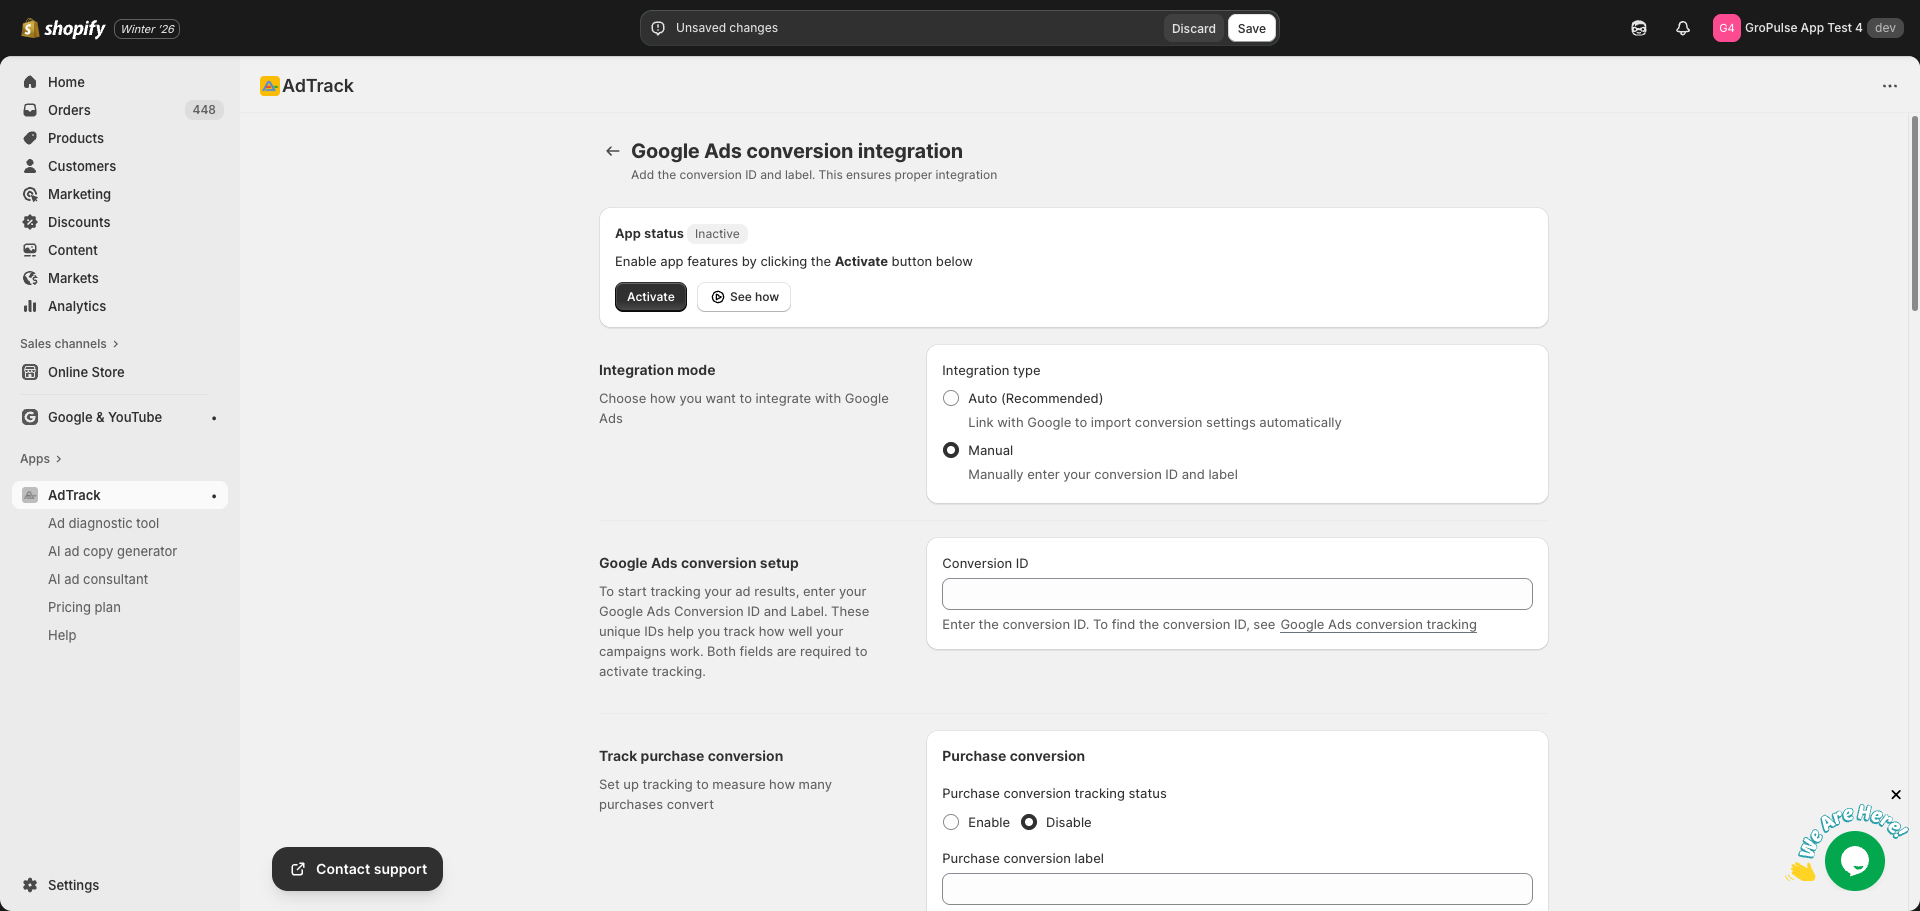
Step 5: Configure Integration
Clicking Configure takes you to the Google Ads conversion integration page where you can set up your conversion tracking.
Integration Mode Selection
Choose your preferred integration method:
| Mode | Description |
|---|---|
| Auto (Recommended) | Link with Google to import conversion settings automatically |
| Manual | Manually enter your conversion ID and label |
Auto Integration (Recommended)
Auto integration is the easiest way to connect AdTrack with your Google Ads account.
Steps:
- Select Auto (Recommended) in the Integration mode section
- Click Sign in with Google in the Google account connection section
- Sign in with your Google account that has access to Google Ads
- Grant the necessary permissions
- Select your Google Ads account from the dropdown
- Your Conversion ID will be automatically populated
- Configure your conversion tracking options (purchase, funnel events, etc.)
- Click Save to apply your settings
Benefits of Auto Integration:
- Automatic import of conversion settings
- Easy selection of existing conversion actions
- Automatic Conversion ID configuration
- Seamless account management
Manual Integration
If you prefer manual control or cannot use Google sign-in:
Steps:
- Select Manual in the Integration mode section
- Enter your Conversion ID (found in your Google Ads account)
- For each conversion type you want to track, enter the Conversion Label
- Enable the tracking options you need
- Click Save to apply your settings
Finding Your Conversion ID and Labels:
- Go to your Google Ads account
- Navigate to Goals > Conversions
- Select a conversion action
- Click Tag setup
- Choose Use Google Tag Manager
- Find your Conversion ID and Conversion Label
For detailed instructions, see Google Ads conversion tracking.
Verifying Activation Status
After completing setup, verify everything is working:
On the Dashboard
- Return to the AdTrack dashboard
- Check the App status section – it should show “Active”
- Check the Account setup section:
- Google account should show “Connected” with your email
- Conversion ID should show “Complete” with your ID
Tracking Status Overview
The dashboard displays status for all configured tracking:
| Section | What to Check |
|---|---|
| Purchase conversion tracking | Shows “Enabled” if active |
| Purchase funnel tracking | Shows status for Add to Cart, Checkout, Payment Info |
| User behavior tracking | Shows status for Page View, View Item, Search |
| Google consent mode V2 | Shows “Enabled” if active |
What Activation Enables
Once fully activated and configured, AdTrack can track:
| Event Type | Description |
|---|---|
| Purchases | Completed orders and revenue |
| Add to Cart | When customers add items to cart |
| Begin Checkout | When customers start checkout |
| Add Payment Info | When customers enter payment details |
| Page Views | All page visits on your store |
| Product Views | When customers view product pages |
| Search | When customers use site search |
Tips
- Complete both activation steps – The app needs both theme embed and custom pixel to track all events
- Use Auto integration – It’s faster and reduces configuration errors
- Test your setup – Place a test order to verify tracking is working
- Check regularly – Return to the dashboard periodically to ensure tracking remains active